Axis arrangementX, Y, Zdesktop CNC milling and engraving machine:
Z-axis moves the tool (router) vertically (up-down)
X-axis - moves the carriage Z in the lateral direction (left-right).
Y-axis - moves the movable table (back and forth).
The device of the milling and engraving machine can be found
Composition of a set of CNC machine tools Modelist2020 and Modelist3030
I Set of 12mm plywood milled parts for DIY assembly
A set of milled parts for assembling a CNC machine with a movable table consists of:
1) Gantry posts of CNC milling machine
2) a set of CNC milled parts for assembling the Z axis
3) a set of milled parts of a CNC machine for assembling a movable table
4) a set of milled parts of a CNC machine for the assembly of stepper motor supports and spindle mounting
II Set of Milling Machine Mechanics Includes:
1. coupling for connecting the stepper motor shaft with the machine lead screw - (3 pcs.). The size of the coupling for the Modelist2030 machine with NEMA17 stepper motors is 5x5mm. For Modelist3030 machine with Nema23 stepper motors - 6,35x8mm
2.Steel linear guides for CNC machine Modelist3030:
16mm (4pcs.) For X and Y axes,
12mm (2pcs) for Z axis
For CNC machine Modelist2020 the diameter of the linear guides:
12mm (8pcs) for X, Y and Z axes.
3.Linear Rolling Bearings for Milling Machine Modelist3030:
Linear bearings LM16UU (8 pcs.) For axes X and Y,
Linear bearings LM12UU for the Z axis.
For CNC milling machine Modelist2020
Linear bearings LM12UU (12 pcs.) For axes X, Y and Z.
4. lead screws for the milling machine Modelist2020 - М12 (step 1.75mm) - (3pcs.) With processing under d = 5mm from one end and under d = 8mm from the other.
For milling machine Modelist3030 - trapezoidal screws TR12x3 (pitch 3mm) - (3 pcs.) With end machining for d = 8mm.
5. radial bearings for fastening the lead screws - (4 pcs.) One bearing in an aluminum block for the Z axis.
6. lead nuts from graphite-filled caprolon for axes X, Y and Z (- 3 pcs.)
III Set of CNC Milling Machine Electronics:
1. For CNC machine Modelist2020: NEMA17 stepper motors 17HS8401(size 42x48mm, torque 52N.cm , current 1.8A, phase resistance 1.8 Ohm, inductance 3.2mH, shaft diameter 5mm)- 3 pcs.
For CNC machine Modelist 3030: stepper motors 23HS5630 (size 57x56mm, torque 12.6kg * cm, current 3.0A, phase resistance 0.8ohm, inductance 2.4mH, shaft diameter 6.35mm)- 3 pcs.
2.controller of stepper motors for CNC machine tool based on specialized microstepping drivers from Toshiba TV6560 in a closed aluminum case
3.power supply 24V 6.5 A for CNC machine Modelist2020 and 24V 10.5A for CNC machine Modelist3030
4.set of connecting wires
The sequence of assembly of a cnc milling machine with a movable table.
The linear movement system of any machine tool consists of two parts: a linear bushing is an element that moves and a stationary element of the system - a linear guide or shaft (linear support). Linear bearings can be of different types: bushing, split bushing, bushing in an aluminum housing for easy attachment, ball runner block, roller carriage, the main function of which is to carry the load, ensuring stable and accurate movement. The use of linear bearings (rolling friction) instead of sleeve bushings can significantly reduce friction and use all the power of the stepper motors for useful cutting work.
Picture 1
1 Lubricate the linear bearings of the system linear movement of the milling machine with special grease (you can use Litol-24 (sold in auto parts stores)).
2 Assembling the Z axis of the CNC milling machine.
Assembly of the Z-axis is described in the instructions ""
3 Assembling the table of the CNC milling machine, Y-axis
3.1 Details for assembling the portal, Figure 2.
1) a set of milled parts
4) lead screws for the milling machine Modelist2030 - M12 (step 1.75mm) with machining of the ends for d = 8mm and d = 5mm

Figure 2. Details of the portal of the desktop CNC milling machine
3.2 Press in the linear bearings and insert the linear bearing holders into the milled slots, Figure 2. Insert the linear guides into the linear ball bearings.

Figure 2 Assembling the table of a desktop CNC milling machine
3.3 Linear bearing holders are driven into the grooves of the movable table part. The tongue-and-groove connection provides excellent rigidity of the knot, all parts of this knot are made of 18mm plywood. By additionally tightening the parts with a bolted connection, we will ensure a long and reliable service life, for this, through the already existing hole in the plate, which serves as a guide for the drill travel, we drill a hole in the end face of the linear bearing holder, as shown in Figure 3, a drill with a diameter of 4 mm.

Figure 3 Drilling the mounting holes.
3.4 We put the table itself and, through the existing holes, we fasten it, using the M4x55 screws from the kit, Figures 4 and 5.

Figure 4. Fastening the bearings of the sliding table.

Figure 5. Fastening the bearings of the sliding table.
3.5 Press the thrust bearings into the table frame parts. Insert the lead screw with the lead nut made of graphite-filled caprolon into the thrust bearings, and the linear guides into the grooves of the frame elements, Figure 6.

Figure 6. Assembling the movable table.
Fasten the frame elements with the screws from the kit. For fastening from the sides, use screws 3x25mm, Figure 7. Before screwing in the screws, be sure to drill with a 2mm diameter drill to avoid plywood delamination.
If the lead screw is not clamped by the parts of the base of the movable table and there is a screw play along the axis in the support bearings - use a washer with a diameter of 8 mm, Figure 6.

Figure 7. Assembling the frame of the benchtop machine.
3.6 Place the running nut in the center between the linear bearings and make holes for the screws with a 2mm drill, Figure 8, then fix the running nut with 3x20 screws from the kit. When drilling, be sure to use a stop under the spindle nut so as not to bend the spindle. .
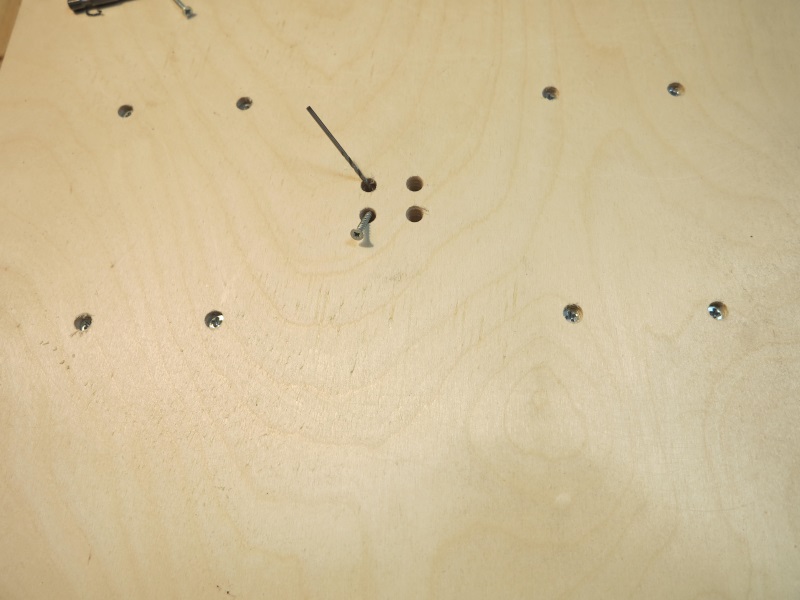
Figure 8. Securing the lead nut.
4 Assembling the gantry of the machine.
For assembly you will need:
1) a set of milled parts for assembling a movable table
2) steel linear guides with a diameter of 16mm (2pcs)
3) linear bearing LM16UU (4pcs)
4) lead screws for the milling machine Modelist2030 - М12 (step 1.75mm) with machining of the ends for d = 8mm and d = 5mm.
For milling machine Modelist3030 - trapezoidal screws TR12x3 (pitch 3mm) with machining of the ends under d = 8mm.
5.Radial bearings for fastening the lead screws - (2 pcs.)
6.the running nut made of graphite-filled caprolon - (- 1pc.)
4.1 Fasten the sidewall of the portal, Figure 9.

Figure 9. Assembling the portal of the machine.
4.2 Insert the lead screw with nut into the Z-axis carriage frame, Figure 10.
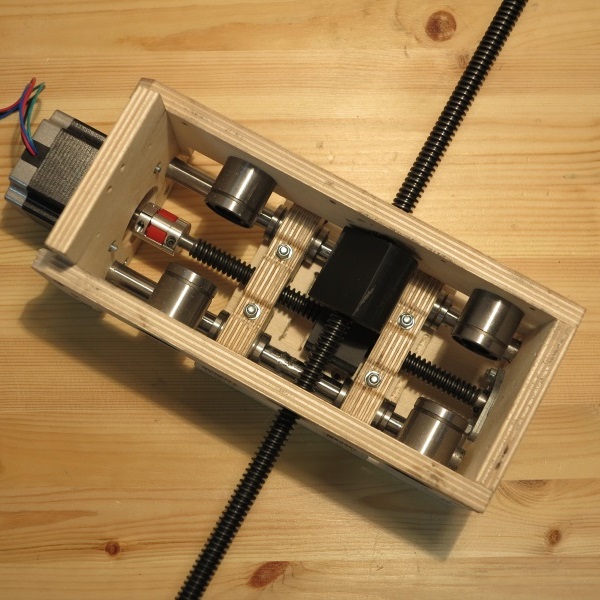
Figure 10. Installing the lead screw.
4.3 Insert linear guides, figure 11.

Figure 19 Fastening the lead screw "in the spacer".
4.4 Fasten the second sidewall of the portal, Figure 11.

Figure 11. Installing the second sidewall of the portal
If the lead screw is not clamped by the parts of the base of the movable table and there is play along the axis, use a washer with a diameter of 8mm.
4.5 Install and secure the rear wall of the carriage Z, Figure 12.

Figure 12. Securing the back of the carriage Z.
4.6 Fix the caprolon nut with 3x20 screws from the kit, Figure 13.

Figure 13. Attaching the X-Axis Spanner.
4.7 Fix the rear wall of the portal, Figure 14, using the 3x25 screws from the kit. 
Figure 14. Fastening the rear wall of the portal.
5 Installation of stepper motors.
To install the stepper motors, use the fastening parts from the set of milled parts of the CNC machine for assembling the Nema23 stepper motor supports for the Modelist3030 milling machine.

Figure 15. Installation of stepper motors.
Install 5x8mm couplings to connect the motor shaft with the lead screw. Fasten the stepper motors to the machine; for fastening, use the M4x55 screw from the kit, Figure 15.
6 Mount the controller to the back of the engraving router, and connect the motor terminal blocks to it.
7 Installing the router.
The router is fastened to the tool neck or body. The standard diameter of the neck of household milling cutters is 43mm. Spindle diameter 300W - 52mm, attachment to the body. To install, assemble the router mount, the fastening details are shown in Figure 16. Use the 3x30mm screw from the kit.
Figure 16 Spindle mount 43mm
Picture 17 Spindle with mounting on CNC machine
When installing dremel-like tools (engravers), in addition, additional fastening of the engraver's body to the carriage Z with a clamp is required, Figure 18.

Figure 18 Attaching the engraver to the milling machine.
It is possible to install a nozzle for connecting a vacuum cleaner
For the manufacture of a volumetric pattern on a wooden surface, factory ones are used. It is difficult to make a similar mini-model with your own hands at home, but it is possible with a detailed study of the design. To do this, you need to understand the specifics, choose the right components and configure them.
The principle of the milling machine
Modern woodworking equipment with a numerical control unit is designed to form a complex wood pattern. The design must include a mechanical electronic part. Together, they will allow you to automate the work process as much as possible.
To make a desktop mini-milling machine for wood with your own hands, you should familiarize yourself with the main components. The cutting element is a milling cutter, which is installed in a spindle located on the motor shaft. This structure is attached to the bed. It can move along two coordinate axes - x; y. To fix the workpiece, you need to make a support table.
The electronic control unit is connected to stepper motors. They provide displacement of the carriage relative to the part. Using this technology, you can make 3D drawings on a wooden surface.
The sequence of work of mini-equipment with CNC, which can be made by hand.
- Writing a program according to which a sequence of movements of the cutting part will be performed. To do this, it is best to use special software systems designed for adaptation in self-made models.
- Placing the workpiece on the table.
- Output of the program to the CNC.
- Turning on equipment, monitoring the implementation of automatic actions.
To achieve maximum automation of work in 3D mode, you will need to correctly draw up a diagram and select the appropriate components. Experts recommend examining factory models before making a mini.
To create complex patterns and patterns on a wooden surface, you will need several types of cutters. Some of them can be made by yourself, but for delicate work you should purchase factory ones.
Diagram of a homemade numerically controlled milling machine

The most difficult stage is choosing the optimal manufacturing scheme. It depends on the dimensions of the workpiece and the degree of its processing. For home use, it is advisable to make a do-it-yourself mini-CNC milling machine, which will have the optimal number of functions.

The best option is to manufacture two carriages that will move along the x-axis; y. It is best to use ground steel rods as a base. Carriages will be mounted on them. Stepping motors and rolling bearing screws are required to create a transmission.
For the maximum automation of the process in a do-it-yourself wood structure, it is necessary to think over the electronic part in detail. Conventionally, it consists of the following components:
- power unit. Needed to supply power to stepper motors and controller microcircuit. Often they use the 12v 3A model;
- controller. It is designed to send commands to electric motors. For the operation of a do-it-yourself mini-CNC milling machine, a simple enough scheme to control the functioning of three motors;
- driver. It is also an element for regulating the work of the moving part of the structure.
The advantage of this complex is the ability to import executable files of the most common formats. Using a special application, you can draw up a three-dimensional drawing of a part for preliminary analysis. Stepper motors will run at a specific stroke rate. But for this it is necessary to enter the technical parameters into the control program.
Selection of accessories for a CNC milling machine

The next step is to select components for assembling homemade equipment. The best option is to use available tools. You can use wood, aluminum or plexiglass as a basis for desktop models of a 3D machine.
For the correct operation of the entire complex, it is necessary to develop the design of the calipers. During their movement, there should be no oscillations, this can lead to inaccurate milling. Therefore, before assembly, all components are checked for compatibility with each other.
- guides. Used steel grinded rods with a diameter of 12 mm. The length for the x axis is 200 mm, for the y - 90 mm;
- support. The best option is textolite. The usual size of the platform is 25 * 100 * 45 mm;
- stepper motors. Experts recommend using models from a 24V, 5A printer. Unlike floppy drives, they are more powerful;
- cutter fixation unit. It can also be made from PCB. The configuration directly depends on the available tool.
The power supply is best assembled from the factory. In case of self-production, errors are possible, which will subsequently affect the operation of all equipment.
The procedure for manufacturing a CNC milling machine

After selecting all the components, you can make a desktop mini milling yourself with your own hands. All elements are preliminarily checked again, their dimensions and quality are checked.
Special fasteners must be used to secure the equipment. Their configuration and shape depend on the selected scheme.
The procedure for assembling mini desktop equipment with CNC woodworking with 3D processing function.
- Installation of the caliper guides, their fixation on the side parts of the structure. These blocks are not yet installed on the base.
- Lapping calipers. They must be moved along the guides until a smooth ride is obtained.
- Tighten the bolts to secure the calipers.
- Attaching components to the equipment base.
- Installation of lead screws together with couplings.
- Installation of propulsion motors. They are attached to the coupling screws.
The electronic part is located in a separate unit. This helps to reduce the likelihood of malfunction during the operation of the router. Also, an important point is the choice of a work surface for installing the equipment. It should be level, as the design does not include level adjustment bolts.
After that, you can proceed to trial tests. It is recommended to first enter a simple wood milling program. During work, it is necessary to check each cut of the cutter - the depth and width of processing, especially in the 3D mode.
The video shows an example of how to assemble a large DIY CNC milling machine:
Examples of drawings and homemade designs
Thanks to the full-scale introduction of computer technologies and automation systems, modern woodworking machines operate according to predefined programs, which allows ensuring the highest quality woodworking. Used at specialized woodworking factories and large sawmills, CNC machines allow you to easily cut and process wood, while it is possible to make appropriate changes to the operation of such equipment. This ensures the greatest possible versatility in the use of such woodworking machines.
If you wish, you can make your own numerically controlled machines that will provide complete wood processing with excellent quality of work performed. We will tell you in more detail about how to make a homemade CNC machine with your own hands.
Despite the seeming complexity of the design of such equipment, it will not be difficult to assemble it yourself. Today on sale you can find ready-made kits for the manufacture of such CNC machines, which allows you to minimize your costs, while it is possible to manufacture the necessary CNC milling machine with 3d, which will perform the full range of work with lumber.
Such equipment is distinguished by its versatility in use, which had a positive effect on its demand and popularity in the market. Such devices can be used to work with the following materials:
- Wood.
- Plastic.
- Composites and polymers.
- Thin metal.
- Rubber.
- Other materials.
The most demanded today are CNC machines, which are fully automated and provide maximum precision in wood processing. With the help of such woodworking machines you can perform the following work:
- Sawing a tree.
- Cut the plywood.
- Carry out fine grinding.
- To make complex three-dimensional and figured cutting of wood.
- Make various building materials from wood.
In each specific case, depending on the functionality of such a device, its execution scheme and the components used will differ. That is why you need to decide first with functionality such equipment and, depending on this, choose one or another type and scheme for the independent manufacture of a CNC machine.
Equipment advantages
If we talk about the advantages of manufactured do it yourself CNC machines, then we note the following:
- Efficiency at work.
- Versatility of use.
- Possibility of simplified equipment reconfiguration.
- Reliability.
- Affordable cost.
Assembly instructions
 We offer you a fairly simple instruction for assembling a CNC milling machine, which will allow you to independently make such equipment for woodworking. This scheme implies the use of ready-made sets of components, which include specially selected elements for the manufacture of such equipment. However, nothing prevents you from finding or making all the components on your own, and subsequently you will not only be able to significantly save money, but also make a machine that will fully meet your requirements.

Subsequently, it will be possible to easily connect a computer or a control unit with software to the completed mechanism, which allows you to completely set the trajectory of the milling work head. At the same time, we note that if you are using a carriage from an old filter, then such a CNC machine can only be used for processing wood, plastic or sheet metal.
If you need a CNC machine capable of fully milling workpieces from various materials, then a powerful stepper motor should be responsible for moving the working tool used. It can be done from a conventional electric motor or purchased ready-made models of low power.
The use of such motors will avoid the need for a helical transmission, which complicates the entire design. At the same time, the characteristics of such home-made equipment and its functionality are significantly expanded. If for some reason you cannot or do not want to use a powerful stepper motor, then we recommend choosing carriages from printers of powerful top models, which will ensure the maximum possible amplitude of movement of the milling working head.
Scheme and drawings of the machine
The basis of a self-made CNC machine will be the milling mechanism. In the event that you use ready-made kits for the implementation of such equipment, then you can choose a mechanism that will fully correspond to the engine power and the subsequent work with wood and other materials.
On the Internet, you can find numerous schemes for the implementation of such milling mechanisms for CNC machines. In each case, the mechanism used will differ depending on the installed motors and carriage. When choosing one or another drawing of such a milling machine, you must give preference to equipment that combines simplicity of design and at the same time fully meets your requirements.

Assembling a CNC machine
First of all, it is necessary to complete the basis of the equipment, to which the milling cutter, carriage and electric motor will subsequently be fixed. Such a base can be made from rectangular beams, to which metal guides are welded or bolted.
The made base for the machine must have different rigidity, which is necessary for accurate positioning of the milling head. Experts recommend connecting all the metal elements of such a supporting structure using screws, which allows not only to ensure the required strength, but also subsequently to easily upgrade your machines.
 In the completed CNC machine, a mechanism should be provided that allows you to move the working tool in the vertical plane. We can recommend using a helical gear for such a vertical movement of the tool, the rotation from which is transmitted using a toothed belt.
The vertical axis that every self-made CNC machine will need can be made from an aluminum plate. The dimensions of such a vertical axis should be precisely adjusted to the overall dimensions of the device you are assembling.
Having made or purchased all the components for such equipment, you can start assembling the machine. You need to mount two stepper motors that attach to the base behind its vertical axis. The first electric motor is responsible for moving the head in the horizontal plane, while the second ensures the movement of the torch already vertically. The assemblies and assemblies used are mounted, while the quality of their fixation should be given due attention.
During the operation of such equipment, it has an increased load with vibration, and in case of poor-quality fastening, problems with the accuracy of head positioning may soon begin. All moving elements and working milling heads must be driven exclusively by belt drives.
Choice of stepper motors
Most of the models of self-made CNC machines are equipped with stepper motors that allow you to move the working tool in three planes. Depending on the design, such equipment can be equipped with two or three stepper motors, as well as additionally configured with electric motors from computer printers.
When choosing the used stepper motors, it is necessary to pay attention to the number of control channels. The best models have five control channels, which increases the functionality of the manufactured mini-machine. Also, when choosing specific models of such motors, you should familiarize yourself with their specification and clarify how many degrees the position of the head on the coordinate table is changed in one step of the motor. The positioning accuracy of the cutting tool will directly depend on this characteristic.
Electronic stuffing of equipment
 Today on sale you can find various ready-made microcircuits for controlling the operation of main engines. It will also not be difficult to find the appropriate software that will send control signals to the motors, and, accordingly, they will, by changing their position, lower and raise the working tool.
An important point in the choice e software is that it must necessarily support the arduino controller drivers installed on your mini-machine. The control board is connected directly to a homemade CNC machine through the LPT or CNC port.
The easiest way is to order such electronic equipment for a CNC machine directly from Chinese auctions and sites. There you can easily find both ready-made sets for machine tools and separately used electrical equipment. The cost of such microcircuits, software and controllers will be at an affordable level.
A do-it-yourself CNC milling cutter is a versatile equipment that allows you to significantly simplify and automate the processing of lumber, plastic, thin metal, etc. and high work productivity. You just need to find a high-quality design of such equipment and purchase ready-made sets of components, select the used cruise engines and automation.
It's nice to see when a person has made all and other household items with his own hands. To simplify the process of cutting metal or sawing out elements from wood, they build homemade machines and devices for a home workshop. Such a solution saves not only time for the manufacture of products, but also money for the purchase of finished products. We will consider several practical and interesting options below.
DIY pipe bending machine
Read in the article
How to use homemade machines and tools for your home workshop
The use of homemade machines and devices for a home workshop is aimed at solving several problems:
- Simplification of the metal processing process. In the course of creating household items, a metal cutter or press is often required.
- Improvement in wood processing. Even to build a small shed or make a wooden one, others are needed.

Buying a ready-made tool is quite expensive, so the use of home-made machines and accessories for the garage is becoming more and more relevant every day. Among the most common home tool options are:
- joiner's workbench;
- device for quick sharpening of knives;
- device for sharpening metal drills;
- drilling machines;
- Press;
- cutting disc machines.

Here are some photos of do-it-yourself tools and devices from "homemade products":
1 of 4


Practical DIY tool shelves
Before creating the devices and with your own hands, determine the storage location for all the devices, so that later you do not search throughout the workshop or where what lies. It is not difficult to make a shelf for tools with your own hands, the main thing is to decide on its dimensions and material of manufacture.

The easiest way to make shelves is to assemble them from wood. Do not forget about the need to cover the finished structure with a protective varnish or to prevent wood from rotting and swelling.

You can create a combined version of a metal support and wooden shelves. Here are detailed instructions for creating such a homemade model:
| Image | Sequencing |
 | Assembling the frame. To do this, prepare two side frames, consisting of 4 corners. Connect the elements with. Then, pull 2 frames together using 4 corners. |
 | When the frame is completely assembled, proceed to making the shelves. They can be made from wood or metal, as well as from other available dense materials. It is enough to cut the canvases of a suitable size and fix them on a metal base. |
 | If you wish, you can make the rack movable by fixing four small wheels. Or install it firmly in the designated spot in the garage. |
You can find other interesting projects and drawings for the manufacture of tool shelves. Watch a video on the topic:
And also make useful household appliances with your own hands:
1 of 4


We make a carpentry workbench with our own hands according to the drawings: video instructions and photo examples
Among the common devices with their own hands, a workbench is distinguished. Strong and dimensional, allowing you to securely fix the workpiece, useful for high-quality cutting of wood and the creation of various elements from it.

The package includes:
- Working surface. For her, use a solid one in order to increase the service life of the device. The thickness must be at least 6 cm.
- Supports. Collected from wooden beams or metal plates. The main task is to ensure the stability of the entire mechanism.
- Vise for fixing the product. If the table is long, you can install two vices at once.
- Tool box. Useful recess or pull-out design for quick access to the small parts you need.

To independently assemble a carpentry workbench for your workshop, you should choose a drawing, purchase material for work.
DIY carpentry workbench drawings
Before buying materials for assembling your own workbench, you should think about a detailed drawing. It should include the dimensions of the machine itself, it is advisable to note the dimensions of the materials used and their quantity.
For example, a ready-made drawing of a folding workbench with your own hands may look like this:

Whichever model you choose to create, consider several features of the desktop that make it easy to cut wood:
- the height and length of the hands of the master: the height and width of the tabletop depend on these parameters;
- which hand is working: place a vice to the right or left;
- what blanks will be made: selection of the table shape;
- what area in the room set aside for the workbench.
Considering all these parameters, it will be easier for you to decide on the drawings of the joiner's workbench and the dimensions of the machine. Here are some interesting examples:


DIY instructions for assembling a wooden workbench
You can buy a wooden workbench in a store or through online catalogs, but it's cheaper to make one yourself. Let's take as a basis a simple version with typical tabletop dimensions: length - 150-200 cm, width 70-120 cm.
The manufacturing work will include several stages:
| Image | What need to do |
 | Make the top cover from thick ones so that you get a shield with a width of 70 to 200 cm. Fasten the elements with long nails, and you need to drive them in from the outside, and carefully bend them from the inside. The working surface of the workbench is made only of wood or. |
 | Sheathe the lid along the lower perimeter with a 5 x 5 cm bar. This will make it more convenient to attach the vertical supports. The location of the supports depends on the size of the tabletop. It is better to make them from a thick rectangular bar of at least 120 x 120 mm. |
 | Install the carpentry workbench correctly. Be sure to secure it firmly. If it will be mounted outdoors under a canopy, then dig holes for the supports. Use other fastening methods indoors. |
When the structure is assembled, install a vice on it. To fully understand how to assemble a carpentry workbench with your own hands, watch the video:
Making a joinery vice for a workbench with your own hands
Professional "homemade products" assemble not only tables for work, but also a vice with their own hands according to drawings. Any design of such a clamp will include several elements:
- Supports where each one falls with a clamping jaw.
- Moving clamping jaw.
- Metal guides. A sponge moves along them.
- Lead screw for moving elements.
- Vorotka. Required to rotate the screw.
When making homemade vices with your own hands, you can use various materials at hand. For example, there is a design option from a profile pipe. To do this, prepare several pieces of pipe of different sizes, a steel stud with a coarse thread and double nuts.
Instructions for creating a vertical vise from a profile pipe:
| Image | What need to do |
 | The largest pipe acts as a body. Supports are soldered to it from below. On the back side, a 3-4 mm steel flange is put on. In the center, a hole is drilled for the running nut, and opposite the front support, the rear jaw. |
 | On the inner movable part, the front steel flange. A stud is mounted in it, with lock nuts fixed to it. Thrust washers are put on both sides of the flange. The last element is a movable tube attached to the front jaw. |
And also watch the video "do it yourself vise at home":
DIY metalwork workbench drawings made of metal
Locksmith's metal workbench does not differ much from the carpenter's one. It is based on a rigid metal frame, not a wooden frame. A vice is attached to it, and the entire workbench is designed to withstand the force of a blow with a sledgehammer.

Do-it-yourself metal workbenches can have one, two or three pedestals, and also do not have shelves and drawers for small parts. In terms of strength, for working in a garage, you can make an ordinary table of metal up to 5 mm thick and a reinforced structure, where sheets from 10 to 30 mm are applicable.
Here are some useful blueprints for making a metal workbench for your workshop:


How to make a tool for sharpening knives with your own hands: drawings and photo examples
Not a single house can do without a knife in the kitchen. It is quite difficult to make the correct one without special devices: it is necessary to maintain the desired angle and achieve the ideal sharpness of the blade.

A certain sharpening angle must be observed for each knife:
- The razor and scalpel require a 10-15⁰ angle.
- Knife for cutting bakery products - 15-20⁰.
- Classic multifunctional knives - 25-30⁰.
- For hunting and hiking, take a device with a blade angle from 25 to 30⁰.
- If you want to cut hard materials, then sharpen at an angle of 30-40⁰.

To ensure the desired angle, it is worth buying or making a sharpener. For example, you can assemble a sharpener with your own hands.


A comment
Tool selection specialist "VseInstrumenty.ru"
Ask a Question"If you do not use sharpening every day, then 1000 rpm is enough for a high-quality result and a long service life of the device.
"To assemble such a machine, a 200 W washer motor is useful. Completely to create a sharpener from an engine from The progress of work on creating such a simple device will be as follows:
- Sand the wood blocks with sandpaper to remove any burrs. Mark up according to the desired angle.

- Attach a stone to the line you drew to sharpen the blade. To do this, attach it to a block and mark its width. Then, on the markings, make cuts, up to 1.5 cm deep.
- In the resulting grooves, fasten the abrasive bars so that the grooves coincide. Then, install the sharpening stone by screwing it onto the bolts.

There are many ways to make a home knife sharpener. Pick the right one and try to create a convenient and useful tool for your home.
How to make a tool for sharpening a drill for metal with your own hands
They independently make not only a sharpener for blades, but also a machine for sharpening drills for metal. Here are some blueprints that are useful for the job:


 Ready-made home machine The simplest and most common version of such equipment for a garage is a converted drill. For work you will need:
 - bed for the base;
- rotation mechanism;
- vertical rack.
For the rack, either boards are usually used. The weight of the drill is small, so there is no need to use metal. In this case, the bed must be made massive in order to reduce vibrations during the operation of the device.

To correctly connect the bed and the vertical rack, as well as assemble all the equipment into one whole machine, pay attention to the video instruction:
Drawings with dimensions for a drilling machine do it yourself
To correctly make any machine or practical device for private use, you should first make a drawing with dimensions. Only then proceed with the preparation of materials and assembly of the device.
Here are some examples of drawings of drilling machines from a drill with your own hands:


And you can also make a homemade vise for a drilling machine. Below is a video instruction for assembling such a device:
Article
We will send the material to you by e-mail
With good equipment, complex technological processes become available. The specialized equipment with an electric drive greatly simplifies the processing of wood blanks. But its acquisition is associated with significant investments. To successfully solve such a problem, you should carefully study the materials of this article. Here's how to create functional woodworking machines for your home workshop yourself.
Some samples of homemade equipment are no worse than factory products in terms of their consumer characteristics.
Before proceeding directly with the technical equipment, a few general remarks should be made about the corresponding specialized room:
- Convenient when the workshop is located in a separate building. This implies sufficient space, no unnecessary worries, the ability to fully equip with other engineering systems.
- If the room is located in, or in the basement, it must be well insulated from the living area.
- The area of a standard workshop should not be less than 6-7 square meters. Height - sufficient for free passage and the maximum level of the lifted tool (from 2, 5 m and more).
- High-quality ventilation, heating and lighting systems will come in handy here. Each engineering system should be considered separately to avoid excessive costs during operation.
- It is necessary to make sure that the electrical power is sufficient for all woodworking machines for the home workshop.
For your information! If the equipment has electronic components, special circuit breakers will come in handy to prevent damage by voltage surges, protective grounding. It is necessary to ensure that the network parameters correspond to the characteristics of the power units (220 V, one phase; 380 V, three phases).

The use of such a source will reduce fatigue and help maintain good vision. It is preferable to install an LED fixture. It does not heat up the surrounding area like a conventional incandescent lamp. Unlike the gas-discharge analog, it is difficult to damage it by mechanical impact.


Woodworking machines for the home workshop and special devices: basic definitions, manufacturing technologies
- Each machine is designed to perform a limited set of working operations with workpieces of certain sizes.
- As a rule, specialized equipment is more convenient to work with compared to universal models.
- Do-it-yourself woodworking machine will be easier to do if you first draw up an accurate list of requirements for its characteristics. Excessive power is not required. The required torque can be provided using a gearbox.
- Likewise, by installing the appropriate transmission mechanism, the speed of rotation of the working shaft is changed. For more accurate processing, a smooth adjustment of this parameter in a wide range is useful.
- To reduce costs, you can use an electric motor of a drill with a broken case, other working parts of failed equipment in the design.
- The most complex mechanical and electronic components will have to be purchased separately. The cost of replicating some technologies at home exceeds the cost of finished products.
- The service life of electrically driven equipment will be increased if it is protected from excessive loads. In particular, it is useful to be equipped with an automatic system that cuts off the power when the engine overheats.
Important! Safety issues should not be neglected. The drive pulleys are covered with shrouds. In front of the working tools, sheets of transparent plastic are installed.

For the rational use of free space, wall and ceiling shelves, racks, hooks and special holders are useful. The exact place of installation of the corresponding ones is chosen taking into account the peculiarities of technological processes, the placement of machines and workbenches.


Related article:
Our review will help you choose and make homemade machines and accessories for your home workshop, as well as understand the technology of their manufacture.
Making a wood lathe for a home workshop
The technical parameters of the respective products together with descriptions can be found on the Internet.

The main part is the bed (1). Other parts of the product are attached to it. It provides not only the integrity of the load-bearing frame, but also good stability on the surface. The carpentry machine is designed for processing relatively light workpieces, so this part can be made from hardwood.
In the central part there is a support with a support for a hand cutter (2). Instead, a holder can be installed for rigid fixation of the instrument. The workpiece is fixed between the headstock (3) and tailstock (4). It rotates with an electric motor (6). To change the torque on the axle in this design, a belt drive and a pulley are used (5). The caliper and tailstock move horizontally along a special shaft (7), which is installed inside the bed.
Important! These drawings can be used to manufacture a working machine. It should only be borne in mind that all dimensions here are in inches.
This project can be used to make a do-it-yourself wood-copying lathe. It should only be supplemented with a special device that is designed to consistently create identical products.

To fix it in the right place, you need to make a special stand. In this example, 10 mm plywood was used, from which an area of 480 × 180 mm was cut. The given dimensions can be changed, taking into account the real parameters. The holes in the plywood are cut so that the fastening bolts and the tool pass through them. For rigid fixation along the contour of the platform, wooden blocks are fixed with screws.

This design attracts with its simplicity, availability of components, and reasonable cost. But some disadvantages should be noted:
- You will have to use two hands to move the cutter. This is necessary to create sufficient force and prevent seizure.
- The minimum radius along which the bends of the parts will be created is limited by the diameter of the tool (cutter).
- To process workpieces from different types of wood, precise adjustment of the shaft rotation speed is required, and in this example this possibility is not provided.
This example explains that even a time-tested and practical design can be improved with a careful study of the equipment and the technological process.
Homemade wood lathe with your own hands: video with instructions and comments from the author of the project
How to make an inexpensive homemade wood lathe with your own hands

It will not be difficult to do it yourself with this kit on wood with your own hands. Such a bed can be fixed on a wooden or metal base. The exact parameters of the headstock are selected taking into account the dimensions and seats of the engine mounts. More than enough will be the power parameters of the electric motor from. For this type of joinery equipment, there will be enough power from 250-300 kW, if it is transmitted to the shaft using a gearbox (pulley).

The last example should be studied in more detail. By choosing a suitable tool with an electric drive, you can get the required power, rotation speed. The standard chuck comes in handy for fast and secure clamping of the workpiece. In modern technology of this type, protection against overheating, dust ingress into the case is provided. High-quality switches are installed here, effective isolation. This picture alone is enough to understand how to make a lathe yourself.
Making cutters for a wood lathe from scrap materials


Files, saws, wrenches, and other tools made from tool steel will do. It is easier to process square-shaped workpieces (in the cross-sectional view). Make sure there are no cracks or other defects that reduce strength. For rigid fixation of through cutters, the machine must be equipped with a special holder.
Important components for a stationary circular saw do it yourself
In this equipment, the table performs the most important functions, therefore, its parameters should be studied with special attention. It is installed with drive mechanisms, power and control circuit elements. It must be designed for the weight of the built-in components and timber. We must not forget that during operation, static and dynamic loads and vibrations will arise.

When specifying the parameters of the machine, the following factors must be taken into account:
- For this equipment, the power of the power unit must be at least 0.85 kW.
- When calculating the structure, it is necessary to check the height of the protruding edge of the disc. It will determine the maximum cutting depth.
- The minimum rotation speed of the working shaft is limited to 1.5 thousand revolutions per minute. It is advisable to increase it so that the color of the wooden blank does not change during the execution of working operations.

Description of an inexpensive circular saw from a grinder with your own hands
As in the previous example, when creating such a machine, you can simplify the solution of the problem using standard power tools.


The drive with the cutting disc is attached to the swing arm. To facilitate physical efforts, a spring or counterweight is installed. Tool movement is permissible only in the vertical direction along the arc. This design is mobile. It can be installed indoors and outdoors on a suitable base. If necessary, the grinder can be dismantled. It is fixed with screw connectors on a damping wooden (rubber) gasket.


Do-it-yourself grinder bed: drawings, video, an algorithm for manufacturing individual parts and assembly:
Advantages and process of creating the simplest wood router for the home workshop
This equipment is used to cut grooves according to specified dimensions and accurately drill at different angles. With its help, you can quickly remove a quarter, create a depression for a workpiece of a certain shape. Even without a detailed explanation, it is clear that such opportunities will be useful to the owner of a private house. It remains to figure out how to make a homemade milling machine for wood. Will such a solution be economically viable, or is it more profitable to purchase factory-made equipment?
The questions raised can be answered after a detailed study of the corresponding constructs.


A power unit is installed in the central part of the table, which rotates the cutter. With the help of clamps and other devices, the workpiece is fixed in the desired position and moved along a given trajectory. Such a workplace is equipped with an operational dust removal system.
To eliminate errors during the implementation of the project, pay attention to the individual parameters of the structural elements:
- A table for performing working operations is created in a stationary design. Its dimensions and load capacity will be determined taking into account the characteristics of the processed samples.
- Experts recommend installing screw adjusters in the lower parts of the supports. With their help, it is possible to establish the exact horizontal position of the structure, even on uneven surfaces.
- The power frame can be assembled from steel pipes (rectangular profiles). For the manufacture of countertops, a high-quality and sufficiently thick chipboard is suitable. A thin sheet of metal will vibrate, which will impair machining accuracy.
- If you choose a motor with a power of 500-900 W, the capabilities of the cutter will be enough only for removing thin layers, creating relatively small depressions.
- When installing a 900-1900 W power unit, more complex operations are permissible. However, some difficulties are permissible when processing hardwood blanks.
- Powerful machines (over 2000 W) can be equipped with any type of cutter. Such equipment belongs to the professional level. It is designed for long-term operation without overheating of the motor.
- For the manufacture of a mounting plate through which the engine is attached to the tabletop, you can use a sheet of fiberglass, metal.
- To ensure good visibility in the working area, a backlight is mounted above the table.

The following table provides information on how much a manual wood router costs in the domestic market.
| Brand / model, photo | Power, W | Maxi- minimum spindle speed rpm | Price, rub. | Notes (edit) |
|---|---|---|---|---|
 PROMA / SF-40 | 1500 | 24000 | 17500-18900 | Designed for grooving, folding, milling. |
 Enkor / Corvette-82 | 1500 | 2400 | 14200-15900 | Distinctive design elements: angle-type stop with a scale that simplifies processing at a certain angle; side supports for supporting large workpieces. |
 Proxxon / MT 400 | 100 | 25000 | 14200-15700 | Compact, lightweight model with low power motor. Designed for processing small pieces of soft wood. |
 PROMA / TFS-120 | 5500 | 9000 | 175000-183000 | Professional grade equipment. It is connected to a 380 V three-phase network. Suitable for equipping specialized woodworking enterprises. |
 X-CUT / XC-3040 | 800 | 24000 | 188000-196000 | Compact machine with numerical control (CNC). For ease of operation, it is equipped with a remote control. Downloading new programs from a computer is permissible using a "flash drive". |

Feasibility of implementing a do-it-yourself CNC milling machine project
The use of programmed control allows you to create large series of parts with high precision, to carry out unique and particularly careful processing. To start a new technological process - just load a new program and press the "Start" button. A simple and complex task will be performed by the wood milling machine automatically, without intervention and control from the user. This technique eliminates operator errors and ensures the highest quality.
The advantages of this class of equipment are obvious. It remains to find out whether it is possible to create a CNC woodworking machine with your own hands. The features of this class of equipment are noted below:
- We'll have to provide the ability to move the cutter horizontally in all directions. To do this, you will need not only the appropriate design of the mountings, but also additional electric motors.
- Accurate positioning of the tool is provided using sensors, stepper motors.
- You will need software that will control the movement of the cutter, perform control functions.

Important! Even with a detailed description and drawings, it will be very difficult to make a CNC milling machine for wood with your own hands.
How to make your own milling cutters for woodworking machines
To create quiet products, you will need workpieces made of durable, high temperature resistant and strong mechanical stress tool steel. Damaged drills, fittings, rods will do. The required shape can be created using a diamond disc that is installed in a grinder. Edge sharpening is performed at an angle of 7 to 10 degrees. A too narrow working part will quickly deteriorate, even when processing softwood.

Drawings and recommendations for creating a do-it-yourself thicknessing machine
High-quality reproduction of this type of processing requires significant efforts. Therefore, it is recommended to use a three-phase electric motor with a power of 5 kW or more with a maximum rotor speed of 4.5 thousand rpm.

The shaft (1) with one or more knives is rotated by an electric motor (4), two pulleys and a belt. For pressing and moving the workpiece, rollers (2, 3) and a manual drive with a chain mechanism are installed here. The structure is assembled on a sturdy frame made of steel corners.
Taking into account personal preferences, it is not difficult to prepare planner drawings with your own hands. To correct the technical characteristics, the volume of future work, the parameters of the blanks, and the size of the room are taken into account.
Making a functional planer from an electric planer with your own hands
You can quickly and inexpensively make a machine based on a standard electrically driven tool.

The picture shows that the power tool is fixed above the workpiece in a special frame. They provide the ability to move it in the longitudinal and transverse directions with strict preservation of the angle of 90 ° between them. A modern plane is equipped with a special outlet for connecting a vacuum cleaner. Therefore, there will be no problems with waste disposal.
DIY wood grinding machine technology
This equipment performs its functions using rigid shafts and flexible blades with an abrasive applied to the surface, brushes and other special tools.


For the manufacture of household appliances, it is recommended to choose a relatively simple one. You can create it yourself after determining the required length, taking into account the exact location of the support rollers. The following algorithm is applied:
- The width of the tape is set from 15 to 25 cm.
- Strips are cut from a suitable grit sandpaper.
- They are glued to a flexible base made of dense material butt-to-end, without large seams.
- Prevents slipping of the belt by increasing the diameter of the support rollers in the central part by a few millimeters. It is also useful to install a layer of rubber on them.
Article