Lighting fixtures can not only dispel the darkness, but also give an unusual aura to your interior.
There are many different ideas with which you can make a wall lamp or any other type of lamp with your own hands.

You yourself are capable of creating a masterpiece that cannot be found in any store.
Creating an extravagant chandelier
Very original item It is made from the simplest materials, most of which can be saved after a picnic. Lamps from various containers will look impressive.

To do this you will need:

- oval plastic bottle with a capacity of 5 liters;
- disposable spoons;
- cable with socket and plug;
- low power LED lamp;
- pliers;
- glue gun;
- screwdriver;
- stationery knife.

To avoid fire, use only LED bulbs!

Use a knife to carefully cut the bottom of the bottle, then remove the handles from all plastic spoons. Do not apply to the cut area a large number of hot glue from a gun, glue them to the bottom of the container.

Approximately you will need about seventeen pieces. Place the next and remaining rows in a checkerboard pattern.

In order to hide the neck of the bottle, place ten to twelve spoons without handles on the glue so that they form a ring.

Pull the socket with the lamp and cable through the hole at the bottom of the bottle.
If you don’t want to make this part yourself, you can purchase it in any department of household goods - the wire, socket and plug are already connected together.

Make a hole in the lid for the cord by drilling it with a drill or a hot self-tapping screw. Screw on the lid and place the previously prepared ring of spoons on top. Exclusive LED lamp ready for use.

Some ideas for creating lampshades
It’s enough to simply create a lamp from scrap materials for your home or garden.

Idea N1
- any hollow container (this could be old saucepan or flower pot);
- wire;
- polyurethane foam and gloves;
- paint and brush;
- sharp knife;
- pliers.

Place the item taken as a basis upside down. Wind the wire around the product the way you want the lampshade to look, since all the turns copy its shape. Put on gloves and squeeze the foam onto the frame a little at a time until it completely covers the wire, leave to dry.

Then, using a knife, give the contours more evenness and paint them in any color. This option will be the best for a street lamp.
Idea N2 is a classic
- thick wire;
- pliers;
- small bottle of water.

Note!

For making the top central element screw a coil of wire onto the bottle, then remove it and trim off the excess. The ends must be secured so that they form a ring, the diameter of which should allow the cartridge to pass through at the bottom, and prevent it from coming out at the top.

Next, you need to make a large outer ring from the wire. To secure it you will need four equal pieces of wire. Connect one edge of each to the small ring, and the other to the large ring. The upper part of the lamp is ready.

The largest will be the bottom circle of wire; it must be attached to the second top one, evenly placing five identical pieces of wire.

To decorate the frame, thread a wire through the second top ring, giving it a wavy shape, and wind it onto the base. Decorate the bottom ring in the same way.


Note!

When walking through the forest, take with you an interestingly shaped branch; it will make an excellent wooden lamp. Wash the branch and remove the bark from it with a knife, coat it with wood varnish. For good stability, screw the lamp to a heavy stand with self-tapping screws; wood can also serve as a stand.

A better option is an oak tree; find a broken branch and saw off a circle at least five centimeters thick from it. Varnish or paint it too.
Making a lampshade with children
There is an option for making a lampshade with children. For the frame you will need a canister or bottle with a capacity of five liters. You need to roll the paper strips into a tube, it is best to wrap them around a pencil or sushi stick, then glue the remaining edge with glue.

These blanks need to be glued to the frame in several layers so that there are no gaps. When the glue dries, the lampshade can be put on a table lamp or made ceiling lamp, which looks very unusual.

Experienced needlewomen can knit or crochet a lampshade, decorating it with crocheted flowers and ribbons.

To give the product the correct shape, you can use a starch solution or regular PVA glue. Look at the proposed photos of knitted lamps, how much tenderness and comfort they contain!
Note!


This article told you how to make a lamp with your own hands. Using the information received and your own imagination, you can now create an exclusive lighting fixture for any room.
DIY lamp photo


In this article we propose step-by-step master classes How to make table lamps with your own hands from improvised materials that you always have in the house. It would seem at first glance ordinary and unnecessary things, but from them you can make original and designer lamps for your desktop.
The most popular and simple materials at hand are: glass bottles and cans, cardboard and paper, plastic vessels, water pipes and cement. We will show and tell you how to make lamps from this in this article.
With simple and elegant table lamp made of copper, you can decorate any corner of your home by making it yourself. She'll fit in perfectly modern interior from loft style to rustic. Prostate and laconicism are the main trump cards of this table lamp.

To do this you will need the following tools:
- Roulette, marker
- Pipe cutter and washcloth
- Wire stripping and stripping tool
- Pliers and a thin flathead screwdriver
- crosshead screwdriver

M materials:
- Copper pipes
- Acetone and super glue
- Copper corners 90°, 7 pcs.
- Electric wire
- Plug and Electric socket
- Switch and light bulb
Technique for assembling a table lamp
To begin, take a tape measure, a marker, a pipe cutter, a rag, copper pipes and acetone.
Mark and cut the tubes
- Use a measuring tape and marker to mark where you will cut the copper pipes.
- Do this carefully, measuring every millimeter precisely, because if the parts are different, then the end result will not be the same size as they should be.

- Guide the pipe cutter and adjust the diameter of the pipe using the nut. See by copper tube, gradually readjust the diameter with the nut, so that the closure continues until the pipe is cut.
- Afterwards, using acetone and a rag, you can wipe the markings off the pipe.

TIP: Our parts have: 3 cuts of 15 cm, 1 cut of 20 cm, 1 cut of 45 cm, 1 cut of 25 cm. We used 12 tubes. When designing your light fixture, please note that the copper elbow size will be added.
While the cable is inside, we connect the parts
Insert the parts together and glue super glue. In order to avoid problems in the future, it is better to glue each part and place it next to each other.

Even though the glue works instantly, you may want to wait a few minutes before proceeding to ensure that the pieces are glued together perfectly.

Tip: It will be more convenient to apply glue if you use a brush. If you want the cover to be at the very top, install it first. This way the first part will be ready, and the cable will go in a different direction.
Tools:
- Wire Stripper and Wire Stripper
- Incisors
- thin flat screwdriver
- crosshead screwdriver
Materials:
- fork
- electro chuck
- switch
- Copper pipes
- electrical wire
 Install the electrical system
- Open the front panel of the cover and start by stripping the insulation. Connect the ground ( Blue colour) and phase (brown, gray or black) using the two screws you will find inside.
- Repeat the same process on the plug and switch.
- In the switch you will find two pairs of small screws, a cable that you must cut to the height you want the switch to be and connect to the corresponding sockets going inside the small screws.
- All you have to do is screw in the light bulb to create your copper table lamp.

Finally, place the lamp in a corner or place you like and see how it will become a wonderful addition to your interior, lighting up the space!

Master class: Table lampfrom paper
When I first saw the Robert Delta table lamp, it was love at first sight! The shape is amazing, it comes in different bright colors, everything I like. I was recently wondering since the accessories were surprisingly durable, why not use them for a lamp?

Here are all the materials used:
- old lantern or lamp kit
- template and thick cardboard or paper, you can take polypropylene sheets
- glue and putty
- sanding block (medium + fine)
- wood block (add weight to base)
Tools:
- art tapes
- metal ruler/xacto knife
- drill (can optionally replace xacto knife)
Lamp manufacturing technology
- Firstly, print the template (6 pieces of each triangle) (1 of each hexagon).
- Cut out the shapes so that they fit snugly on the board. Then use glue to attach the pieces to the back of the mat.
- Using a metal ruler and Xacto knife cutting board, cut each shape.
- Put them together.


- Next, glue the bottom (shapes 2 + 4) to the base (shape 6). The triangles fit together nicely and if you did everything right they will just fall into place.

Then use small pieces of art tape to attach them together and wait for the glue to dry completely.
TIP: Use super glue, it dries instantly (we used Aleene). Apply glue lightly, and wipe off excess.

- After gluing the bottom half (shapes 2 + 4 to the base, turn mold 6 upside down (open end down), place the square on a flat surface and let it dry overnight, this will help maintain its area.
- The next day, start working on the top of the lamp. Glue the shape 1 + 3, leaving a little hole to insert the lamp inside. The top one (form 5) was glued together with artistic tape, but it is not yet glued to form 1 + 3.
- Then reinforce the seams with glue on the inside.
Then start working on the base of the lamp.
The level at the bottom of the lamp needs to be made a little bigger, so cut some 1×4s to raise it a little. It will also add extra weight, giving it more stability. Use screws to attach the 1×4 to the existing metal base. (We swapped the existing rod with one from another lamp to get it to the correct height).

Next, drill a hole for the cord and insert a plastic sleeve from an old lamp. The lamp should be disassembled, and the cord and wire should be pulled through the threaded rod of the hole in the new base. Inside the lamp, glue it in the center.


At the top (shape 5) mark the center and drill a hole for central rod. Then glue it in place.

- After applying the adhesive, remove excess, and if necessary, lightly, and apply a second layer after sanding.
- Using a medium-grit putty and fine sandpaper, finish with a sanding block. IN this moment, you'll notice its sturdy base.


Once you've finished removing dust, apply paint! To cover top part threaded rod, use the top of an old lamp - it just slides over the rod. Then return it back to the nest!
That's it, your handmade table lamp is ready.


Bottle table lamp


Tin can lamp
This lamp is perfect for a home desk, both for students and schoolchildren. Boys will especially appreciate it; it looks more like a transformer and a robot from the future. You can paint or decorate the jar itself with paper, thread, or make it more embossed. How correct.


Table lamp made from plastic bottles
Plastic bottles can always be found around the household, so decorating an old table lamp is not difficult. Usually, when restoring old lamps, the bases are left and plastic is used for the lampshade. The lampshade mount is usually used as an old one. When working with plastic bottles, remember that they are easier to cut paper knife or construction knife. Glue is used for rubber or special glue for plastic.


Table lamp made from branches and slices
Wood in the interior is always a classic - it is always fashionable and relevant. By decorating a table lamp with a cut of wood or an old piece of driftwood with your own hands, you will get a designer item that simply has no price.
- To do this, we need to select any piece of wood we like, process it correctly namely, dry it, apply impregnation against pests and cover it with varnish.
- The second stage is to mount the top of an old floor lamp into the base. If this is not the case, it doesn’t matter; light supply stores usually sell bases for lampshades.


Other original ideas
The basis for a table lamp can be, in principle, any item you don’t need: these are children’s toys, Sewing machines, unnecessary socks and so on. Experiment and create beauty!


The coziness and comfort in the room depends on the lighting. Do homely atmosphere full of warmth you can by making a lamp with your own hands. Ideas that will help you with your own hands and minimum costs to make an exclusive and fashionable lampshade, you can learn from this article.
Pendant lamp in the interior
Preparation
What you need to know before making a lamp:
- It is recommended to use LED or energy-saving light bulbs when creating your own designer lamp. Standard incandescent bulbs get too hot and can damage the structure.
- If you are disassembling a finished lamp, you need to be extremely careful with the wires, and after finishing, make sure they are intact.
- There are light bulbs in several color temperatures. While creating pendant lamp For your home, you should opt for a “warm” shade.
An illustrative example for distinguishing color temperature: than larger number on the box, the higher its temperature, and the colder shade of light it has.
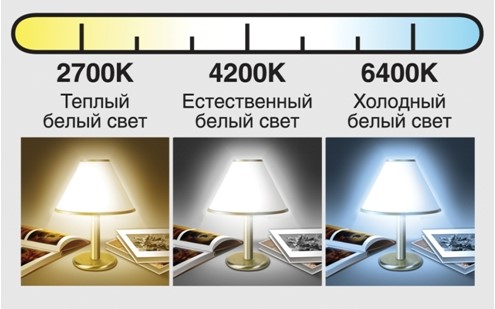
Light bulb color temperatures
Frame selection
Before making a lamp, you need to prepare the base. Most often it consists of a pair of rings to which a cardboard or plastic backing is attached to give it shape.
The following ideas will help resolve the issue of finding the basis for a future lampshade:
- You can make this type of frame yourself with only wire and pliers on hand.
- Frames are sold in construction stores or in handicraft shops.
- It’s not uncommon to find old lamps at flea markets where you can get the frame.
- Instead of frame structure, the lamp socket can hold the neck of a 5 liter plastic bottle. Therefore, there is a solution in the figure below.

DIY lampshade
Lamp ideas
There is nothing complicated about decorating a pendant or table lamp yourself. But it’s better to draw a sketch on paper before starting work. The process will be simple and quick, and you can make changes along the way.
"Live" lamp
This designer lampshade is called “Photosynthesis”. It was designed and brought into reality by an author from Tel Aviv. The framework is shown here metal mesh, at the base of which is placed indoor plant. As it grows, the flower fills everything inner space lamps and makes the design of the room summer and fresh. There is no need to use a special light bulb here; a regular LED light bulb will do for plants. Creating such a pendant lamp is not too troublesome. You can add variety to its decor, taking into account what accessories and tools will be available.

Hanging living lamp
When making such a lamp with your own hands, you cannot use an overly heavy pot with a plant. Special attention You need to pay attention to the insulation of the wiring and run it along the supporting wire.
Make a lamp with your own hands from fabric - perfect solution, after all big choice colors and textures allows you to realize many creative ideas and create decorative lampshades for a room with any interior. First of all, you need to prepare the necessary materials:
- textile;
- tape or self-adhesive film;
- ruler or centimeter;
- scissors;
- a simple pencil;
- metal rings for the frame;
- binders;
- brush;
- glue;
- strip of paper.
Sequencing:
- Before you make a lamp, you need to determine its shape. A cylindrical base is ideal for a fabric product.
When deciding on the height and width, you should make sure that the base is not too close to the light bulb.
- You need to cut out a rectangle from the adhesive film and a piece of fabric, the edges of which are 5 cm larger. Attach the fabric to the table with the film, front side down.
- Find the most beautiful pattern on the fabric that should be on the lamp and use a ruler to draw the corners and dotted line.
- Align the fabric and stick the film on it.
- Using binder clips, secure the lampshade to the surface of the frame from the bottom and top.
- Use a pencil to mark the edges and the side that will be on top. Glue the parts of the lampshade to each other and let them dry.
- Turn the structure over, apply glue to the edge and insert a wire ring. Secure with binders and let dry. Repeat the procedure at the other end.
- Glue a strip of paper from the edges. After it dries, glue it on top fabric strip. Do the same on the seam on the side of the lamp.

DIY fabric lampshade
If you make small triangular cuts in the paper while gluing it, it will bend better.
There are other ideas on how to make a lamp with your own hands. Using various materials and fittings, you can create equally impressive decorative lampshades from threads, paper and other available materials.
Photo collage
To make such a designer lampshade-photo frame, you will need:
- frame, as in the previous example, or a ready-made lamp with a clean white lampshade;
- several sheets of tracing paper;
- scissors;
- PVA glue;
- a simple pencil;
- printer (recommended to use inkjet).
Choosing your favorites and beautiful pictures, using photo editors you need to make a collage. You can collage images by cutting them out of paper. This method leaves a lot of room for creative idea: You can apply any decor to the lamp, not just a photo: a child’s drawing, a motivating aphorism or a map of your favorite area.

DIY photo collage table lamp
Before you make a lamp from photographs, you should make sure that the paint is dry. You should absolutely not bend paper sheets of tracing paper, because the bend will always be noticeable.
Sun made of ropes
Creating such a designer pendant lamp is much easier than it seems. Required tools:
- threads;
- glue (for wallpaper or PVA);
- petrolatum;
- balloon.
Initially already inflated balloon lubricate with Vaseline. This is necessary so that threads do not stick to it. The threads are soaked in glue and wrapped around the ball. After the product dries, it is blown off and put away. The making of the rope sun is completed.
What needs to be done to make the decor of the lamp as successful as possible: firstly, you should first get your hands on it and make a couple of small lamps for testing. Secondly, before winding the threads on the ball, you need to mark the place where there should be no threads. Through this hole the ball will be removed and the light bulb will be inserted.
Making a lamp
Decorating the lamp is half the battle. The main thing is quality work done without sad consequences. Therefore, it is imperative to take into account the following factors:
- If a lamp hanging from the ceiling is connected, the junction of the wires and the product itself must be covered with a protective cap.
- If the light bulb gets very hot during operation, the designer lampshade surrounding it should not be too close. This is why it is worth using small incandescent light bulbs.
- If the product is heavy, it is strictly forbidden to hang it on wires. For this purpose, special rods, cables or brackets are provided for mounting on walls or ceilings.
- To illuminate a room with high humidity: in a bathroom, sauna or bathhouse, it is better not to implement your ideas for making a lamp with your own hands, but to buy and install a special product that contains protection from moisture.
- During installation of the lamp, the wiring must be insulated to eliminate the possibility of injury to the master and his loved ones.
With my own hands. Video
This video will tell you how to create an LED lamp with your own hands from scrap materials.
Decor made from paper, photographs, threads, fabric and any other means has its own advantages over finished products purchased in a store. With a minimum of cost and time, decorative lamps not only decorate the home, but also emphasize the originality of its owner. Personalized modeling of lighting fixtures is an opportunity to realize your creativity, decorate the interior and bring relatives together to work together.
People who have developed Creative skills, very often they create interior elements with their own hands, and making a master class chandelier is not difficult. Only it is better to buy factory-made lamps for the bathroom, because they must be small and reliable.
Dwellings containing objects self made, acquire a refined and original look.
We make a chandelier with our own hands from plastic bottles
To make a chandelier from plastic bottles we take:
- If there old chandelier, you can take her island
- Many colorful bottles
- No more than ten steel rods
- From plastic bottles we use scissors to cut out any figures that you want to see on your chandelier (animals, flowers, etc.)
- We attach several twigs to the chandelier island. From the rest we make something similar to a hedgehog, connecting the rods in the middle. We remove one rod where the light bulb will be
- Next, we supplement the resulting frame with previously cut plastic figures.
- We connect the island and the hedgehog together.
Now you know how to make a plastic chandelier with your own hands. To consolidate the material, we recommend that you watch a video that contains examples of chandeliers made from plastic bottles:
Making a chandelier with your own hands from wood
To make a wooden chandelier we will need:
- Twelve strips for door trim, 30-45 cm each.
- Liter jars from which we will make lampshades (6 pieces).
- White and wood-colored paint.
- Self-tapping screws for wood.
- Sandpaper.
- Seaming machine.
Description of the manufacturing principle.
- Making the planks smooth using sandpaper
- We need room for the electrical wire, so we make a notch on the back of each strip.
- We drill three strips to which we will attach the shades.
- We paint the planks a wood color.
- We make a regular hexagon from the plans.
- We attach the cartridge to the hole in the cover.
- We roll up the jars with light bulbs inside.
- We paint the lampshade in any light color.
DIY chandelier made of wood, photo below:
Making a chandelier with your own hands from threads
To make a chandelier from nylon threads we take:
- Let's make a lampshade from a plastic bowl
- Multi-colored threads
- Fastening paste
Description of the manufacturing principle.
- First of all, let's make the paste. Mix half a glass of flour and two glasses of water, two glasses of water with a temperature above 60 degrees, boil and throw in about three tablespoons of sugar. Stir and wait until it cools down. Next, we’ll look at how to make a lampshade with your own hands for a chandelier.
- Throw the yarn into the paste.
- We wind the resulting yarn around a bowl.
- After 24 hours, separate the resulting thread lampshade from the bowl.
- We attach the lampshade to the bottom and that’s it, the chandelier can be hung on the ceiling
Attention! A DIY lampshade for a chandelier requires the use of a light bulb of no more than 60W, as it is made of flammable materials.
Have you decided to change your interior and want something unusual? The store offers huge selection different things, but why not do something yourself? The designer lives in each of us, you just need to wake him up, change the world that surrounds you, make it the way you see it!
Why not start with a chandelier? It can become the calling card of your home that no one else has. This will not only save your money but also give you a sea of unforgettable emotions.
Make a chandelier shade with your own hands. You will be surprised that things that you were ready to throw away can be useful to you and reborn in your new invention.
First you need to decide on the style of what kind of chandelier you want.
If you are young - a romantic style chandelier is for you, you need to decorate country house– country style will be just right.
DIY chandelier (photo based on lampshade decorations)
To make a chandelier with our own hands, we take:
- Light bulb socket.
- Power cord.
- Frame for a chandelier.
- Decor for jewelry.
- Multi-colored threads.
- Hot glue.
- 60 Watt light bulb.
For the frame, what's left of your old, long-forgotten chandelier is suitable. Many famous designers began their illustrious careers by giving old items a shine, bringing them back to life and putting them up for sale.
Take measurements and decide on the fabric you will use. Sewing the cover the right size put on the frame. You can decorate the lampshade however you like. These can be cut out flowers, animals, figures, beads and much more that your imagination can reproduce. We attach a socket equipped with a low-power light bulb to the lampshade and everything is ready. A lampshade made by yourself will lift your spirits every time you look at it.
Making a New Year's chandelier with your own hands
How to make a New Year's chandelier with your own hands to surprise your friends with your suddenly discovered talent?
To make a chandelier we take:
- Organic glass or thin wooden sheet.
- Linen rope.
- Multi-colored balls.
- Small stapler.
- We use glass parts left over from an old chandelier.
Description of the manufacturing principle.
We start by cutting a square from plexiglass, the dimensions of which are 50:50 cm. We make holes every 5 centimeters throughout the entire area, as chaotically as possible. We take a linen thread and thread it through the water hole and out into another, adjacent one. The length of the extended ends should be two meters. We repeat this procedure until we fill all the holes in the square.
We hang this composition instead of a chandelier on the ceiling and continue to decorate the chandelier as christmas tree. We take the balls and tie nylon threads of different lengths to them, and tie them to the structure, concentrating them in the central part. Next, we perform the same operation with glass products, but we hang them at the edges; the length of the thread should be less than on the balls. If you look at the structure as a whole, it will look like an inverted pyramid.
Now you know how to make a New Year's chandelier with your own hands. Start your crafts right now and you won't stop with the chandelier.
IN Lately Decorations for chandeliers such as thread wrapping have become very fashionable.
Description of the manufacturing principle.
We will need a lot of thread and PVA glue, as well as an inflatable ball. Cotton threads are perfect for our project, since the glue applies evenly to them and behaves obediently.
We wrap the inflated ball with threads, apply glue and wait until it dries. Then we simply pop the ball with a needle. Cut a hole on top for the light bulb and you're done. Your result can be compared with the DIY chandelier in the photo.
Today, a chandelier is not just a source of lighting. It is one of the main elements of room decor. Handmade lamps are the most popular, as they personify the individuality of the homeowners and their extraordinary creative abilities.
Undoubtedly, handmade creativity is a rather difficult task, requiring a lot of patience and accuracy. However, doing something with your own hands is always quite exciting and educational. The topic of this review is how to make a chandelier with your own hands.

Choosing material for a homemade chandelier
In order to make a handmade lamp, a variety of materials are used:
- glass;
- tree;
- plastic.

In addition, sometimes very unusual things are used to make a chandelier at home:
- paper;
- cardboard;
- disks;
- straw;
- branches;
- wine bottles And so on.

When choosing this or that material, you need to take into account your own preferences and the style used in the design of the room.

In addition to the material, devices may differ in manufacturing techniques. The most common are:
- Japanese origami;
- macrame;
- weaving;
- thread;
- knitting;
- applique;
- embossing

Ideas for creating a chandelier with your own hands - step-by-step instructions
Nowadays, there are many unusual ideas on how to create a beautiful lamp for an apartment with your own hands. Let's look at those that are more popular.

Chandelier made of plastic spoons
Ordinary disposable plastic spoons are the simplest and most affordable type of material to make a chandelier. The advantages of such raw materials are:
- low cost;
- manifold color solutions;
- durability.

To make a lamp, you will need:
- 5 liter plastic bottle;
- disposable spoons;
- PVA glue;
- light bulb socket;

Procedure:
- Prepare the bottle. To do this, remove the label, cut off the bottom, wash the workpiece thoroughly and dry it.
- Prepare the spoons by cutting off the handles.
- Cover the entire bottle with scoops with the convex part facing out.
- Secure the cartridge in the made lampshade.
- Attach the chandelier to the ceiling and connect it.

Chandelier made from plastic bottles
An interesting solution from a decorative point of view would be a lamp made from plastic bottles.
- We take scissors and cut out different patterned shapes and unusual figures. We will assemble a chandelier from them.
- We attach several thin rods to the frame of the old lamp and connect them, removing the central one. At this stage, the lighting fixture takes on the shape of a hedgehog.
- We fix all the prepared figures and forms onto the frame of the chandelier. The product is ready!

Let's consider special example– the process of creating a lamp in the form of leaves:
- Cut blanks from bottles small size imitating leaves. Usually birch leaves are chosen.
- Using a soldering iron, slightly melt the sections of the leaves and draw out the veins - this way they will look more impressive.
- Make holes in the stem of each leaf using a heated thin needle.
- Use wire to form branches. Screw them to the frame of the future chandelier.
- Attach leaves to the branches. Ceiling lamp original design ready!

Chandelier with paper butterflies
A lamp with paper butterflies is also popular. This model looks very impressive and luxurious, although it is quite simple to manufacture.

Sequencing:
- The role of the base is played by the frame from an old lamp or a simple rim made of metal or wood.
- Take paper and cut out butterflies from it according to pre-prepared templates.
- Secure the cut insects to a fishing line or nylon thread.
- Attach the resulting threads to the frame of the future chandelier and decorate it.

Fabric chandelier
This type lighting fixture also based on a solid frame or thick wire. First of all, prepare the base, and only then can you start cutting out the material to create the lampshade.

The length of the finished product depends on your wishes, and the width must correspond to the size of the frame. After completing the pattern work, be sure to try it on. The next step is to sew the fabric to the base of the chandelier.

In order for the lampshade to retain its shape, you need to choose the material wisely. If you use light material, then the lower part of the lampshade should be weighted.

You can use fringe, braid or lace as decoration. But try not to overdo it with the decor.

Lamp made of threads and a balloon
To create such an original lampshade you will need to prepare:
- thick threads or rope about 1 m long;
- old cartridge;
- petrolatum;
- glue and brushes;
- balloons – 1 – 2 pcs.

Manufacturing process:
- Inflate the balloon to the required volume, and use a felt-tip pen to mark the boundaries of thread winding.
- Coat the entire surface of the ball with Vaseline using a brush.
- Pour the glue into a wide container and begin to process the threads with it as you wind it around the ball.
- After you fill the ball with threads to the marked boundaries, it should be left to dry.
- After a day, burst the balloon and remove it.
- Cut a hole in the top for the cartridge and insert it. You also need to cut a hole at the bottom of the lampshade - this will make it easier to insert the light bulb. The product is ready!

Wine bottle chandelier
This chandelier is more labor-intensive to create than the options described above. It's quite difficult to make. This requires patience and attention. But the effort is worth it!

Necessary materials:
- wine bottle;
- cartridge;
- cable;
- sandpaper;
- base made of metal or wood.

The tools you will need are a glass cutter.
Manufacturing procedure:
- Preparatory stage. Wash and dry the bottle, remove the labels, mark with a marker a line along which to cut the bottom using a glass cutter.
- Sand the cut with sandpaper.
- Insert the wire through the neck of the bottle and attach the socket.
- Attach the bottle to a pre-prepared frame.

The number of shades for a chandelier depends on you - you can leave one or make five or six.

Chandeliers made from laser discs
If a large number of old CDs have accumulated in your apartment, do not rush to throw them away. They make a pretty creative lamp.

To make an unusual accessory from laser discs you will need to prepare a couple of planks round shape. Their size should be slightly larger than the size of the disks. Also needed:
- fluorescent light bulb;
- steel or wooden racks;
- old magnetic starter;
- a lot of CDs.

Take a board that is thicker and make a hole in it for the starter. Connect everything to the lamp. Then start stringing CDs onto it while simultaneously mounting the racks. At the end, attach the second board. The work is completed.

Wooden chandeliers
Wood is the most common material for various kinds crafts. The chandelier is no exception.

To make such a lamp, you need:
- wooden planks 0.4 m wide;
- glass jars 1 liter volume for lampshades;
- sandpaper;
- self-tapping screws

Procedure of manipulations:
- Process the slats sandpaper.
- Make recesses in them on the back side for mounting the wire and three holes for the lampshades.
- Cover the planks with varnish.
- Attach the sockets, screw in the light bulbs.
- The lampshades will be ordinary liter jars, painted white.

Choosing a lamp for a homemade chandelier
To make a chandelier made by you from scrap materials look even more attractive, you need to choose the right light bulbs for it. The following recommendations will help you:
- Choose a lamp of suitable power. Remember that overly powerful products can cause a fire.
- Look at the number of lumens. The larger it is, the more natural the lighting.
- Consider whether the shape of the light bulb matches your device. Some chandelier models require bulbs of a strictly defined shape. Only then will they work efficiently and correctly reflect light rays.
- Be sure to look at the expiration date. If you plan to use the lamp frequently, then take a closer look at the lamps with the longest life expectancy.
- Ask what kind of light the lamp will glow - cold or warm. For your home, it is better to purchase an option with warm shade Sveta. This will make the atmosphere seem more comfortable.
- Don't ignore the energy consumption of a light bulb. Optimal choice products are considered to have low energy consumption.
- Check for mercury in the lamp - this will determine how it is disposed of. Products containing mercury cannot simply be thrown into the trash. They must be handed over to special collection points.

Decorating the product
As decoration homemade chandeliers and lamps you can use a variety of things:
- paints and varnishes;
- lace;
- satin ribbons;
- fringe and braid;
- beads, beads, rhinestones, stones.

Good decorations include artificial or dried flowers, feathers, and butterflies cut from fabric. In general, what to decorate with ready product, depends only on you. You can use any available means that your imagination indicates.

In conclusion, we note that such a homemade lighting device as a chandelier will definitely bring a touch of freshness and style to the decor of the room. Your loved ones and guests will definitely note the originality of the accessory and your skill. In addition, a hand-made lamp is an excellent gift for a friend or colleague.
Original photo ideas for homemade chandeliers


