4.67 / 5 (3 ratings)
Who will refuse extra space on the balcony? This is a space that never gets in the way.
Someone will need it to store seasonal items. Indeed, in an apartment, as a rule, each square meter has its own purpose. Others redevelop and arrange.
And still others acquire a cozy corner where they can relax. All this can be realized if this room is insulated. Otherwise, it will be damp, cold, unattractive.
Many people think that insulating a balcony is an expensive, laborious process that requires the involvement of specialists. In fact, you can do everything yourself if you know how it works. Consider below how to insulate a balcony on your own, without making any mistakes.
Errors when insulating a balcony
As already mentioned, in order to normally insulate the balcony and not reap the consequences of improperly performed work, you need to act according to a clear algorithm. It starts with preparatory work. It is necessary to remove all unnecessary things from the balcony, remove the old frames with glass and take them out, clean the surface for work.
But which of the old structures should be left, and which is better to dismantle? If the railings or partitions remain of normal strength on the balcony, they will be useful for subsequent insulation. Outside, they can be hidden under plastic, and inside they can be sheathed with insulation. This will be an excellent base for making the structure more rigid. But if there are tiles on the walls of the balcony, it should be removed, it will only interfere with the installation.
After the surface is cleaned, it is checked for cracks. All destruction of the floors is preliminarily covered with a classic cement mortar, and the cracks between the concrete slabs are blown out with polyurethane foam.
Strengthening the balcony parapet
The most important thing in the insulation of the balcony is the installation of metal-plastic glazing. But if ordinary windows can be safely inserted into the opening, the situation is different with the balcony. The parapet, on which bulky window frames are placed, is not always ready for such loads, so it is better to strengthen it before replacing the windows. At the same time, in order to ensure a rigid structure and not increase the total weight, it is better to use reinforced mesh and cement, since the brickwork will be both heavy and bulky.
Installation of windows
As soon as the preparatory work is done, they begin to actually install the windows. And here lies a mistake for many owners of balconies. Having estimated that the old wooden frame is in excellent condition and will serve for a long time, it is decided that it is not worth replacing it yet. This is a mistake in the category of saving money. In fact, even if an old wooden window is in excellent condition, it is not capable of providing the same heat retention qualities that a plastic frame has. The new design will last a long time, it will maintain the same temperature at high humidity, temperature drops. And due to the affordable price, almost everyone can afford PVC window structures. Therefore, the insulation should take place exclusively with the replacement of the old glazing.
The choice of material for insulation
The next most important factor affecting the quality of insulation is the choice of insulation. They will have to sheathe the walls, ceiling, floor. Most often, foam or mineral wool is chosen as insulation, depending on the budget. These are the most successful materials in terms of thermal conductivity. Of course, extruded polystyrene foam is the best choice. It is easy to use, easy to cut and glue. In addition, the material has a long service life in high humidity conditions. But for such excellent characteristics you have to pay dearly.
You can save money by choosing regular foam. It has the same characteristics as the above material, but it has a slightly shorter service life.
Sealing cracks
Having chosen a heater and installing double-glazed windows, they move on to the next element of balcony insulation - sealing the cracks. There is no escape from them, since all old balconies have this problem. And it is necessary to eliminate the cracks, because even if you use all the most modern materials, all the heat will go through these holes.
To eliminate cracks, I use special sealants or mastics. They are highly resistant to changes in temperature, humidity, and other atmospheric phenomena. They blow out the sealant with a special gun, then wait for it to dry completely, and only then install the insulation on the walls.
Insulation of balcony walls and parapet
When the material for insulation has been selected and all the preparatory work has been completed, you can proceed with the installation. By this time, there should be the following materials:
- polystyrene or penoplex;
- penofol;
- polyurethane foam;
- dowels with special caps;
- foil tape.
The installation principle is as follows: polystyrene or polystyrene foam is prepared for installation by choosing the desired size and, if necessary, cutting it off. Then foam is applied to the wall and the insulation sheet itself with a thin layer, not forgetting to lubricate the foam joints with it. With the help of a level, the first sheets are installed so that they stand level, and then they are firmly attached to the wall with dowels. In this case, the dowels should be of such length so as not to punch through the wall.
The next stage is the installation of a heat insulator. To do this, take penofol (a material covered on one side with foil that reflects heat and does not allow it to leave the room) and glue the insulation with it with foil tape. In this case, you should not spare the heat insulator - you need to glue not joint to joint, but with an overlap of 3-5 centimeters.
Floor insulation
When the walls are insulated, they move to the floor. It requires the following materials:
- penoplex;
- polyurethane foam;
- wooden slats (with a thickness corresponding to the thickness of the foam, as a rule, 50 mm);
- self-tapping screws.
Wooden slats are laid on the floor along the balcony, the distance between which should correspond to the width of the foam + 1 cm. They are screwed with anchors or self-tapping screws to the floor. In this case, the self-tapping screw should go through every 30-40 cm of the slats. To make the workpiece even, laying must be done using a level. And if some elements of the floor are slightly lower than necessary, you can put a piece of plastic under them.
Then, penoplex is installed in the openings between the rails and all the cracks in the structure are blown out with foam to completely ensure thermal insulation.
As soon as the installation of the insulation is completed, decorative flooring is done. First, chipboard or plywood 2 cm thick is laid on top of it so that the floor can withstand the load. The canvas is screwed to the bars with self-tapping screws every 10-15 centimeters. The canvas on the balcony should be mounted across, and a gap should be left between the sheets, since then they can rub against each other and creak.
When installing chipboard on slats, you must not step on it, as this can deform the canvas, and the floor will be uneven. This is a common mistake when installing a floor. Until the canvas is fully secured, you cannot walk on it.
Do you need a warm floor on the balcony?
Warm floors are a popular solution today. They are installed in offices and living rooms. They are economical and practical. But is it possible to make such heating on the balcony? Yes, this will be the best option. The fact is that the radiator, if installed on the balcony, will only warm up the air, but the floor will remain cold. A warm floor will completely warm the entire room. But only specialists can install it. It is better not to do the installation on your own, since there are a lot of subtleties that can be ignored without work experience.
Is it possible to insulate the balcony in winter?
Some people are faced with the problem of a cold balcony in winter, when it is very difficult to insulate it. But is it real? After all, any construction work is best done in summer, and some materials do not tolerate frost at all during installation. If you use insulation and foam that can withstand low temperatures, you can also carry out insulation in the winter. But it will be more difficult to do, and the installation itself will be more expensive, so it is better to do everything in advance.
But if you had to insulate in winter, what should be the actions? It should be understood that the cement used to seal the cracks quickly freezes in winter, without having time to grab. Therefore, you need to purchase either special additives that allow the solution to maintain plasticity, or use winter glue. Otherwise, the cement slurry will lose its strength and quickly collapse.
Polyurethane foam also depends on temperature fluctuations. Therefore, you need to purchase a special version that can be used for installation during frost. It should be remembered that foam is the same insulation as polystyrene. And if it does not fulfill its functions due to the fact that the owner saved money and bought "summer" foam in winter, you can not even dream of a warm balcony.
Thus, a warm balcony, although it is made in summer, but in extreme cases (if there is no very severe frost), it can be made in winter. But it should be remembered that all the materials used must be frost-resistant (the characteristics must contain the possibility of installation at low temperatures), and it is better to entrust the work itself to professionals so that any violation of the technology does not affect the final result.
Balcony finishing
The last stage of the balcony insulation is decorative. When the walls are insulated, the floors are installed, it remains to decorate all this and bring it into a finished look. This requires the following materials:
- wooden slats;
- laminated panels;
- decorative guides;
- polyurethane foam;
- construction stapler;
- self-tapping screws;
- staples to the stapler.
First, they put wooden slats using self-tapping screws. It is convenient to do this, since the wooden frame is already available. In this case, you need to use a level so that the workpiece looks even. Reiki is placed on the ceiling and walls. Moreover, in the latter case, their thickness should be at least 20 mm. They are screwed to the walls with self-tapping screws, and if the wall is made of concrete, dowels are used. In order for the slats to firmly attach to the wall, it is recommended to first apply mounting foam on them, and the distance between the slats should be no more than 35-40 cm.
If you decide to insulate the wall between the balcony and the room, which is not at all necessary, fix the slats as described above.
As soon as the wooden frame is assembled, they begin to install the decorative elements. To do this, prepare laminated panels and attach them with a construction stapler directly to the slats. So that the ends do not spoil the appearance of the wall, they are hidden behind decorative guides. First, the ceiling is sheathed, then, according to the same principle, the walls.
As soon as the main room is insulated and decorated, it remains to complete the work on the parapet and complete the laying of the floor. First, the parapet is trimmed. To do this, the same 20 mm thick wooden slats are stuffed onto the parapet itself, creating such a frame when there is enough distance between the window sill and the rail to install the decorative panel. Having installed the frame, they stuff the laminated panels with a stapler on the parapet. The joints are hidden under decorative guides, and the slopes are trimmed with the remains of the panels. At the bottom, the panels are hidden not under the guides, but under the skirting board. And on the slopes, they are fixed on polyurethane foam, additionally using the remnants of the guides and a stapler. In order for the slopes to be clearly separated from the rest of the wall, it is recommended to install decorative corners at the corners. They finish the work by covering all the seams and joints with a special sealant.
An alternative type of installation of insulation on the balcony can be viewed in the video material.
In the heading | with tags, |
Despite their small size, the complex modernization of these parts of the residential buildings is challenging. To find out how to do it yourself, step-by-step photos must be supplemented with detailed descriptions of working operations. Information about modern materials will come in handy,. It is necessary to find out how the new premises will be equipped. Finding the right answers to these and other practical questions will be easier after reading this article.
Read in the article
Do-it-yourself balcony insulation: step-by-step instructions for preparatory work
Open balconies in domestic climatic conditions can be fully operated no more than several months a year. They are blown by cold winds, covered with rain and covered with snow. After the implementation of the project, the necessary protection will be created. Even when choosing the most economical option, the insulating characteristics of the property will improve, and the costs for it will decrease. After a deep modernization, you can actually increase the living space at a relatively low cost.

Preventing erroneous actions
Some important details should be noted at the beginning to rule out incorrect decisions:
- Excessive "frugality" can subsequently be transformed into additional costs. If you install cheap frames without, use insufficient quality and finishing materials, the desired result will not be obtained. Subsequent alterations are additional costs.
- Wrong choice of technology also comes with troubles. It is necessary to carefully study the nuances of the techniques in order to make sure that they are realistic to reproduce on their own. Specialists can be invited to perform the most complex workflows.
- Standard cannot be installed on the balcony. Some municipal authorities prohibit discoloration of external surfaces, installation of frames and other visible changes from the outside.
| Image | Name | Advantages | disadvantages |
  | Expanded clay | Low cost; good filling with granules of complex volumes; maintaining integrity over a long service life; incombustibility. | High moisture permeability, which is accompanied by a loss of insulating properties. |
 | Mineral wool | The durability of products of a modern level; high temperature resistance; high quality butt joints. | Low strength; deterioration of the structure and an increase in thermal conductivity when water enters. These materials must be additionally protected from mechanical damage and increased. |
 | Styrofoam | Reasonable prices; ease of processing; smooth outer surface; light weight. | Low strength, flammability. To improve resistance to open flame, special additives are used, but the corresponding materials are more expensive. |
 | Expanded polystyrene boards | High strength of products with a sufficiently high density; ease of installation; moisture resistance; durability. | Relatively expensive factory-made materials from well-known manufacturers. Difficulty filling internal volumes without the formation of empty spaces. |
 | Polystyrene formed at a construction site from several liquid components | It has all the advantages of slabs, but additionally it fills all cavities of any shape. | The total cost is higher because special equipment has to be used. |
 | Foamed polyethylene with a layer of metal foil (penofol) | Small thickness; long-term preservation of good consumer characteristics; moisture resistance. | High price. |
For your information! The insulation system will be effective if you install insulating materials on the outer wall, floor, ceiling.


How to insulate a balcony with your own hands: a step-by-step photo, installation of windows
| Drawing | Description of actions |
We will send the material to you by e-mail
The process of warming the room itself is very important, since with the help of such a repair, drafts, cold are removed, and the space of the connected room also expands. But it is not enough just to install double-glazed windows and cover up cracks and holes with polyurethane foam. It is necessary to insulate it. To save money in your wallet, it is better to insulate the loggia with your own hands, the step-by-step photo instructions presented in the article will help you do the job.
Amazing balcony with ecological materials
Initially, you need to select a building material. It is important to remember that not only thermal performance can depend on the selected components, but also. If the building material is too thick, it will steal the usable area.
Note! Any material to retain heat must be environmentally friendly, as well as meet the thermal and steam characteristics.
The room can be insulated with the following materials:
- Penofol ... An excellent substitute for mineral wool. It has a multi-layer coating that also has a reflective effect.
- Polyurethane foam ... Suitable for balconies as well as possible. Very poorly flammable, made from environmentally friendly materials. Installation is done by pouring.


- Expanded polystyrene ... A fairly economical choice of material and also very effective for a balcony.

- Isover ... Available in sheet form. Made of mineral wool, with fiberglass particles.

As a rule, expanded polystyrene is mounted on the walls and ceiling. It is good to use it, because its properties have a high coefficient of thermal conductivity, as well as a small thickness. It can be cut perfectly with a kitchen knife. Styrofoam can be considered an alternative option. For cold winter, sheets 10 cm thick are suitable, for mild weather it is better to use 5 cm.
Related article:
Preparatory work and do-it-yourself loggia insulation: step-by-step photo instructions
Before the main process, preparatory work should be done. Only then will it be possible to do the insulation of the loggia with your own hands, and a step-by-step photo instruction will help with this. This will require:
- Select those places that will be accurately processed. In any case, you should definitely process the parapet. Walls can be treated as needed. If there are no neighbors on the sides, then they also need to be covered with building materials. Often all walls are insulated.
- Before repairing, you need to take everything out and clean the surfaces.
- It is recommended to change windows and install double-glazed windows, if there are none.
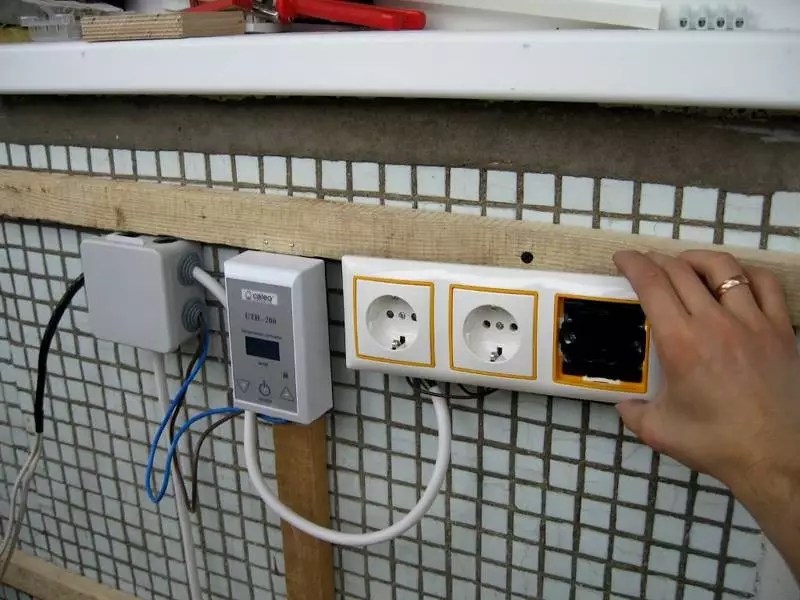
- Next, you need to lay the wiring for sockets, lamps and switches.
- The next step is to select a material.
- After selecting the material, you can proceed to work with the floor, walls, then the ceiling.
- Upon completion, finishing work should be carried out.
Fastening for thermal insulation can be both an adhesive composition and a dowel. If an adhesive is used, then in the process of work it will be necessary to glue the gluing area and the material itself.
Helpful advice! The formed seams, which are obtained directly in the process of insulation, should be filled with polyurethane foam.

Penoplex and how to insulate a loggia with it
Many people dream of converting a balcony into a full-fledged room. But in order for the use of such a room to be comfortable, it will need to be insulated. As a rule, parapets in apartments have thin walls. In this regard, at the initial stage, it will be necessary to demolish and lay it out on a new one. Thus, the wall will be thicker, and therefore warmer. It is recommended to use a brick that is placed on the adhesive with an edge. For such masonry, silicate brick is ideal.

After the fresh masonry has shrunk, you can proceed with the installation of windows. For this, it is recommended to use the services of professionals. Next, you can move on to insulation. will be installed on ceilings, walls and floors. Following the instructions, you can get to work:

- The prepared pieces should be placed in the frame. It is also possible not to create a frame, but to mount the slabs directly on the walls using special mounting fungi.

Helpful advice! Plates should be adjusted so that they fit tightly one to one. This will get rid of the cracks, which means that it will be much warmer on the loggia. It is recommended to walk at the joints with polyurethane foam or sealant.
- Reflective insulation should be placed on walls, ceilings and floors. Penofol is ideal. It is recommended to glue the joints with foil tape.

- After that, the balcony will be ready for final finishing. To do this, you can use a lining made of wood or plastic, or install other panels.
Do it yourself. How to insulate the floor on the loggia?
The floor should be treated first, and then all other surfaces. The work process is as follows:
- It is necessary to properly clean the floor from debris and dust.
- Next, you need to seal up all holes or crevices with foam.
- Now you should use a thin one and put it on the entire floor. Lay it in such a way that there are no joints or there is a minimum number of them.
- When the first layer is laid, you need to walk around its perimeter with construction foam, including joints and seams. Then the second layer is laid by analogy.

- Now you can mount the frame from a wooden bar. The distance between the bars should be about 50 cm.
- The formed distance should be filled with polystyrene. The thickness of the insulation will depend on the thickness of the timber. Ideally when they are flush.
- Next, you need to cut off the penofol to the size of the balcony and lay it with the foil side up, but so that it looks about 20 cm at each wall.
- Now you can fix the floorboards to the beams and mount the decorative covering.

Alternatively, the floor can be installed underfloor heating or loggias can be made with penoplex.

Insulation of the ceiling and walls of the loggia
For almost all types of premises, walls and ceilings are insulated in the same way. Thus, the walls are insulated like this:
For, Styrofoam is best suited. The process is carried out by analogy with the walls and floor.


Insulation of the loggia from the inside: what is better to do?
To find the right material, there are some important factors to consider:
- Purpose of the premises.
- If the balcony will be used as a storage room, then you can use any building material, mounting it in 1 layer.
- When the balcony turns into one room, it is necessary to use different building materials, which are stacked in 2 layers, over the entire area.
- If it is combined with the room, then you need to use a two-layer insulation. The walls can be made in one layer, and special attention should be paid to the parapet.
- Using heaters for interior decoration, the usable area will be less, so this factor should be taken into account.
The choice directly depends on the factors described and the tastes of the owner of the room.
Finishing work
Finishing work is needed. This is due not only to the aesthetic appearance, but also affects the protective factors. If we are talking about outdoor decoration, then the parapet can be covered with corrugated board or siding.

Internal work can be anything you like. It all depends on preferences and imagination. But it is worth noting that finishing the loggia inside with your own hands will bring more pleasure and joy. Often the work is done with PVC panels. You can also wallpaper or just paint the walls. The loggia looks very good in wood trim. It will be not only beautiful, but also environmentally friendly.

Article
Warming a balcony or loggia is a rather laborious, not fast process. Usually it is performed by professionals who specialize in this type of work. But if you know how to insulate balconies from the inside with your own hands, you have the necessary tools available and are not afraid of work, then this is a completely feasible task.
Moreover, the area of the balcony is usually small and with a competent formulation of the case and adherence to the technology of work, and especially, using plates of insulation material "penotex", this process will not last long.
Preparing the balcony for insulation
Usually balconies and loggias are insulated from the inside with their own hands. External insulation of the balcony parapet is rarely used, since it is not only dangerous in terms of work, especially if you live on the upper floors of a high-rise building, but may require special permission from local authorities that oversee the appearance of building facades.
No permits are required for insulation from the inside.
Answering the question how to properly insulate a balcony from the inside? A number of conditions must be met and the order of work must not be violated. First of all, the balcony is freed from the things and plants on it, building materials and other things that can interfere with work. After that, cracks, cracks, holes in the places where the parapet dock with the wall, and in general wherever you notice flaws, are carefully sealed with polyurethane foam or cement mortar.

This must be done because otherwise, in an unfavorable cold wind, even a very good insulation can freeze through, it will be even worse if rain water or snow gets into the cracks. For most types of modern heaters, water is not terrible, mold does not develop on them, and they practically do not absorb moisture. But on brick or panel walls, moisture accumulated between the wall and the expanded polystyrene plate can serve as a place for the development of mold. Then an unpleasant smell of dampness may appear on your insulated balcony or loggia.
Innovative insulation from TechnoNICOL
LOGICPIR Balcony
suitable for walls, ceiling, floor.

- saves space - plate thickness from 20 mm.
- keeps heat due to the unique thermal conductivity of 0.022 W / m ° K (compare with glass wool 0.032-0.041 W / m ° K);
- protected from moisture, rot, mold and fire (flammability group G1 according to GOST 30244-94);
- will last for many years (the insulation retains its properties for 50 years).
Additional advantages of LOGICPIR Bath: easy installation all year round!
After this stage, you can start actually doing the insulation with your own hands.
Ceiling insulation
It would be technologically more correct and better to start work with do-it-yourself insulation of the ceiling of a balcony or loggia, then go to the walls and complete the work with floor insulation. Depending on the type of insulation you have chosen and its thickness, the ceiling may become lower by up to 10 cm.If you already have plastic windows installed on the balcony, you will either have to sacrifice the upper part of the windows, since the PVC profile rarely exceeds 50 mm in width, or use a thin insulation material , which will not achieve the effect you expected. Therefore, if the windows are not installed, first insulate the balcony ceiling and only then call the measurer.

Currently, there is no question of how to insulate the balcony inside. The choice of different types of insulation is great. Depending on the selected insulation (mineral wool, polystyrene, expanded polystyrene "Penoplex", penofol), it can be installed either on a pre-assembled wooden lathing or directly on a balcony slab. It is possible to insulate with mineral wool mats only using a wooden crate, otherwise it will not be possible to fix it on the ceiling.

Selected sized wooden blocks equal in cross-section to the thickness of the insulation you have chosen can be attached to the ceiling using plastic dowels and long self-tapping screws. The distance between the bars must either exactly match the width of the insulation plate, or be 30-40 mm. already, if mineral wool mats are used so that they enter the space between the bars with effort and do not fall out on your head during further work. It is better to lace them, passing a nylon rope between the bars with small nails stuffed in them.

If you carry out insulation with your own hands with expanded polystyrene or polystyrene, and in the future you do not expect to trim the ceiling with wooden "clapboard" or plastic panels (as an option for finishing material for the ceiling - plasterboard), then there is no need to arrange a crate. Plates of expanded polystyrene "penotex" are glued directly to the balcony slab, cleaned of paint layers, with any waterproof adhesive mastic used in construction and finishing works. It is better to use adhesives such as waterproof mastic or glue "liquid nails", because in the cold season, if the balcony located above is not insulated, the dew point will shift behind the insulation, and condensation will form there. Plates of expanded polystyrene do not require additional sealing of the joints, since they have grooves at the ends that prevent the formation of "cold bridges". But the joints between the foam plates can be sealed with polyurethane foam and glued with foil tape.

An additional layer of insulation material, which significantly reduce heat loss, is best done from a thin foil insulation penofol or izolon. In this case, the material is glued to the mounted plates of a thicker insulation, with the metallized side inside the balcony. All places where penofol sheets are joined are glued with foil tape. At this stage, the insulation can be completed, but you can lay a heating film, which is perfect for these purposes and works from a 220V electrical network.

Further do-it-yourself finishing depends on the availability of the material and its type, if these are plastic panels or "lining", they are mounted, either directly on the insulation plates, or on wooden blocks passed over it. It is better not to use a galvanized metal profile used for drywall structures, as it will freeze and moisture will condense around it.

If you did not use penofol as an additional insulation material, then you can plaster the surface of the foam or expanded polystyrene with your own hands, after gluing a reinforcing fiberglass mesh, and then paint it.

After completing the insulation and finishing of the balcony ceiling, proceed with the walls insulation. Only the parapet and the side walls of the loggia are subject to insulation. The room wall does not need to be insulated.
The whole process of wall insulation with your own hands is completely identical to the process of ceiling insulation, with the only difference that you can use a thicker insulation material, especially if the parapet is made of metal structures or has a thin wall of lightweight concrete.
A heat-heating film can also be laid over a layer of insulation laid on the parapet wall, but this is not at all necessary.
Floor insulation
This is perhaps the most time-consuming stage of work, because depending on the floor covering you choose, from which you will arrange a "clean" floor, there are two options for working: with a lathing device - if the floor is planned to be covered with such building material as boards, mineral wool is used or polystyrene, or without it - in the event that "penotex" expanded polystyrene is used.

Penotex boards have different densities. For work on insulating the floor of a balcony or loggia with your own hands, brand 45 will be most suitable.
It freely withstands the weight of an adult without bending, and on it you can directly arrange a concrete screed or lay any type of coating (laminate, linoleum, ceramic tiles).

After laying and gluing the foam polystyrene slabs "penotex" to the slab, just like on the ceiling, it is better to fix it at the corners of the slab with dowels - "fungi". A layer of foam foam is laid on top with the foil on top and then the cable of the "warm floor" system with elements of wiring and automation. The cable must cover at least 70% of the balcony floor area and be 50 mm away from the walls. After laying the cable, the floor is filled with either cement mortar or special leveling mixtures "self-leveling floor". You can also use a topcoat based on epoxy resins, which can be of the most varied colors and, after polymerization, can be used as a "clean floor" without any additional treatment. Before pouring the screed, a 20 mm thick damper tape must be installed around the perimeter of the balcony to prevent thermal deformation of the screed.

No one can guarantee that when the temperature drops sharply, the coolant (water) in them will not freeze and they will not burst. But you can become the culprit of a serious accident and you can leave the whole entrance without heat.
Conclusion
Insulation of the balcony from the inside, although laborious, but the effect that is achieved by insulation can fully justify all your efforts. Such a balcony becomes not only a resting place in the warm season, but also an excellent room for growing indoor and garden flowers, seedlings of garden plants.
The creation of a favorable microclimate on the loggia involves not only wall insulation, the entire space must be hermetically sealed. Floor and ceiling surfaces are also sheathed with a material with a low degree of thermal conductivity. In our article, you will learn how to properly insulate a balcony from the inside.
- self-insulation (personal experience)
- ... Most useful from youtube
- On the example of Moscow
Heat insulator selection
The advantages and disadvantages are inherent in each type of thermal insulation. In order to choose the most suitable insulation, you should compare the main characteristics of heat insulators.
The most common options for heat insulators:
- Extruded polystyrene foam (penoplex);
- Foamed polyethylene (penofol);
- Polyurethane foam (PPU);
- Styrofoam;
- Mineral wool.
Mineral wool
The thickness of the sheets varies from 2 to 20 cm. Mineral wool is divided into three types, depending on the components of the raw material:
- Stone;
- Slag;
- Glass.
An example of a mineral wool device on a loggia. The material fits into the prepared structure. The frame for installation can be made of metal profiles or wooden blocks.
Manufacturers produce cotton wool in the form of mats and soft rolls. In some cases, one side is covered with foil. Aluminum foil improves the level of thermal insulation.
When laying mineral wool, the foil side should be directed towards the interior of the room. This principle allows heat to bounce off the aluminum cover and return to the room.
This method is quite common, despite the existence of cheaper heat insulators. The insulation is resistant to fire, does not contribute to its spread. When mineral wool is heated, no harmful substances are released into the air.
The main disadvantage is that moisture is destructive, a vapor barrier is needed.
Pay attention to the integrity of the mineral wool packaging before purchasing. Moisture adversely affects the properties of the heat insulator. For high-quality insulation, it is necessary that the space of the loggia be dry.
Heaters based on polymers
Penoplex, polyurethane foam, polystyrene, foamed polyethylene are polymers treated with foamed compositions.
Advantages:
- The presence of gas bubbles provides not only a good level of thermal insulation, but also a low weight of the slabs;
- High degree of moisture resistance;
- The materials are durable;
- Antifungal resistance;
- Simplicity and convenience when laying plates or sheets, as well as rolls (foamed polyethylene);
- An economical repair option, subject to the choice of foam as insulation.
The main disadvantage: support the spread of flame during a fire, emit harmful substances during combustion.
When choosing foam and other polymer-based materials, it is necessary to correctly select the thickness of the plates and determine the density
If you plan to use the space in winter, then choose a thickness of 50 mm. The density is determined by the further coating - for the putty, a value of 25 kg / cu. m.
1. Foam sheets

Insulator plates (expanded polystyrene) during installation.

Polyfoam refers to the budgetary methods of insulating the loggia, however, it is considered a rather fragile material, therefore, a crate is required for installation. A worthy replacement is extruded polystyrene foam; for its installation, the creation of a special frame is not required.
2. Penoplex

Plates of extruded polystyrene foam (thickness 50 mm) are used as insulation. Seams between the elements are sealed with polyurethane foam. Penoplex is attached using special disc dowels ("fungi").

3. Penofol
The material is used as a separate heat insulator, and with the help of penofol, it is possible to provide vapor barrier to polystyrene foam. Due to the foil side, warm air is reflected and trapped in the room.
In order to accelerate the insulation of the structure, you can use an alternative method of thermal insulation - spraying polyurethane foam (PPU).
4. Polyurethane foam
PPU is one of the most modern heat insulators. The cost of application services is considered high in comparison with other analogs, but many managed to evaluate the operational properties of PU foam. This insulation is characterized by high thermal insulation rates due to its fine-pored structure.
Spraying polyurethane foam is carried out by specialists, one day is enough for installation work, and it does not take much time for complete drying.
The main stages of work on warming the space of the loggia
In order to increase the usable area in your house and operate the premises all year round, you must:
1. Close up the gaps if available. Study the room carefully to eliminate any flaws in the structure. As a rule, the slots are filled with polyurethane foam, even if they are of considerable size.
After complete drying, it is necessary to trim off the excess.
2. Glazing with reliable double-glazed windows.
3. Organize a waterproofing layer. To protect against moisture, waterproofing with penetrating properties is used - "Penetron", "Aquaton", etc. The composition is applied with a roller, brush, or sprayed. Such impregnation penetrates into the thickness, therefore, the walls become resistant to unfavorable weather to the maximum, and the strength characteristics improve.
The device of the waterproofing layer allows you to eliminate the smallest surface cracks, which may not be visible visually.
4. Heat insulating layer. To organize a warm structure, we use the selected material (polyurethane foam, polystyrene foam, expanded polyethylene, polystyrene, etc.).
5. Installation of a vapor barrier layer. In order to make a vapor barrier, you should use special polymer membranes ("breathing"), as well as films "Rockwool", "Izospan", penofol.
When using penofol, lay the insulation in such a way that the side covered with foil is directed towards the interior of the room. If this condition is met, the heat will be constantly reflected from the foil, lingering inside the space.
6. Final finishing of walls, floor and ceiling surfaces.
A detailed description of each stage can be found in the article: .
Balcony decoration
The goals of creating interior decoration:
- External masking of the heat insulator;
- Organization of a favorable indoor environment in the room.
To create the interior of the balcony, you can choose from various finishes. For the finishing layer, plaster, plastic panels, MDF, lining, plywood, GKL sheets and even a block house are perfect.
Lining panels are environmentally friendly and reliable. One of the main advantages of the finishing material is rigidity. The lining is fixed on a wooden lathing frame.

The walls of the loggia are sheathed with clapboard, the flooring is laminate.

Facing the balcony with a block house.

The plastic panels have grooves for connecting elements. The plastic version of the lining has less rigidity and strength than wood.

Installation of sheets of gypsum plasterboard on metal profiles. Plasterboard boards can be wallpaper, paint, or decorative plaster.

Wall decoration with wallpaper over sheets of gypsum plasterboard.

Bamboo wallpaper. The base for finishing is plasterboard.

Video
1. The result of the loggia insulation.
Glazed balcony. Demonstration of electrical leads. Testing the strength of extruded polystyrene foam. The use of foam with a thickness of 30 and 50 mm, finishing the walls with putty. Concrete floor screed on top of insulation slabs.
2. Stages of repair work on the balcony.
Consistent process of furnishing the premises. Scheme of wall insulation with polystyrene and foamed polyethylene, finishing - plastic panels. Floor: leveling, thermal insulation, sheathing with OSB boards, installation of laminate lamellas.
.