If you are planning to build a timber or log house, ask how the workers will connect the crowns to each other. If with nails or even with rebar, consider whether you need to invite this team.
When the neighbors in their summer cottage decided to build a house from a bar, they found a company that was ready to make their wish come true. There, they made an estimate for them, but explained that this total cost of work is valid if the box at home is assembled on nails. And if the customer wants the crowns of the house to be assembled on wooden pins, then you need to pay more than 50,000 rubles. For advice on what to do, they came to me.
Let's estimate the price
Even if the builder, ignoring common sense, decides to build a timber or log house on nails, it will cost him more! I'll explain in more detail.
In the process of building a wooden house, boards 25 mm thick are widely used - the so-called inch. It is used for the manufacture of formwork, subfloor, lathing and other purposes. From the boards inevitably remain short trimmings, suitable only for firewood. Of these, it is possible to prepare pins, as they say, for nothing.
When I was building a log house, I cut blanks 120 mm long from the accumulated scraps of an inch board on a miter saw. Then he dissolved them on a band saw lengthwise into bars of square section 25 * 25 mm. Then with a hatchet he sharpened these bars on both sides. In a few hours, I prepared more than 600 pins - for the whole house! The purchase of the same number of nails 6x 200 mm will require more than 6,000 rubles.
Log house assembly
Collecting crowns on such dowels is a pleasure! First, two adjacent beams are placed in a given position and the place of each dowel is marked. The upper bar is turned over and, using a square and a simple template, the markings are transferred to the central axis of the upper and lower bars. It remains to drill holes in both bars and hammer the dowels into the lower crown. Then the interventional insulation is laid and the upper timber is installed with holes on the pointed dowels. For upsetting, you can walk along the beam and knock with a sledgehammer.
I use a cheap spade drill with a depth mark. Of course, the total depth of the holes in both bars must be greater than the length of the pin, otherwise, during shrinkage, the bars will hang on the pins with the formation of cracks. Short pins do not interfere with the normal shrinkage of the beam box: they work on a cut, fixing the position of the beams.
Hammering a square dowel into a round hole is a little unusual, but practical! If the wall is deaf, then I place the dowels every 1.0-1.5 m in a checkerboard pattern. For a wall, regardless of its width, at least two dowels are needed.
Once I saw a picture of how workers were assembling a house from a bar on long wooden dowels, similar to rake handles. They lifted another heavy damp beam and drilled into the wall with a long drill - not cheap, I must say. Subsequently, the house hung on these sticks during shrinkage, huge gaps formed between the crowns. Even when assembling furniture, it is impossible to drill strictly vertically shallow holes for dowels and self-tapping screws, just holding a drill in your hand. In the case of a house, deviations from the vertical are inevitable and very large!
Now about nails
As with the assembly on long wooden dowels, the house can hang on the nails during shrinkage (Fig. 1). It is difficult to hammer long nails into a beam without drilling. This means that labor intensity will increase and the estimate will increase, since nails of this size are not cheap. On the market, one nail 6x 200 mm costs on average more than 10 rubles apiece (I have already said about the manufacture of short dowels).
But you don't have to give up nails completely. For example, the uppermost crown connected to the veranda, or spacer inserts between the rafter beams, can be easily fixed with nails.
Often there is a layout when a large span cannot be covered with wooden beams without an intermediate support. A wall or column usually acts as such a support. But when you need to do without them, use a reinforced beam (Fig. 2). It is assembled from two bars fastened with nails. Moreover, if you hammer nails at an angle, then the strength of the connection will be even higher. I usually do this - I put a support under the not yet connected beams of the composite beam so that there is no sagging. Then I fasten the bars with nails, after which I remove the support.
In conclusion, I will say: each material has its place! Applying dowels and nails in those places where it is needed, we will get a warm and durable house at no extra cost!
How to connect the crowns of the log house: methods in the photo
- Drilling the crown under the dowels.
- Installation of dowels in the crown
- To drive a large nail into a dry board or timber, it is advisable to drill a hole using a long bit.
- Nagels, sawn from scraps of the board.
- Rice. 1. Assembly of the wall: a - on nails; 6 - on pins. When assembling on nails, normal shrinkage of the log house is impossible, gaps will form between the crowns. The length of the dowel must be less than the total depth of the holes in the upper and lower bars of the crowns.
- Fixing the top crown with a nail.
- Rice. 2. The run, knocked down with nails from two beams, serves as an intermediate support for floor beams.
- Spacers from a bar between the rafter beams can be fastened with nails.
- If the span to be covered is large, then a composite beam assembled from two beams fastened with long nails is used as a run.
 GD900 Thermal conductive grease paste silicone patch heat sink connection 5…
307.83 rub.
Free shipping★★ ★★ ★★ ★★ ★★ (4.90) | Orders (361)
He is faced with the question of how to fasten wood elements. The first thought that occurs to him is to use nails for this. But at the same time, many people worry that they will rust under the influence of dampness. This can lead to damage and destruction of wood at the joints of the beams. But still, nails can be used to connect the wooden elements of the baths. Moreover, experts offer two options for fastening the beams - with the help of dowels or nails.
The use of dowels in the construction of a bath
Nagels are fasteners made of wood. They have a rather large thickness, their diameter is usually at least 3 cm. In order to install the dowel, you need to cut a hole in the beam into which it will fit. In this case, the fastener itself should be slightly less in thickness than the diameter of the hole prepared for it. But at the same time, the dowel should not be too thin for its groove. He must enter into it tightly. Otherwise, the necessary strength of the connection of the wooden elements of the bath will not be ensured.
To create an even hole for the dowel in the bars, you will need a powerful drill and a long drill bit. The groove for the dowel must be done very carefully so that later it is not necessary to close the free distance between it and the fastener. You also need to pay attention to the choice of material for the dowel. It must be made of durable wood that can withstand significant loads. How strong the fastener will be depends on how strong and safe the connection of the bars will be.
Use of nails
If the future owner of the bathhouse still wants to fasten the timber with nails, he needs to know a few important points:
- only long nails are suitable for connecting the beams - at least 25 cm. Smaller fasteners will not provide the required fastening reliability;
- nails are not hammered directly into the beam; holes are prepared for them in advance. However, they should be longer than the nail itself. As in the case of dowels, the nails should fit tightly into the holes created for them;
- holes are created vertically in the beam, and the nails in them must be recessed at least 3 cm deep from the top edge of the beam. This is necessary so that during the shrinkage of the wood material, the fastener does not abut against the beam located in the next row. If this happens, then under the influence of the force of the metal, the wood in the place where the nail is located may begin to crack. The result is the formation of cracks into which air will blow in, precipitation will begin to fall. In addition, as a result of moisture entering the beam, metal fasteners will begin to rust. And rust will destroy the wooden walls of the bath.
Which is better: dowels or nails
To use pins, you need to order their manufacture from durable wood. Fasteners made of inexpensive pine or birch will not work. In addition, it must be resistant to moisture. If the pins collapse under the influence of dampness, this will negatively affect the strength of the building.
Nails are the best option for fastening timber. It is only necessary to choose fasteners with anti-corrosion protection, which will not allow them to deteriorate under the influence of dampness. If you manage to correctly install the nails into the timber, then there will be no risk of rusting at all, since they will be located inside the wood, and they will not have contact with air and moisture. Another advantage of using nails is their low cost. In addition, their service life is longer than that of wooden dowels.
One of the main stages in the construction of a cobbled building is the assembly of a log house. Before you start construction, you need to know how to properly mount the timber.
Otherwise, the quality of work is out of the question.
In the corners of the log house, it is necessary to make cuts.
The need to connect wall elements appears in the following two cases.
- When cutting the corners of a building.
- If you need to build up timber when its length is not enough.
The methods of fastening the timber are varied. They are selected based on the specific situation.

The photo shows the types of corner cuts.
The methods of attaching the beam to each other during the construction of log cabins differ significantly from the joining of log analogues. In our technological age, the old methods of joining lumber are gradually being modified.
At the moment, two types of fasteners are used in wooden housing construction.
- Fixing corners with the remainder. Its most common varieties are: “in the oblo” and “in the bowl”.
- Fasteners without residue. Its most popular subtypes are “to the tooth” and “to the paw”.

Bowl connection.
“In a cup” the beam is connected, thanks to the locking grooves.
There are several varieties of them: one-, two- and four-sided.
- With the first type of lock, a perpendicular groove is made in each of the bars using a notch. It is cut through from one side, usually from the top. This file must fit in its width to the perpendicular section of the timber.
For the most part, house-building companies use this particular fastening technology for profiled timber.
This is due to the fact that the manufacture of such grooves requires minimal time and effort.
- The methodology for creating the next variety of slot locks includes sawing timber from two sides, in other words, from below and from above. The level of the depth of perpendicular cuts is about a quarter of the height of the bars.
The connection is of very good quality. However, it requires high qualifications from carpenters, otherwise they may allow chips or cracks when cutting grooves and laying beams.

This type of connection is the simplest and fastest. The bars are joined together. Then they are fixed with studded metal plates fixed with staples or nails.
At the same time, the strength and density of the resulting corners mainly depend on the skill level of the carpenters. It is necessary to carefully adjust the ends of the combined bars, since their absolutely flat surface is necessary. However, even highly experienced masters do not always cope with this task. The corners are not tight, in addition, they experience regular perpendicular loads.
Although this type of corner connection is the fastest, its quality is minimal.
Heat loss through such corners is very large.
Therefore, it is best not to use butt jointing of beams in the construction of residential buildings, but to use other, more complex types of joints.

Dowel fastening.
- Such a fastening of the timber between themselves is done with dowels, that is, wedges made of hardwood, so that the corners are strong.
- Installation of inserts in the grooves of the timber makes it possible to stop its shifts at the joints of the log house.
- Please note that the strength of the corners depends on the type of wedges. They can be longitudinal, transverse or oblique. The latter variety is difficult to manufacture, however, when using it, the most durable corners with low thermal conductivity are obtained.
Fixing the bars "in the root spike" is not without reason also called the "warm corner". This type of connection effectively saves heat in the house.
Therefore, it is very popular in the construction of cobbled buildings.
- The basis of the technology is as follows: in one of the combined beams, a groove is sawn with one's own hands, on the other, a spike is cut out, having dimensions corresponding to the groove.
- During the construction of the log house, a heater for the beam is laid in the groove recesses. In its quality, you can use linen, jute or felt from the same raw material.
- It is very important that the elements of the locking joint fit tightly with each other. Thus, heat loss will be minimal.
- To increase the strength of the log structure, alternate spikes and grooves in the corner rows, and fasten them with additional round dowels for wooden beams.
- Using dowels, undercuts, fat tails and other groove / spike fasteners in the joints, be sure to leave vertical gaps between the elements of the lock. They are needed to compensate for the shrinkage of the walls.

Fastening in half a tree.
Another simple type of cutting corners is “half a tree”. This name has been fixed among professionals, due to the fact that cuts are created at half the thickness of the timber. The assembly of a blockhouse with this method begins with drilling holes for dowels or dowels at points near the corner joints.
Before attaching the timber to each other, calculate the length of the dowels so that it is enough for several rows. There is also a more modern version of this connection. With it, dowels are added to corner joints to increase their strength and heat capacity.

Dovetail notch.
The most reliable, durable and with minimal heat loss method is the T-shaped dovetail cutting of corners. It looks like a “radical spike”, only the protrusion is not rectangular, but trapezoidal in shape. The grooves are given the same shape. It should be noted that the price of such a cut is quite high.
At the moment, such subspecies of T-shaped beam joints are known:
- lock grooves on plug-in spikes;
- symmetrical spikes in the form of a trapezoid, called the "frying pan";
- rectangular spikes, called "semi-words";
- asymmetrical trapezoidal spikes - "deaf frying pan";
- a straight groove on the root tenon, in addition to the log house, with its help, the imitation of the beam is also fastened.
There is another subtype of this mount: “in the paw”. With it, horizontally located recesses and grooves in the form of trapezoids are cut in the bars. They should fit perfectly with each other. Since such sawing is quite difficult to carry out, this kind of cutting is rarely used.

Ways of longitudinal connections.
When erecting large buildings, the length of which exceeds the standard size of a beam of 6 meters, it becomes necessary to fasten two beams along.
In this case, the instruction allows the use of one of the following types of connections.
- Oblique castle.
- "The spike on the dowels / dowels is longitudinal."
- "In half a tree."
- "The root spike is longitudinal."
This raises the question of whether it is possible to fasten the beam with reinforcement or other metal clamps. It is possible, although this is practiced less frequently than the use of wood fasteners.
The fastening of the bars with the help of spikes on the dowels is quite strong. For such a connection, cuts are made for the same grooves at the ends of the two beams. Then they are laid tightly against each other, then a wedge-shaped insert made of hardwood is driven into the groove.
Dowels can also be made of steel. Their shape is different - there are trapezoidal, prismatic, rectangular, serrated and even inserts.

Longitudinal connection root spike.
Longitudinal build-up of lumber "in half a tree" is similar to a similar fastening of corners. The ends of the elements to be joined are cut to a width that is half their thickness. The strength of the fasteners is increased by using dowels.
They can be replaced with staples, large nails or mounting plates. This type of connection is fast and simple. However, its strength is not enough for the load-bearing (external) walls of a large cobbled building.
When connected into longitudinal root spikes, a groove is cut on one of the ends of the beams, and a ledge on the other side. To increase the strength of the fastening, it can be made trapezoidal. So you exclude horizontal movements of the beams in the log house.
Increasing the length of lumber with a "slanting lock" is the most difficult method. However, it gives the mount the highest strength and reliability of all the described methods.
The angular and longitudinal connection of timber, as well as fastening - imitation of timber, is a very important component of building a house. They need to be taken very seriously. The strength of the building under construction and the quality of its cladding depend on this.
In the presented video in this article you will find additional information on this topic.
The technology of assembling a log house from a bar for a house or a bath
Organization of the workplace for the assembly of walls
In order for the work to be argued, the bars are laid out in a stack at a distance of 5-6 meters from the building on one or better - on its two sides. Each layer of beams in a stack is laid on pads of boards.
A workplace for marking and cutting beams is equipped next to the stack. A variant of the arrangement of such a workplace is shown in the figure.
It is convenient to mark the beam using a template at a height of 0.9 - 1.1 meters in the marking area, node A in the figure. After marking, the timber is lowered onto low linings in the cutting area. In this position, it is convenient and safe to saw the timber with a chain saw.
The cut beam is lifted onto the wall. To facilitate lifting, slopes are arranged - inclined bars, which rest with their upper end on the upper crown of the log house. The beam is moved along the slopes with a rope.
Wedge-shaped stops are nailed to the slopes, which make lifting the timber safer. In addition to safety, the stops allow you to manage with small forces. Even one person can, if necessary, lift the beam, fixing it with stops at intermediate points.
It is most convenient to carry out work on assembling a log house from a bar by a team of four people. You can work together, just work will go slower.
For the installation of the upper rims of the log house and the roof, scaffolding is constructed.
 Three-tier scaffolding on the pediment of the house. 1
— Rack extreme; 2
- l-shaped rack of the scaffolding of the first tier on the side facade; 3
- flooring; 4
— Rack central; 5
- cruciform braces (shown conditionally); 6
- bosses
Three-tier scaffolding on the pediment of the house. 1
— Rack extreme; 2
- l-shaped rack of the scaffolding of the first tier on the side facade; 3
- flooring; 4
— Rack central; 5
- cruciform braces (shown conditionally); 6
- bosses The assembly of the upper crowns of the log house is carried out from the level of the first tier. The flooring of the first tier is laid on g - shaped racks, pos. 2 in the figure. Racks are installed around the walls of the house and attached to the walls with the help of bosses, pos.6.
At the stage of erection of the roof (attic), on the facades, where the device of gables is necessary, it is necessary to make scaffolding in three tiers. For the construction of scaffolding racks, boards 50 x 150 are used mm. Flooring is made from the same boards.
It is more convenient, faster and safer to work from scaffolding than from ladders - do not forget about it.
Marking bars for wall assembly
Practical construction experience shows that it is not realistic to keep in mind the sequence of marking the elements of corner joints.
Before starting work, they draw a scheme for assembling the walls of the house, on which they indicate: the serial number of the crown, the type of connecting element at the ends of the blanks, the position of the openings in the wall.
An example of a house wall assembly scheme is shown in the figure:
 Scheme for marking the corner joints of the beam and the joints of the details of the longitudinal walls, for a house with overall dimensions of 6x9 meters. BUT and With- longitudinal walls; D and B- transverse walls; E- an inner wall made of timber - a partition; 1
- joints of beams.
Scheme for marking the corner joints of the beam and the joints of the details of the longitudinal walls, for a house with overall dimensions of 6x9 meters. BUT and With- longitudinal walls; D and B- transverse walls; E- an inner wall made of timber - a partition; 1
- joints of beams. At the house, which is shown in the diagram, each crown consists of 7 pieces of bars from 3 to 6 in length. m.
The crown of the longitudinal wall consists of two parts: the main timber of a standard length of 6 meters and an extension, 3 meters long. On one crown, long bars are laid on the left, and extensions on the right. On the next crown, laying begins in the same order, but on the right.
The details of the crown of the transverse wall and the partition are made from one bar of a standard length of 6 meters.
To exclude cold bridges in the outer walls, the joints of the beams of the longitudinal wall, item 1, are performed by making vertical cuts “to the floor of the tree” with an overlap of 15 - 20 cm. The beam in the corners of the crowns is connected into a dressing with a root spike (for more details, see below).
How to correctly and quickly mark spikes, grooves and other profiles, ensure identical dimensions of timber blanks?
The easiest way to do this is with templates. The template is applied to the beam and the contour of the template profiles is transferred to the surface of the beam with a marker.
It is more convenient, faster to mark and there will be fewer errors if the template completely repeats the contour of the part, has the same length as the part to be marked. I put a template on the beam and immediately transferred all the dimensions and profiles to the workpiece.
For our example, it will be necessary to make seven templates, according to the number of parts in the crown. One template marks two mirrored parts of the walls.
If you think about it, the number of templates can be reduced. Consider how to make universal templates for marking the details of the longitudinal walls of the house (see the wall assembly diagram above).
 Two templates (highlighted in bright yellow) for marking the timber of the longitudinal walls. 4
- a groove for a root spike; 5
- groove for the spike of the inner wall; 6
- sample; 7
- dobor bar.
Two templates (highlighted in bright yellow) for marking the timber of the longitudinal walls. 4
- a groove for a root spike; 5
- groove for the spike of the inner wall; 6
- sample; 7
- dobor bar. The picture above shows the pattern. for marking the main beam in the crown, in which the extension is located on the right. On the wall layout diagram, these are crowns A1, A3, A5 and C1, C3, C5.
bottom template serves for marking the main beam in the crowns with an extension on the left - A2, A4, A6 and C2, C4, C6.
At first glance, the templates are the same, but they differ in that the grooves, pos.5, for connection with the partition, are located in different places of the templates.
The same templates are used to mark the details of the extensions. To do this, on patterns at points b and with through holes are drilled, and at points a and d incisions have been made.
To mark the extension, the template is applied to the timber and points are pricked through the holes and cuts on the surface of the workpiece.
Remember this technique with the device holes in the template. This will help you create generic templates in many other cases.
The templates are made from planed "inch" boards.
As a result, we manage to reduce the number of templates from seven to three (2 for longitudinal walls and 1 for transverse ones). Two longitudinal templates (right and left) provide the ability to obtain blanks for longitudinal walls, and one transverse template allows you to harvest parts for transverse walls and partitions.
And now let's consider how templates are used. To mark the first beam of the crown (for example, starting from the left), the left template is placed on the beam and the end of the template is circled with a marker on the left, then two grooves and, finally, a selection for the connection “to the floor of the tree”. The marked beam is transferred to the place of cutting, where unnecessary fragments (they are better when marking out
hatch) cut out with a chainsaw.
How to mark details with spikes? Obviously, the tongue and groove are elements of the same node, which means they must correspond to each other in size and location. In a detail with a spike, a spike is marked in place of the groove.
If the groove dimensions are 5×5 cm, then the spike should have dimensions - 4.5 × 4.5 cm. The gap is filled with interventional insulation.
The profile of the template is transferred to the upper face of the beam. The markings are transferred to the vertical edge of the beam using a square. According to this markup, accurate cuts are carried out.
How to assemble smooth walls from a bar of different widths
Specifications (TS) for the manufacture of timber allow deviation of the size of the timber in one direction or another from the standard value specified in the documents.
If the purchase documents indicate the standard dimensions of the timber, for example, section 150x150 mm. and a length of 6 meters, the actual dimensions will differ from the standard.
Each bar, in a batch of timber brought to the construction site, will differ from the dimensions indicated in the documents by several millimeters. The cross-sectional dimensions and length of the bars will be different.
Dimensional variation must be taken into account when developing templates, marking timber and assembling walls.
How to assemble even walls if the timber is different in width and length?
 b- the minimum width of the beam; delta b- the difference between narrow and wide beams.
 Obviously, from a beam of different widths, only one surface of the wall can be made even - either from the outside or from the inside of the building.
If they want to make a smooth wall of the house outside, then all the bars in the wall are aligned along the outer edge. Then inside the house, wide bars will protrude from the wall by the amount of "delta b"(difference between narrow and wide bars). Alignment on the outer edge leads to an increase in the gaps in the corner connection of the bars (see figure).
If the bars in the wall are aligned along the inner edge, then the "steps" of the protruding beams will already be on the outer surface of the wall. The wall outside is usually sheathed. And if you chamfer the outer edges of the beam, then the steps on the wall will be invisible even without sheathing. The corner joints of the beams are more dense, "warm".
How and with what to connect the crowns of the log house
Each log crown is connected to the lower crown with metal or wooden dowels. Nagels are located at a distance of approximately 250-300 mm from the end of the beam and then every 1-1.5 meters of the length of the beam.
Each detail of the crown is fixed with at least two dowels. The length of the dowel must be at least 1.5 times the height of the timber.
 cm., pos. one.
 Dowels made of round steel with a diameter of 6-8 mm.- pins with a pointed end or nails (6x200-250 mm), they simply hammer into the bars of the crowns with a hammer, an option a on the image.
The upper ends of the dowels of any material must be deepened into the beam by 2-4 cm. If this is not done, then when the beam dries and the log shrinks, the dowels will be higher than the beam and raise the upper crown. A large gap is formed between the crowns.
For the same reason it is impossible to make clogged dowels from reinforcing steel. The corrugated surface of such dowels will keep the beams of the crowns from moving during the shrinkage of the log house, even if the dowel is deepened into the beam. The crowns will simply hang on such dowels.
Small-diameter driven steel dowels cannot always provide the necessary wall rigidity, especially with long wall spans. Their use can be recommended for small buildings - for example, baths. To increase the rigidity of the walls of large buildings, it is necessary to install dowels of increased diameter.
Steel pins with a diameter of 10 or more millimeters, as well as wooden pins, are inserted into holes pre-drilled in the bar. The diameter of the holes is made slightly smaller than the diameter of the dowel.
With a tight fit of the dowel in the hole, the rigidity of the wall increases, but the risk that the dowels will interfere with the shrinkage of the log house increases.
Wooden pins with a diameter of 25-30 mm it is convenient to cut from round cuttings for the tool. Such cuttings are made from hardwoods. It is recommended to chamfer the lower end of the dowel - it will be easier to drive the dowel into the hole.
Can be cut from a regular "inch" board dowels of square section 25x25 mm. Chamfers are removed from one end of the workpiece. Such pins are hammered into a hole made with a drill with a diameter of 24 mm.
The ribs of such a dowel made of relatively “soft” coniferous wood are crushed during nailing, the wood is compacted, providing a fairly tight fit of the dowel in the hole.
How to drill holes in a beam for dowels
The depth of the holes in the wall for the installation of dowels must exceed at least 4 cm. dowel length. Moreover, the hole must be free from chips.
To drill holes in a beam, deep enough and of large diameter, a low-speed electric drill (drill) is usually used. The passport of a power tool usually indicates what diameter of drilling in a particular material the drill is designed for. Given the large drilling depth, it is better to choose a drill with a power reserve.
To drill holes in the timber, it is convenient to equip the drill with an emphasis, as shown in the figure.
 The stop bar is attached to the drill with steel clamps.
 The emphasis, in the form of a wooden block, is attached to the drill, for example, with clamps. The stop stops drilling at the required depth, but the rotation of the drill does not stop after that. Continuing to rotate in one place, the drill clears the hole of chips, grinds and then easily gets out of the deep hole.
It is convenient to drill holes for connecting the crowns in a bar that is already installed on the wall in the design position on the interventional insulation. But usually here a problem arises - the interventional gasket cannot be drilled. The fibers of the gasket material are simply wrapped around the drill and clamped.
You have to install the beam on the wall in two stages. First, the beam is mounted without a gasket and temporarily fixed from displacement, for example, with nails. Drill holes for dowels. Then the timber is shifted from the wall and interventional insulation is laid.
In places of drilling cut the lining with a sharp knife. Then, the removed beam is reinstalled in place, already on the gasket, and fixed with dowels.
Drilling holes in a beam laid on a wall should be done while standing on a solid foundation - scaffolding, scaffolding, flooring. Standing on a narrow wall and drilling is dangerous. The drill can "bite", a powerful drill will turn around and easily throw the worker off the wall.
How to make a flat wall from a curved beam
In the beam brought to the construction site, part of the beams may turn out to be curved. The beam may have curvature in one plane, or twist with a screw and become diamond-shaped in cross section.
If possible, then it is better not to use curved bars for the walls of a house or a bath. Bars with curvature are recommended to be cut into smaller pieces and used in other, less critical places.
A small amount of timber that has a curvature in one plane can be used to mount walls. You should not lay such a beam in the wall with a bulge up or down, in the hope that it will straighten out under the weight of the house - the beam will not straighten out, even if it is placed in the lower crowns.
The curved beam is laid into the wall, straightening it in a horizontal plane as shown in the figure.
 The curved beam is straightened sequentially by fixing it with dowels
 A curved beam is drilled, combining it at the drilling points with a straight beam. After laying the interventional insulation, the curved beam is fixed with a dowel at one end and, unbending, is sequentially fixed with dowels at other points.
It does not take much effort to unbend the beam. To facilitate the work will help the lever and bracket
Mezhventsovy gasket - insulation, sealant
For and cold, a gasket is laid between the crowns. Previously, moss or linen tow was used for this. Currently, special gasket materials based on flax or flax jute are commercially available. The material is sold as a roll of tape with a width of 20 cm.
A strip of cushioning material is laid along the entire upper edge of the beam in two or three layers and fixed with staples using a construction stapler.
If the wall is not sheathed, then the gasket should stand 1-2 from the outer edge of the beam. cm. otherwise it will get wet.
Some craftsmen lay the cushioning material in one layer and offer to caulk the joints after shrinking the log house, adding an additional amount of material to the voids of the joints. In this embodiment, we have a lower consumption of gasket material.
The work of caulking joints is quite laborious and tedious. It is better to immediately lay the seal thicker, in several layers (three layers), to eliminate the need for caulking horizontal joints.
How to control the correct assembly of the log house
In the process of building a house or a bath, it is necessary to regularly check the correct assembly of a log house from a bar. To do this, it is enough to control the following five parameters:
- Verticality of corners.
- Height of corners and walls.
- The horizontality of the crowns and the upper faces of the timber.
- The straightness of the walls.
- The quality of laying interventional insulation.
For control of the verticality of the corners apply the following method.
 To control the verticality of the angle, a vertical line is applied on each side of the crown. 1
- bottom trim; 2
- crowns; 3
- control lines; 4
- plinth.
To control the verticality of the angle, a vertical line is applied on each side of the crown. 1
- bottom trim; 2
- crowns; 3
- control lines; 4
- plinth. On each side of the crown, at the same distance from the corner edge, draw a vertical line.
With the correct laying of the crowns, this line should be straight and coincide with the vertical. The verticality of the line is checked by a plumb line.
If deviations are found, then the work is suspended and the cause is eliminated.
The height of corners and walls is measured roulette. The measurement is taken from the base horizontal line, which is applied to the strapping beam using a water level.
Horizontal rims and top faces the timber is checked for level.
Straightness of walls determined visually by pulling a cord along the wall.
Especially carefully and constantly check the verticality and height of the corners. Deviations from verticality are eliminated, up to the replacement of the beam in the crown. The height of the corners is adjusted by increasing the thickness of the gasket between the crowns in the settled corners. Sometimes it helps if you knock with a sledgehammer on a beam in a high corner.
The quality and thickness of the laying of interventional insulation is checked visually by examining the walls.
Window and door openings in a log house
From the second crown, doorways begin to form. The distance from the floor level to the window is chosen within 70 - 90 cm.
Laying timber in the crowns in the zone of openings has its own characteristics.
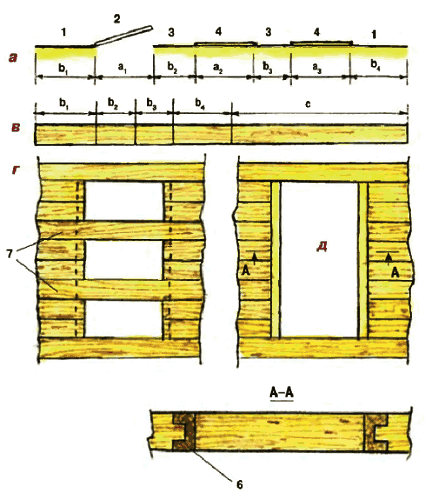 a
- layout of openings in the wall, where: 1
- wall; 2
- door opening; 3
- pier; 4
- window opening. in
- scheme for cutting timber, where c - the remainder of the cutting. G
- a variant of the opening device in the log house with the installation of temporary fastening beams, pos.7. d
- an option with the installation of decks in the opening, pos.6 - we immediately get an opening ready for installing a door or window.
a
- layout of openings in the wall, where: 1
- wall; 2
- door opening; 3
- pier; 4
- window opening. in
- scheme for cutting timber, where c - the remainder of the cutting. G
- a variant of the opening device in the log house with the installation of temporary fastening beams, pos.7. d
- an option with the installation of decks in the opening, pos.6 - we immediately get an opening ready for installing a door or window. In practice, two options are used for the formation of openings when assembling a log house.
One option is " G" on the image. The opening is made in a draft version, only preparation is made to create an opening. The opening is prepared for the installation of doors and windows not immediately during the assembly of the log house. This work is left for later - usually done after shrinkage of the log house.
This option allows you to speed up the assembly of the log house. Bars must be installed in the opening, fastening the wall with a log house, pos.7 in the figure. At least two such bars are installed in the doorway.
In the process of shrinkage of the log house, the walls can “take away” inward or outward. To prevent this the timber in the piers is fastened with vertically installed boards.
In another variant - d» in the figure, the openings are immediately prepared for the installation of doors and windows. To do this, decks (pigtails) are installed in the openings - a vertical beam with a groove, pos.6 in the figure. The spike of the wall beam enters the groove. In this way, the beam of the pier is fixed from displacement. In this version, the openings are immediately ready for the installation of doors and windows.
Decks (pigtails) traditionally serve not only to connect the timber in the opening, but also serve as window slopes, window sills. To do this, they are carefully processed, curly chamfers are removed.
 Option for installing a window in a wall made of timber: 1 - finishing the window slopes; 2 - a board of a vertical pigtail with a rail - a spike, enters the groove of the wall beam; 3 - plastic window frame; 4 - sealing tape PSUL
 In modern conditions, when installing plastic windows and arranging plastic slopes and window sills, decks (pigtail) can be omitted. The bars in the opening are fastened like this. A vertical groove is cut out at the ends of the bars along the entire length of the opening and a rail is inserted there, which fixes the bars of the wall from displacement.
The length of the deck (pigtail) or rail should be less than the height of the opening by 5-7 cm so as not to interfere with the shrinkage of the log house.
Timber for houses, baths in your city
How to install windows in a timber wall
If the opening in the wall was made in a draft version (see above), then the installation of the window begins with sawing the opening to the desired size. To do this, a rail is stuffed along the border of the cut, item 2 in the figure, and the bars are sawn off with a chain saw along the edge of the rail.
 Proper installation of a window in a wall made of timber. 1
- wall; 2
- rail; 3
- platband; 4
- window; 5
- window box; 6
- wall beam above the window; 7
— mezhventsovy heater; 8
- shrinkage gap above the window and deck; 9
- window frames; 10
- wall beam (wall); 11
- deck; 12
- nail.
Proper installation of a window in a wall made of timber. 1
- wall; 2
- rail; 3
- platband; 4
- window; 5
- window box; 6
- wall beam above the window; 7
— mezhventsovy heater; 8
- shrinkage gap above the window and deck; 9
- window frames; 10
- wall beam (wall); 11
- deck; 12
- nail. Then, with a circular saw, spikes are cut out at the ends of the bars of the wall (wall). On the spikes, pos.10, a deck is placed with a groove, pos.11. The joints are sealed with insulation. The deck is nailed to the wall beam with nails hammered at an angle, pos. 12. So the nails will not interfere with the shrinkage of the log house.
A window box is inserted into the opening thus prepared, which is attached to the deck with self-tapping screws. Above the window frame be sure to leave a gap, pos.8, to compensate for the shrinkage of the log house. Gap size 5-7 cm. The gap is filled with soft insulating material.
The compensation gap must also be left above the upper end of the deck.
Similarly, openings are prepared and inserted into the walls from the timber of the door.
After the assembly of the first floor of the house is completed, the log house is covered with beams of interfloor or attic (if the building is one-story) ceiling.
Can be a constructive element. And they can perform an independent function.
The next page describes the construction of a sloping roof of a house made of timber, where floor beams simultaneously serve as an element of the mansard roof's load-bearing frame.
Watch the video clip, which describes in some detail and shows the technology for installing a log house from a construction beam.
Since ancient times, wooden houses were built in Russia without the use of nails. Such structures were very strong and reliable. Today, wooden houses, especially cobbled ones, are also very popular in suburban construction. In such buildings, only individual parts are hammered together with nails, since the walls should not be of a rigid structure. They must have a certain mobility, because during the operation the tree either gains or releases moisture, changing its dimensions. Also, over time, nails rust and spoil the wood. Therefore, it will be further considered how to fasten the beam without the use of nails.
Beam connection options
The main types are the following:

- Longitudinal joint, which is used when increasing the length of the log in one crown. With this connection, the displacement of the material relative to the longitudinal axis is prevented.
- Crown. This type of connection is used to pair elements placed in adjacent crowns or layers of the wall. It prevents the movement of logs in a horizontal plane under the influence of the weight of the upper elements of the building.
- The corner joint is used for mounting logs when constructing the corners of a building. Prevents walls from moving relative to each other.
- T-shaped connection is used to form the interior walls of the house. Prevents displacement of the inner wall and its undocking.
When using a certain articulation option, it is necessary to take into account the level of your skill when working with timber and wood tools, as well as the complexity and expediency of the chosen installation method.
Back to index
Longitudinal connection
During the construction of a wooden house, quite often there is a need for a longitudinal connection of a beam to increase its length. Due to the fact that the docking points are most susceptible to various kinds of deformations, it is better to reduce the number of such places to a minimum. It is recommended to use such splicing in places such as internal walls and piers, because they are less prone to deformation.
You can fasten the timber together using various locking joints or using a longitudinal spike. The most popular and easy to perform is the articulation with a straight or oblique half-wood lock.
In the case of using this method, the bars are recommended to be additionally fixed with wooden dowels at the points of contact of the surfaces.
The use of a central spike allows you to achieve a better connection of the timber. The size of the stud is selected so that its length is 2 times the width of the beam, and the depth of the nest for the stud is made slightly larger than its length. For a better connection, the central tongue can be combined with a lock connection or veneer can be used.
Back to index
Crown joint of timber

This type of connection allows you to fix the timber along the horizontal plane, which they are in contact with each other during the construction of the walls of the building. For its implementation, the following mounting methods are used:
- with the use of plug-in dowels and spikes;
- using metal pins;
- wooden dowels;
- using milled locks;
- using self-tapping screws;
- using staples.
If any metal elements are used for fastening, it must be remembered that increased corrosion of the former occurs at the points of contact between metal and wood, which eventually leads to premature damage to structural elements. This method of fastening the timber is the simplest, cheapest and unreliable, therefore, it can be used only in cases where other connection options cannot be used for any reason.
If you still decide to save money and time and connect the timber with nails, then use special nails without a hat for this, which you can make yourself from a wire with a diameter of 6 mm, which must be melted. To do this, the upper beam is pre-drilled through with a drill. In this case, you need to know that this installation method will eventually lead to cracks in the wood that will need to be caulked.
The use of self-tapping screws and brackets is an additional and temporary means of fastening, because these elements are short-lived and unreliable, they spoil the appearance of the wall.
The most common method of crown articulation is wooden dowels. In this case, instead of a metal product, wooden pegs with a section of any shape (round, rectangular, multifaceted) are used, which are driven into the prepared holes, and the next log is mounted on the part that will stick out. For the manufacture of dowels, it is necessary to use a durable wood species. At the same time, the pins should have their own fibers perpendicular to the timber fibers and have less moisture than the wood from which the house parts are made. This method is simple in execution, but at the same time it is quite reliable and durable.