To do the repair of old wooden windows with your own hands - such a task periodically arises for home craftsmen.
Even now, in the age of the popularity of plastic products, wooden frames do not lose their relevance.
Many are only now beginning to realize the benefits of the familiar wood, which has recently been vigorously changed to plastic. Wood is not just a natural ecological material, it has quite obvious qualities.
Wood products are quite resistant to external influences, have good heat and. windows help to maintain optimal humidity levels inside the building. Manufacturers quickly realized that a kind of "plastic boom" was subsiding somewhat, and began to actively advertise products from modified wood.
Nothing bad can be said about their quality, on the contrary - it pleases. In contrast to the price, which is somewhat intimidating. I must say that with a lot of effort and effort, you can restore an old wooden window. It's not that hard, although it takes time. But a practically killed dilapidated window can be turned into an attractive, looking new product.
Wooden window repair technology
There are special technologies that allow turning even completely unusable and rotten windows into quite decent ones, adding several more decades to their life.
What is required for this?
Materials, tools
- Various chisels from 4 to 30 mm wide.
- A planer for stripping and cutting grooves, folds, quarters, as well as points of perpendicular edges, it is also called a picker.
- A fragment of a thin and wide jigsaw or hacksaw blade.
- Palette knife or boot knife.
- Thin-walled core drill for wood.
- level or flight.
- carpenter's.
A plumb line is also necessary, but it is not difficult to make it from a nut and thread.
You will also need materials:
- liquid nails (assembly);
- natural:
- flange brushes 80 and 40 mm;
- small nails;
- large, dense and deep plastic bag;
- scraps of waterproof plywood or a block of fine-grained solid wood;
- , matching the tone, on sawdust;
- thick-grated whitewash, zinc or titanium;
- kerosene;
- a board made of boards or a plywood sheet a little larger than the frame;
- aquarium silicone glue.
In this case, water-based deep penetration polymer putties are not required. The fact is that their use significantly enhances the thermal conductivity of wood products. Depending on the design, a clear acrylic lacquer may also come in handy.
If it is possible to use a special industrial hair dryer, then a plastic bag and kerosene will be superfluous.
It is better to restore windows in warm and dry weather, with an optimum humidity of 40 percent (no higher than 65). Just in case the weather turns bad, we protect the openings with foil on any temporary frame.
Disassembly and revision
One of the important elements of the window structure are wooden chopiks (special pins) that hold the window together in the corners.
But there is one more method, which can be called capital - processing is enough for tens of years... This will require a special device: this is a piece of pipe made of solid steel, welded on one side. It is fixed in a 30-degree tilt position. This procedure is carried out strictly in the open air, away from buildings.
In case the drying oil flares up, you need to have a mat made of fiberglass or burlap at the ready, with which, in an unforeseen event, the neck of the pipe is closed. You can continue when the fire goes out.
How does the overhaul process take place?
Three-quarters of the pipe is filled with linseed oil, and they begin to heat it from below with hot air from an electric stove or a building hair dryer. With a sudden increase in the smell of drying oil, the heating is temporarily suspended, then we continue again. Impregnation can be started when the heated mass disappears and bubbles do not appear.
For impregnation, a steel hook is used, with which the part is embedded in the mass for several minutes, then it is taken out and dried with it. Details cannot be taken even with hands in mittens. Also, you should not bend over the neck of the pipe and look into it. The process is being watched obliquely, from the side. Parts processed in this way can serve for many decades.
Restoration of old wooden windows
Wedges and nails
Before starting work, you need to take care of new wedges and dowels. The pins can be made from suitable straight grained wood with a core drill (straight across the grain). For each individual element, a wedge of the required size is prepared from a suitable wood species, for example, mountain ash or oak.
Alignment
A leveled frame is assembled on the slipway-shield, at first without securing it with anything. As before, they are aligned diagonally, fixed from the sides with nails. The mounting holes are drilled. Then the frame is disassembled, the grooves of the joints and the mustache are coated with liquid nails, checking with diagonals, collected in a slipway, if necessary equalized. After the glue has set, fixation with pins is carried out.
All this must be done on the same day, while the glue joint is still sufficiently plastic. The dowels are finally fixed with wedges, driving them from both sides along the fibers of the dowel.
The pins lubricated with liquid nails are hammered into the prepared holes with mallets so that the fibers of this element are perpendicular to the fibers of the wood of the main product. This is an important condition for their reliable connection.
Fitting the sash and frame
Keeping the outer edge square does not mean square corners of the various mounting openings. The fact is that the tree has the ability to dry out unevenly. Therefore, the next important and necessary step is the alignment of the quarters inside. First, we adjust one sash: we put it on the priest and check it with a plumb bob of a quarter.
If there is a perpendicular one, then it is taken as a base. If there is no such one, we find the most "left" corner with the help of a racer and a square. Then you need to beat off new lines of an even opening from him and from other corners along the reishin with a pencil. With a zenzubel and a chisel (in the corners), we remove all unnecessary.
In the same way, we inspect and check the outer sashes. Then the flaps are positioned side by side and aligned in width and height. It is not necessary to touch the quarters under the glass, since their slight distortion will not do much harm. After all the above measures, the sashes will be made smaller than the opening of the frame itself.
Small strips of plywood are placed in the quarter of the frame for adjustment on liquid nails. When the glue sets, we process everything accurately and accurately with a chisel, not forgetting to make recesses for the fittings. We nail down small carnations at a distance of 15 to 25 cm, plunging their caps deep into the depths of the nail. We return the ebb to the place with the help of liquid and ordinary nails.
Sanding and filler
For small irregularities and grooves, it is quite acceptable to prepare the putty on your own. To do this, in a ratio of three to one, sawdust and liquid nails are mixed. Prepare the composition in small portions, which are quickly used. This mixture sets in a few minutes. Grind the frame with sandpaper.
Painting
For most often they use high-quality oil paint. The best option in this case is to buy a thick-grated composition, and mix with nut or linseed oil, following the example of artists. Ready-made oil paints on sale are based on mineral or synthetic thinners that are inferior to traditional ones in terms of their durability.
Pentaphthalic and glyphthalic enamels are also not very suitable for finishing: a new painting will be required in a few years. And multiple layers of paint do not look very aesthetically pleasing.
When choosing a thickened paint, it is advisable to make sure that it contains a mineral and not a synthetic pigment.
If you rub a pinch of white between your fingers, there should be no slippery sensation. White should not stick to your fingers. Almost all of the synthetic pigment flies off when shaken off. Knead the paint in a flat wide-necked dish. Dry paint is poured there, oil is added portionwise to the hole in it, and they begin to knead. The oil is added gradually, bringing the mixture to the required consistency.
Repairing old wooden windows in a bathhouse allows you to restore their functionality and restore their original decorative properties. This can be a point-by-point repair, consisting in the elimination of individual structural defects, or a complete restoration.
If you plan to repair wooden windows, then first you need to inspect them for defects. All detected defects must be eliminated. Possible problems that may be identified during the repair work are listed below.

Defect number 1. There is a gap between the frame and the box
Most often, there is insufficient tightness of the window structure, which is why drafts appear in the bath. The gap that appears between the frame and the frame is often the result of insufficient sealing of the sashes.

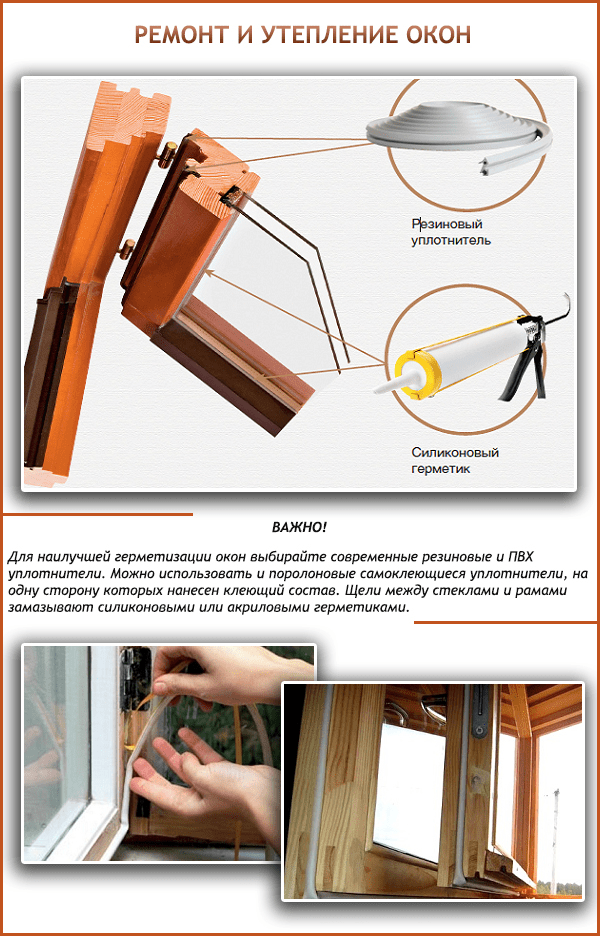
This defect is eliminated by placing a sealing material in the flaps. This could be:
- rubber;
- foam rubber;

This will allow not only to improve the old wooden windows, but also to additionally insulate the room.
Note! Often you can get rid of such a gap without using a sealant - you just need to bend the hinges to the side opposite to the half-thongs of the sash.
If a gap appears around the entire perimeter, then all the loops are bent, and if it is formed in a specific area, then only the loop that is located in the place of its (defect) formation can be bent.
Prices for seals for wooden windows
seal for wooden windows
Defect number 2. The paint is peeling and cracked

Refurbishment often involves renewing the paint. Let's make a reservation right away that it is not worth applying paint to the previous dilapidated layer, since this will not increase the aesthetic characteristics of the structure, but only protect the tree from decay. The algorithm of actions should be as follows.

Step 1. First, the window is removed from the hinges, all metal elements are removed and the glass is removed. If this is not done, then painting will take more time and effort.


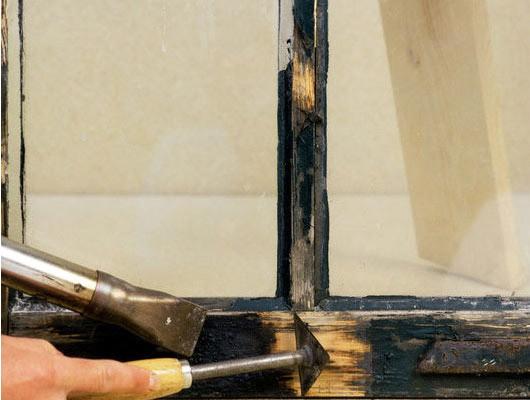
Step 2. The old paintwork is removed. This can be done in one of two possible ways.
- You can use a construction hairdryer to remove paint. When exposed to high temperatures, the coating will begin to bubble and flake off, making it easy to clean with a spatula.
- Another equally effective way is to treat surfaces with a paint remover (for example, a special Docker S5 Wood gel remover).
Both methods make it possible to quickly remove the paint, but they have a common drawback: the work must be carried out outdoors, since harmful gases are released during processing. And if processing outside the premises for some reason is impossible, then you can clean the windows mechanically - using a metal brush or spatula. Of course, such cleaning requires more time and effort, therefore, they resort to it mainly when the coating is so shabby that it disappears by itself.

Cleaning the frame with a spatula - photo
Step 3. Then all cracks found on the structure are putty, after which the window is cleaned with a grinder or sandpaper.


Example of applied and leveled filler
Step 4. The primer is applied in two layers on the wood. Once the primer is dry, you can start painting directly.
Step 5. To achieve a more effective result, it is advisable to apply the paint in two or three layers.

Note! When applying the first layer, paint is applied, which is diluted with a solvent. Such a liquid mixture will saturate the wood, and in tandem with other layers forms a dense and uniform coating.
It is easier to paint with a spray gun, and the result in this case will be as effective as possible. If a brush is used, then the work must be done with special care, since the risk of uneven application and formation of sagging is greater. After the paint has dried, the window is assembled and reinstalled.

Wood paint prices
paint for wood
Video - Painting windows
Defect number 3. Tight closing of the flaps
Another common problem is a skewed frame, as a result of which the sashes are difficult to close or they cannot be closed at all. In this case, you should start by inspecting the loops - those, as you know, can settle over time. If the loops really have settled, then you can:
- put them in other places on the window frame;
- wind steel wire around the hinge rods and thus adjust the position of the leaves.

Sometimes a skew is formed due to a change in the shape of the frame as a result of the swelling of the tree. To eliminate this defect, all excess is cut off with a plane, and the frame is adjusted to the box. It happens that it is impossible to determine the place of pinching by eye. In this case, it is necessary, when closing / opening the doors, to stretch a carbon copy between them and the box. The places where the marks will appear should be shaved off.
Note! Also, the frame may not close due to the coating layer being too thick. If so, then it is peeled off with a coarse-grained skin.
Defect number 4. The section of the structure is rotten
If fragments of rotten wood were found on the window, then they must be replaced. Defective elements are cut out with a chisel, while it is advisable to cut off undamaged tissue in order to prevent the spread of rot.

The recess formed after this is processed with wood glue, after which a pre-cut piece of wood is placed there. Once the glue is dry, sand the area with sandpaper.

Prices for joinery glue
wood glue
Defect number 5. Skewed window sashes
Such distortions appear due to loosening of the corner joints of the frame.

There are several ways to eliminate such a defect, but the most effective and at the same time simple to execute is the installation of metal corners in the corners. To install the corners, you need to cut out the landing nests with a chisel in advance. The corners are installed in them, but so that the latter are located slightly above the surface of the window frame. Screws are used to fix the corners.

After that, a layer of putty is applied to the renewed area, and it is also cleaned with sandpaper.
Window corner prices
window corner
Complete window restoration
If the old window structure is no longer subject to spot repair, then you can either replace it (today, windows are sold made of modified wood that does not need painting), or you can start restoring it. The second option is preferable, since the cost of modified wood products is quite high.

The restoration technology described below will improve the appearance of even a rotten window and add it (windows) with a service life of another 30-40 years.
Stage one. Preparing everything you need
To work, you will need the following equipment:

As for the necessary materials, there are a lot of them. For convenience, they are presented in the form of a table.
Table. Consumables for restoration
| Name | Description | Quantity |
|---|---|---|
| Special assembly adhesive for wood | About 300 g | |
| Mandatory silicone based | 15-20 ml | |
| Produced from sawdust | 500 g | |
| Minimum thickness - 1.5 mm | - | |
| Can be purchased at all hardware stores | 3 kg for all windows of a medium-sized sauna | |
| Hand diluted filler pigment | 2 kg for all windows | |
| Dimensions must exceed the dimensions of the window frame | 1 PC. | |
| 4 cm and 8 cm | 2 pcs. | |
| Width 50 cm, depth 170 cm (holes are sealed with tape) | 1 PC. | |
| - | 2 l | |
| # 80 or at least # 60 | 70 cm | |
| - | 500 g | |
| 6-8 cm | 500 g |
Note! It is undesirable to use water-based deep penetration putties - they significantly increase the thermal conductivity of wood.
You may also need acrylic varnish or stain of the appropriate shade (it all depends on the design of the structure). If it is possible to use an industrial hair dryer in work, then a bag and kerosene will not be required. After preparing everything you need, you can proceed with the restoration.

Building hair dryer
Construction hair dryer prices
construction hair dryer
Stage two. Dismantling and revision
The main elements of any wooden window are pins (they are also called "chopiks"), connecting the structure at the corners. And the reconstruction should start exclusively with dowels.

Window frame elements, position 4 - dowel
Step 1. First, the sash is removed, the putty is picked out with a chisel, or the glazing beads are removed. After that, the glasses are removed.

Step 2. All fittings are removed (in any case, they must be replaced); wooden ebb tides are removed from the outer flaps (they are called drips): they - ebb tides - are fixed with nails, which are probably already rusty. All remaining nails and squares are removed - subsequent actions will be performed exclusively with wood.

Step 3. The sashes and the frame are alternately laid on the panel and aligned with rectangularity. For this, the diagonals are measured: they must be equal to the length. In this case, it is especially necessary to work with the vents especially carefully. They are small, and a millimeter of deviation will lead to the formation of a gap of 0.5-0.7 mm.

As an example: suppose an error of 3 mm was made on the sash and about the same in the opposite direction on the window frame. In this case, a 4 mm gap is formed, from which you will noticeably pull.
Step 4. The aligned elements are fastened with nails driven into the shield close to the sash, the previous pins are checked.

 Nagels in the sash - scheme
If everything is normal, then approximately in the middle of the corner they are drilled with a drill, the diameter of which should not exceed 0.6 of the width of the rectangular array of wood. This does not take into account the quarters, as well as the slots with bevels (see the bottom of the figure).
If any of the dowels "left" (see the same figure, upper part), then the following actions are performed.

Step 5. When the holes in each structural element are ready, the frame is disassembled and cleaned of the old paintwork.
Stage three. Removing paint
As noted above, the old coating can be removed by heat treatment or chemical treatment. For the first cleaning method, you will need an industrial hair dryer. You should not use a household appliance: it still will not give the required temperature (and this is about 250 ° C). Also, do not heat wood with a blowtorch or gas torch.
The procedure is as follows: the element to be cleaned is placed on the bottom and heated in sections of 30-35 cm. When the coating begins to bubble, it is cleaned off with a palette knife or a regular boot knife.

Note! If you use a spatula with a straight blade for this, then it will either slide over the paint or cut into the material.
Video - Cleaning a window from old paint
You can also use special chemicals for cleaning. In the absence of such, you will need materials at hand - kerosene (in no case a nitro solvent or solvent - these funds will spoil the wood) and a plastic bag.
Step 1. All elements are wrapped in old rags.
Step 2. Then they are placed in a bag, while not forgetting about a small margin for tying.
Step 3. Elements are poured with kerosene (500 ml).
Step 4. The bag is tied and left for 1-2 days for the paint to soften.
Step 5. Parts are removed and cleaned in turn with the same tools.
Note! If you remove all the elements from the bag at once, the kerosene will quickly evaporate, and the paint, as a result, will solidify back.
Stage four. Impregnation
All wooden elements must be impregnated with linseed oil. This is required not only to restore the structure of the worn-out material, but also so that the embryos of rot, destroyed by chemistry or heat treatment, do not develop again.

You can apply drying oil with a brush, but for high-quality impregnation, you need a steel pipe with a diameter of 10-12 cm. The pipe is installed at an angle of 30 °, for which it is most convenient to use small goats. The whole procedure is carried out outdoors as far from residential buildings as possible. In addition to the pipe, you will need a fiberglass mat for work, because drying oil can catch fire when heated. If this happens, the felt felt should be thrown over the neck of the pipe. Once the fire is extinguished, the operation will continue.

Step 1. The ¾ pipe is filled with linseed oil and heated from below with an industrial hair dryer. The drying oil will bubble when heated - this is evidence that air is coming out of it. If there is a sharp increase in the smell, you need to move the heating device aside, wait a little and continue heating. As soon as the bubbles disappear, you can proceed directly to the impregnation.
Note! In no case should you bend over the neck! It is possible to observe the drying oil only from the side obliquely.
Step 2. For further work, you will need a hook made of steel wire with a diameter of 5 mm (one end should be pointed). The first element is placed in the pipe and melted with this hook for 4-5 minutes, after which it is hooked with it, removed and laid to dry. You should not take the parts with your hands, even with gloves - the temperature of the drying oil will be about 130 ° C.
Step 3. The rest of the elements are impregnated in the same way. Ordinary pine, for example, treated with linseed oil and dried in the open air, will last more than 150 years, and if it is treated with oil paint, then repainting will be done no more than every 15 years.
Stage five. Recovery
The procedure begins by creating new wedges and dowels.
Wedges, dowels
The pins are drilled from any straight-grained type of wood using a core drill. It is important that the drilling is done across the grain. For each of the dowels, a wedge 0.5-0.6 cm wide, 0.1-0.15 cm thick and a length equal to its (dowel) diameter is preliminarily prepared. It is advisable to make wedges from rowan or oak.
Window frame dowel
The diameter of the pins themselves should be 0.5-0.6 cm larger than the diameter of the holes made for them.
Outside alignment
The frame, not yet secured by anything, is assembled on a board covered with plastic wrap. The algorithm for further actions is given below.
Step 1. The frame is aligned diagonally and fixed with nails in the same way as described above. You need to re-go through the mounting holes with a drill.
Step 2. After that, the frame is disassembled, the grooves and mustaches of the joints are coated with "liquid nails". The frame is then quickly assembled and just as quickly checked diagonally. Adjustments are made if necessary.
Step 3. As soon as the glue dries, you can start fixing the pins. This must be done immediately after assembly, while the glue joint is still plastic. Each of the pins is lubricated with "liquid nails" and driven into the corresponding hole with a mallet.
Note! The fibers of the wood should be located perpendicular to the fibers of the dowels - this way the connection will be as reliable as possible.
After that, the pins are finally fastened with wedges driven in parallel to their (pins) fibers.
Fit
External rectangularity is not yet a guarantee that the installation openings are also rectangular. The fact is that wood can dry unevenly. For this reason, after alignment, it is necessary to start adjusting the quarters.
Step 1. The sash is placed on the priest, after which the quarters are checked in turn using a plumb line. If there is at least one exactly perpendicular flap, then you need to focus on it; in her absence, the most "left" of the corners is determined by the racer and the square. From this corner, the features of the new opening are beaten off to the rest, after which the excess is removed with the help of a chisel.

Step 2. Likewise, the flaps are checked and aligned to the outside.
Step 3. After that, the sashes are stacked in a row and leveled in width / height (see figure below). In this case, you can not touch the quarters at all, since their insignificant bias does not play a special role. But if you want, you can align them too.

Step 4. At the end of the procedure, the sashes will be smaller than the opening of the window frame. To fit them, it is necessary to place strips of plywood in quarters on the "liquid nails". When the glue hardens, the frame is brought to precision with a chisel, after which grooves are made for the fittings.
Step 5. The leaves are tacked with small nails hammered in with a step of 20-25 cm.
Puttying, sanding
The preparation of the putty is not difficult: you need to mix "liquid nails" with sawdust in a ratio of 1: 3, focusing on volume, not weight. The mixture is mixed quickly, in small portions, and applied within a few minutes (the glue dries quickly). The frame is then sanded.

Note! Before applying the putty, the tides are installed in place: first on the "liquid nails", and then on the usual ones.
Paint application
For painting, as already noted, it is preferable to use oil paints. Ideally, it should be thickly grated paint, mixed with linseed oil with your own hands (this is how artists do, by the way). But ready-made paints that are sold as "natural" are actually made from thinners based on minerals or synthetics, which are significantly inferior in terms of durability. Penta and glyphthalic enamel paints are also not suitable: after five years, repainting will be required, and excessive layers will only spoil the attractiveness of the bath.
Note! In general, paint is made up of three main components - thinner, filler and pigment. In order for the painted windows to shine for a long time, you need to buy paint, the filler of which is made of marble flour.
Oil paint is mixed in a wide container as follows: a small pile is poured, a hole is created at the top of the latter, into which the paint itself is poured. Next, the mixture is kneaded, and the oil is added in small portions until the required consistency is reached (it should resemble liquid sour cream). The painting procedure itself is carried out traditionally.

Finishing
After the paint dries, the windows are covered with a stain that changes color and emphasizes the texture of the wood. Moreover, the stain is absorbed into the material, so even after sanding, the windows will not have to be tinted during repair work.

The final stage of finishing - varnishing the window with tinted or transparent acrylic-based varnish, installation of fittings and glass.


Glazing
Before installing the glasses on the inner lower corners of the quarters, aquarium glue is squeezed out in strips. Next, the glasses are fastened with small nails, the glue drips are removed with a rag soaked in vinegar. The nails themselves do not need to be removed from the silicone - it will protect them from rusting.
As soon as the glue hardens (its setting rate is 2 mm / day), the glasses are sealed with ordinary putty - chalk mixed with drying oil.

Note! If the glass is to be fixed with glazing beads, then they should be pre-processed in the same way as other wooden structural elements.
Summing up
The old technique of window restoration, improved with current materials, really works wonders. Even the oldest, unsightly and rotten windows, restored using this technique, will look no worse than their plastic counterparts, while the useful properties of wood are fully preserved.

The restoration of wooden windows, especially old Soviet-made ones, is a great topic of controversy between specialists and ordinary consumers as well. The fact is that there is no unequivocal opinion on this issue. Some consider the restoration of wooden windows unprofitable and even stupid, since the installation of new plastic structures is not much more expensive. Others, on the contrary, argue that it is not reasonable to change good solid wood windows to plastic.
There is a grain of truth in the statements of each side. But there are also plenty of misconceptions. Let's try to understand in more detail this topic, as well as understand why the restoration of wooden windows is both good and bad at the same time.
Misconceptions of supporters of plastic windows
The main misconception is that supporters of plastic windows significantly overestimate the cost of restoration of wooden windows... In practice, even ordering it from a construction company, you pay 1.5-2 times less.
- Capital restoration of a turnkey double-leaf window costs about 8-10 thousand rubles ().
- A plastic window with two sashes costs an average of 14 thousand rubles.
With installation, window sills and low tide, all 20 thousand will be released, or even more (this is the real price for good windows with high-quality installation, the companies where migrant workers sculpt what we do not take into account).
That is, the difference is not the claimed 30-40%, but all 200-250%. With 3-5 windows in an apartment, the savings are very tangible, up to 50 thousand.

The second misconception is that supporters of plastic windows believe that PVC is beautiful and modern. In fact, this is not entirely true, plastic is still an indicator of poverty, and not the other way around. It looks cheap and austere, especially white. People with money put just wooden windows, and not plastic consumer goods, which are so actively promoted by many corporations.
Well, and the third misconception - PVC windows last 50 years... This is a marketing ploy, in fact, not a single plastic window will work that long. Normal service life for plastic is 15-20 years, no more. After this period, they are handed over in all respects and it is already desirable to change them or overhaul them. In fact, the repair of plastic windows may be needed much earlier, after 7-10 years (fittings and gaskets fail faster than the profile itself and double-glazed windows).

Wooden windows do not breathe without cracks.
The misconceptions of the supporters of the restoration of wooden windows
The main misconception is the belief that wooden windows "breathe".
In fact, the airing effect when closed is due to the loose closing of the flaps, in other words, the presence of cracks through which air passes from the street. As soon as a rubber seal is installed on the windows for insulation, this effect instantly disappears.
The second misconception is that the restoration can be done by yourself.
Many believe that it is possible to restore windows without involving specialists, making the restoration 2-3 times cheaper. This is actually the case, because consumables will cost not 10 thousand, but a maximum of 3-4 thousand.
However, things are not so simple. For restoration work, you will need a construction hair dryer, a sander, a drill, special tools for removing paint (a regular spatula will not work, it will cut wood) and a rubber seal insert. This set of tools will cost at least 15 thousand, if we take a very bad China, which may not survive until the end of the restoration. But even if all the necessary tools are there, then the probability of correct repair without experience tends to zero. Most likely, it will turn out not of high quality and expensive.

The third misconception is the hope that the restored wooden windows will last as long. Wood also has its own resource, therefore, most often, after restoration, windows become unusable after 10-15 years or even earlier. But there are nuances here, the term of further operation strongly depends on the wood used in the production of windows and its condition at the time of repair. In "Stalinist houses" it happens that under several layers of paint a tree of valuable species is hidden and in perfect condition. After careful processing, it can last another 20-30 years without problems.
But in many Khrushchev houses (small families and dormitories), for example, a pine window profile is often found, which will not be helped by any restoration (a conscientious master will refuse to restore such a window).
Final comparison
Taking into account all the misconceptions and the real advantages of restoring or replacing windows, we made a comparative description of both options.
| Parameter | Installation of PVC windows | Restoration of windows |
| Price | from 18 thousand for a window of 2 sashes | up to 10 thousand for a window of 2 sashes |
| Lifetime | 15-20 years old | 10-12 years old |
| Thermal insulation | High | Average |
| Noise isolation | High | Average |
| Service | Minimum | Minimum |
| Appearance | Just like others | Original |
| The convenience of use | The average | The average |
| Standard mosquito nets | Yes | No, but you can make custom |
| Damage to the wall near the window | Yes | Not |
| Windowsill | PVC or installing old | old |
| Fittings | Swing-out | Usually swivel without ventilation mode |
| Strength | Average | Above average |
| Burglary resistance | Low | Average |
| Environmental friendliness | Average | High |
As you can see from the table, for the most part, the parameters, although few, are better than the restored wooden ones. This is the main disadvantage of the overhaul. In other words, it will not be possible to achieve the same high performance as for new windows with all the desire and professionalism of the master.
But, restoration is still much cheaper, which is very important in a crisis. In addition, they have a more interesting design and are much more difficult to crack (PVC windows can be cracked in 30 seconds without breaking glass). So restoration has its tangible benefits. That is why it is so difficult to choose between installing new PVC windows and restoring old wooden ones.
If the old wooden windows are in satisfactory condition and are made of high quality wood (it is usually heavier), then it makes sense to restore them. The cost will come out a little, but the result will be good, and such windows can stand for a very long time. But there is no particular sense in tidying up the rickety windows with a strong backlash. It is better to throw out and put plastic or euro windows.
Conscientious craftsmen adhere to a similar position and do not undertake restoration when it is not profitable for the client. But, unfortunately, there are not so many of them.
Do-it-yourself wooden window repair is a very relevant question. Wooden windows do not recede even in the age of modern plastic ones. Wood is not only a natural prestigious material, it also has real advantages: wooden windows are resistant to external influences, provide excellent sound and heat insulation. And most importantly, the optimal humidity is automatically maintained in a house with wooden windows.
Manufacturers, seeing that the "plastic boom" in the window market is subsiding, are vying with each other to offer windows made of modified wood. Nothing bad can be said about them, except for the price: not that it is not happy - it scares. Meanwhile, the restoration of wooden windows with your own hands is not so difficult, and as a result, the window that was killed by the great-grandfather can be restored to the appearance of a completely new product.
Technology, tools, materials
Independent and professional restoration of old windows is most often based on the so-called Swedish technology. But if you figure it out, then its whole essence comes down to inserting a Euro-strip sealing cord, and fitting and repainting remain in the field of additional services, the price is from 3000 rubles / window. And in principle, the Euro-strip technology is not restoration, but insulation. (About which on the eve of the onset of cold weather).
In the meantime, we will find out what kind of tool and materials will be needed for this - there will be few of them:

Zenzubel (selector)
- A set of chisels of various widths, from 4 to 30 mm.
- A special plane for cutting and cleaning folds, quarters, grooves and sharp edges of perpendicular cuts - zenzubel; in Russian - selector, see the figure on the right.
- A fragment of a wide, 4-6 mm and thin, no more than 0.3 mm hacksaw or jigsaw blade (saw band). If there is a manual jigsaw on the farm, then a solid tape for it.
- A wide boot knife or palette knife is a special knife used by painters to clean paint from a palette.
- Thin-walled core drill for wood 8-10 mm inside; purchased after revision of the shutters.
- Carpenter's square.
- Raceway or bubble level 1 m.
You will also need a plumb line, but you can easily make it yourself from a thread with a nut. From the materials you will need the following:
- Assembly glue for wood - "liquid nails", about 0.3 kg.
- Wood putty on sawdust of the desired tone, 0.5 kg, or 0.5 liters of fine sawdust; sold in hardware stores.
- Natural drying oil, 3 kg for a two-room apartment of average size.
- Densely grated (dry mixture of pigment with a filler, diluted by hand with a thinner) whitewash, titanium or zinc, 2 kg at the same rate.
- Flange brushes 40 and 80 mm.
- Kerosene, 2 liters.
- Nails, small and 60-80 mm, 0.5 kg each.
- Skin No. 60 or No. 80, 0.7 m.
- A dense plastic bag with a depth of 1.7 m and a width of 0.5 m. Wrapping from bedding, etc. is suitable. The holes need to be sealed with tape.
- A sheet of plywood or a flat board made of boards a little larger than the window frame.
- Scraps of aviation or water-resistant plywood 1-1.5 mm thick or a block of solid fine-grained wood - oak, beech, walnut, rowan, pear, plum, cherry, acacia.
- Silicone AQUARIUM glue, 10-20 ml.
Note: water-based polymer putties of deep penetration into wood are not suitable for this case: they significantly increase the thermal conductivity of wooden parts.
Additionally, depending on the design of the window, you may need a stain of the desired tone and acrylic clear varnish. If you can use an industrial hair dryer, you will not need kerosene and a large plastic bag. Stocking up on the above, you can start overhauling old windows.
Working conditions
It is better to take for windows in dry, warm, even hot weather: the permissible air humidity is not more than 65%, and preferably 40%. In case of bad weather, for the period of repair, we tighten the window openings with a film on a temporary frame made of waste sawn timber: slabs, waste, old pickets, etc.

Correct and incorrect seating of the dowel
Disassembly and revision
The most important element of the window construction is the wooden bosses-pins ("chopiki") fastening it at the corners. Sufficient attention will be paid to the description of the methods of working with them, and the repair of the window begins precisely with the inspection and revision of the dowels.
First of all, we remove the sashes, remove the glazing beads or carefully pick out the putty with a chisel and take out the glass. Then we completely remove the fittings (it will still need a new one); we carefully remove the wooden drips (drips) from the outer flaps: they are on the nails, which are probably rusted. We also take out all the other nails, remove the steel squares - for further work, only wood should remain in the frame and sashes.
Next, we put the frame and then the sashes one by one on the shield and level them to squareness, measuring the diagonals: they should be of equal length. We especially carefully measure and level the vents: they are small and the cost of an error is high. 1 mm of divergence of the diagonals along the length gives a gap of 0.6-0.7 mm.
Example: on the sash we were wrong by 3 mm, and by the same amount in the opposite direction on the frame. You will get a slit about 4 mm wide, clearly visible, and pulling from it will also be noticeable.
We fix the leveled part of the window with nails, carefully driving them into the shield close to the sash, and check the old pins. If everyone is sitting as expected, approximately in the middle of the corner, carefully drill them out with a larger diameter drill, but not more than 0.6 of the width of a rectangular one, excluding the grooves, quarters and bevels of the solid wood (see Fig. Lower part). If there is a “left”, which is not uncommon, see the picture above, we work like this:
- We dig the old one along the contour with 3-4 drops of superglue, this is necessary so that it does not fall out during drilling and the hole does not go away.
- We are waiting for 5-10 minutes for the glue to set firmly in the depth, it flows far away.
- We drill a correctly positioned hole.
- With a saw tape, pushing it into the slots between the connection mustache, we saw through the old dowel.
After the fastening holes in all the details of the window are drilled, the frames are disassembled into parts and cleaned of old paint.
Removing paint
There are two ways to remove old paint from windows: thermal and chemical. An industrial hair dryer is used for heat treatment. Do not try to do it for everyday use: it will not give 200-250 degrees. And do not set the temperature on the hair dryer to more than 250 - you will get a low-temperature, without charring, wood burn, and it will lose its quality. The same will happen if you heat with a blowtorch or propane torch.
The part to be cleaned is placed on the priest and warmed up in sections of 25-30 cm. When the paint starts to bubble, clean it off, like plasticine, with a boot knife or palette knife. A spatula with a straight blade, even a sharpened one, either cuts into wood or slips over paint.
Video: thermal paint removal
With "chemistry" paint is removed using a plastic bag and kerosene (solvent or nitro-solvents are not suitable, they will ruin the tree):
- Each piece of wood is wrapped in rags.
- The whole bunch, how much will fit into the neck of the bag, is thrust into it; there should be a margin for tying the bag.
- Water the wrapped pieces of wood with 0.5 liters of kerosene.
- The bag is tied tightly, left for a day or more, until the paint softens.
- Take out the parts one at a time and brush off the paint with the same tool.
Notes:
- Chemical softening of paint is a smelly and fire hazardous operation. It should be carried out on the balcony or on the street.
- If you take the whole bundle out of the bag at once, the kerosene will quickly evaporate and the paint will harden again.
In both cases, if the window is supposed to be painted with paint, it is not necessary to pick out small particles of paint in the recesses: it will only be easier to putty and sand. If the window goes under the stain with varnish, then you will have to work hard on them.
Impregnation
The next stage of work is impregnation with linseed oil. The purpose is to prevent the rot embryos killed by heat or chemistry from developing again, and to restore the structure of old wood as much as possible. Hastily, for several years before the next repair, the details are impregnated with a brush from all sides 3-4 times; subsequent - after complete absorption of the previous one. Before the subsequent impregnation, the surface of the part should not be tack-free.

For centuries, they are impregnated in a special device: a piece of steel pipe 100-120 mm welded from one end. It is installed obliquely at about 30 degrees; it is advisable to use a welded trestle from the corner so that the pipe does not slide. The operation is carried out only in the open air, away from residential buildings: in the yard, in the country. It is imperative to have a sackcloth or fiberglass mat on hand: drying oil can flare up. You need to know this in advance, and not be scared, but immediately throw a felt felt over the neck of the pipe. It goes out - you can continue.
Linseed oil is poured into the pipe 3/4 and heated from below with a hairdryer or a stream of hot air from an electric stove. As the drying oil heats up, it will begin to bubble: moisture evaporates from it and air comes out. If the smell of drying oil suddenly increased sharply, move the heater aside, wait a little and continue heating. When the bubbles are gone, you can start the impregnation.
Warning: under no circumstances look directly into the mouth of the pipe or bend over it! You need to follow the drying oil sideways.
For impregnation, you need a hook made of steel wire 5-6 mm with a pointed end. The part is placed in a pipe and heated with a hook for 3-5 minutes, then it is hooked with the tip, removed and placed on the table to dry. Do not grab the parts with your hands even with gloves: hot drying oil with a temperature of over 130 degrees will drain from them.
Parts from the most ordinary pine treated in this way serve in the open air for 150 years or more, and painted with oil paint require repainting no more than once every 15 years.
Restore windows
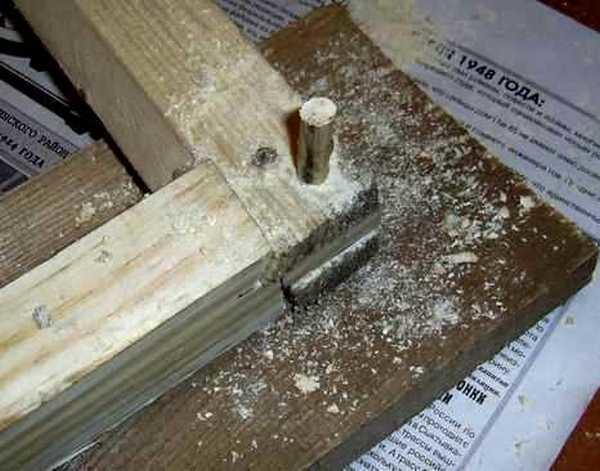
Dowels and wedges

Before taking on the actual restoration of wooden windows, you need to prepare new pins and wedges for them. The pins are drilled with a core drill from any straight-layered industrial wood. You need to drill CROSS-FIBER, as shown in the figure. Hastily planed "chopiki" frames will not last long. For each dowel, it is necessary to prepare in advance a wedge with a length of its diameter, a width of 5-7 mm and a thickness of 1-1.5 mm. The best wedges are oak and mountain ash. The diameter of the dowel is 0.5-0.7 mm larger than the diameter of the mounting hole for it.
Outward alignment
The leveled frame is assembled, while not fixing anything, on the slipway; it must be covered with plastic wrap in advance. They are aligned diagonally, as before, and are also fixed with nails driven in from the sides. Drill through the fastening holes again.

Next, the frame is disassembled, the mustache and grooves of the joints are coated with liquid nails, quickly (the glue hardens in a few minutes) is collected in a slipway, just as quickly checked with diagonals and, if required, trimmed. When the glue sets, they start fixing with pins. It is impossible to postpone it for another day: in order for the pins to hold the frame properly, the glue joint during their installation must still be sufficiently plastic.
The pins are lightly greased with liquid nails and hammered into the holes with a mallet. THE NAGEL FIBERS MUST BE LOCATED CROSS THE WOOD FIBERS! This is an indispensable condition for a reliable connection, see fig. Finally, the pins are fixed with wedges on both sides, driving them ON the FIBERS of the pins, also see the figure.
The question may arise: what about the counterpart? The fibers of the nail will go along its fibers.
The fact is that after driving the wedges into the pins, the counter piece will fall on the “waist” of the pin and will not split. And a wedge driven into the dowel even before the glue has completely hardened will give, in addition to the lateral one, some vertical force, so that the entire joint will be compressed and the glue will gain strength under pressure. After 3 days of exposure at +25 degrees, such a frame, dropped at an angle from a height of a meter, remains rectangular.
Fitting the frame and sashes
The rectangularity along the outer edge does not guarantee the straightness of the mounting openings: the tree may dry out unevenly. Therefore, the next stage of work is the alignment of the inner quarters.
First, we adjust the window frame and the vents in the corresponding sash: we put the frame on the priest and, in turn, check the quarters with a plumb line. If there is at least one exactly perpendicular, we take it as a base. If not, we will have to suffer with the square and the bus until we find the most "left" corner. From it, then from other corners with a pencil on the flight tire, we beat off the lines of the new opening and a zenzub with a chisel, and at the corners with a chisel we select the excess (in the figure - on the left).

Further, in the same way, we check and align the flaps OUTSIDE. Then we lay the sashes next to each other and align them in height and width, as shown in the figure on the right. Quarters under the glass can not be touched: both for the view and for the reliability of the window, their slight distortion is insignificant. But if you get a taste and want to align them too, it won't hurt.
After the described operations, the sash together will be smaller than the frame landing opening. To fit into the frame (it is into it, otherwise the window will not close later!) We put strips of plywood in quarters on liquid nails. When the glue hardens, we bring it to accuracy with a chisel and a chisel, select the recesses for the fittings. Then we grab them in 15-25 cm with small carnations, sinking their caps with a doboinik. Then we saturate the linings with drying oil with a 40 mm flute
Putty and sanding
Putty for small grooves can be prepared by yourself by mixing sawdust on liquid nails in a ratio of 3: 1 by volume. You need to knead quickly, in small portions, and just as quickly putty: the glue sets in a few minutes. Finally, sand the frame with sandpaper.
Reminder: before puttingty, do not forget to reinstall the ebb, on liquid nails and then on regular ones.
Painting
For decades, wooden windows have been painted with oil paint. The best option is to buy thickly grated paint and mix it yourself in linseed or "wood" (walnut) oil, as artists do. "Natural" ready-made oil paints on the market most often turn out to be based on synthetic or mineral oil thinners, which are much inferior in durability to traditional ones. Glyphthal and pentaphthalic enamels are poorly suited: after 5 years the window will require repainting, and unnecessary layers of paint spoil the look.

When purchasing thick paint, make sure the pigment is mineral and not synthetic. White can be tested by rubbing a pinch between the fingers: there should be no slippery sensation and the powder should stick to the fingers. The synthetic pigment almost completely flies off when shaken off.
Advice: the main parts of the paint are pigment, filler (dry) and thinner. If you want your windows to shine for a very long time, choose a paint filled with marble flour (microcarbonate).
Knead the oil paint in a wide flat dish: pour it in a bunch, make a hole in its top, pour oil there and knead. The oil is added in small portions to the desired thickness. For windows, the consistency of liquid sour cream is needed.
Video: an example of painting a wooden window
Finishing
Finishing "by nature" in the described technology is made with stains. Stains change the tone of the wood and accentuate its texture: an ordinary commercial pine, after being treated with a suitable stain, can be almost indistinguishable in appearance from bog oak, pandana or mahogany. It is advisable to experiment on old chocks before decorative finishing: choose the tone and degree of dilution.
 Finishing with wood stains also has additional advantages: the coloring composition penetrates deeply, coloring the wood in the mass, so that after sanding it will not have to be painted over in case of repair. In addition, the stain increases the wood's resistance to decay and UV rays.
The decorative finishing of the window is completed by its varnishing with transparent or tinted acrylic varnish, the installation of fittings and glass. The only competitor to acrylic in terms of quality is Japanese tung varnish, but not every oligarch can afford it.
Glazing
Before installing the glasses into the inner corners of the quarters under them, squeeze out aquarium silicone glue over a thin sausage. After fixing the glasses with carnations, remove the drips of silicone with a cloth moistened with vinegar. It is not necessary to wipe the cloves dry from the silicone: it will protect them from corrosion. After the silicone hardens (2 mm / day), we seal the glass with putty, as usual: chalk mixed with drying oil. If the glasses are to be fixed with glazing beads, they must be pre-processed, like other wooden parts, and painted.
Outcome
The old technology of restoring wooden windows, complemented by modern materials, works wonders. A completely shabby window, which has been in the hands of a skillful and neat craftsman, looks no worse than a plastic one, and retains all the useful properties of a tree.
Video: an example of work on basic repair and insulation of windows
Do-it-yourself repair and restoration of wooden windows is an occupation for the patient. But it allows, firstly, to save money, and secondly, to get great looking and well-kept warm windows. After all, along the way with staining, you can lay insulation, which guarantees the absence of drafts. You will get windows according to the so-called "Swedish technology".
You meticulously inspect the window sashes and frame, open and close several times, see if there are any gaps and how large they are. Assess the condition of the wood: are there any rotten areas, if any, what are their sizes.
The first stage is dismantling and assessing the condition of the windows
The first step is to establish whether it is possible to restore the affected areas or whether a rotten fragment requires a complete replacement. If replacement is unavoidable, there are only two options: if you know how to work with wood - cut out the required part yourself, if not - you order it from the joiner. All other window defects can be eliminated by any person with "straight" hands with their own hands.
Tools and materials
Since we are repairing old windows, we will need to remove the old paint: restoration without this is almost impossible. For this you will need:
- a building hair dryer or a thick plastic bag, rags and 0.5 liters of pure kerosene;
- spatulas, wide knife (boot).
In the future, you will need to repair damage, level the frame and sashes, etc. The set of tools here is more extensive, but even if you buy them, it will not take very much money, and you can make them even less if you rent.

- hacksaw, jigsaw, hacksaw blades;
- plane, chisels, sampling (if any - excellent);
- drills and drills of different diameters;
- dense wood for wedges and dowels;
- drying oil for impregnation or ready-made primers;
- putty on wood;
- rubber sealing cord;
- new fittings: hinges, latches;
- large, preferably carpentry square, building level, slope;
- glazing beads and silicone sealant.
For impregnation, you may need either factory compounds and a brush, a metal vessel, drying oil, an electric stove or a heat gun.

And the last stage of restoration will be staining. This stage is very important - the appearance and service life until the next repair depends on the quality of the work.
- set of brushes;
- paint for windows or stain and varnish, if you want to preserve the natural look of wood.
The procedure for the restoration of wooden windows
It all starts with dismantling. The sashes are removed first, then the frame itself. Can I not remove the window frame? It is possible only in one case, if it is in perfect condition: there is no damage to the wood, all angles are exactly 90 o and no defects. But it will be more difficult to work. In all other cases, dismantling is complete.
Glasses are carefully removed from the doors, the old putty is peeled off, all the carnations are given. Fittings are removed from all parts: they must be replaced. Now the external ebbs are carefully removed: the nails with which they were attached are probably almost crumbling.

Removing the paint
You can use a building hair dryer, setting the temperature to 200-250 o C. It is better not to set it anymore: wood loses most of its properties during high-temperature processing. For the same reason, it is undesirable to use a blowtorch: even without charring, you will break the structure of the wood and it will collapse faster.
Remove the paint from the window, heating the surface in a small area. Bubbles quickly appear on the surface, and you need to pry them off with a wide knife, scraper or spatula. It is better to find an old spatula, with a rounded blade already: a new one often "cuts" into the wood, and then you have to grind it for a long time. In general, it is more convenient to work with a wide knife, which is used by shoemakers.

The second method is chemical softening. There are modern compositions for softening paint, but how they affect the structure of wood is a question. You can use the old, proven method: treat with kerosene. You will need a large bag made of thick plastic wrap (must be whole, without a single hole), old cotton rags (they should not fade) and kerosene. It is undesirable to use other solvents - they again affect the structure of wood fibers.
Wrap the frame with strips of fabric, put it in a bag (its height should be enough for the neck to be tied). Pour out the kerosene and tie the bag tightly. After a day, you can remove the paint. But do not take everything out at once - while they are processing one part, the paint on the others will harden. We took out one part, tied the sack, removed the paint. They took up the next one.

When removing paint in shallow depressions and cracks, the paint can not be removed: less need to putty and level. But this is only if you paint the window. If you plan to varnish, you will have to do everything scrupulously. But for the first experience, it is better to process it under paint: easier and faster.
Align the frame
For leveling, a fairly large, absolutely flat surface will be needed. This can be a table (but the surface is necessarily flat), a workbench, a sheet of plywood laid on stools, etc.
The first is to align the frame. Laying and setting the corners. They should be exactly 90 o. We inspect the contour: the strips should be even. At this stage, we remove the places affected by rot or replace the completely rotten parts of the frame with freshly made ones. (How to process a rotten area is written a little below).

We check the planks in vertical and horizontal planes, remove the excess with a plane. In the corners we earn extra money with chisels. The result should be perfectly straight, level surfaces. We check the corners again, measure and align the diagonals, fasten the frame at the corners with nails. Then we take a skin or a sander (belt) and process until smooth.
We restore the sashes
We disassemble the connections of the shutters. They are assembled on pins - small round wooden hairpins. For windows that have served for more than a decade, they must be replaced. It is easier not to knock them out (you can do this), but drill with a smaller diameter drill. Then remove the remnants and clean the hole for the installation of a new retainer.
If necessary, the sash can be disassembled completely into planks. Clean the joints, align the planks, cut off all unnecessary with a plane, having worked part-time where the corners are needed. In general, put everything in order.

The next stage is the assembly of the sashes. Fold, processed boards, measure diagonals and corners. Now a tricky operation: you need to remove the strips, coat the grooves and joints with glue and install them back. In this case, it is necessary to ensure that the sash does not warp. After setting the bar in place until the glue has seized, set the corners and diagonals.
After assembly, for greater reliability, we will install new pins. Let's make them first. We take a core drill with an inner diameter of 5-7 mm. Drill cylinders from a block of dense wood across the fibers (exactly across). These will be pins. The diameter of the stud should be slightly larger than the drilled hole in the frame (approx. 0.5 mm). So it will "sit" tightly and hold the structure well.
Do not use planed chopiks instead of dowels: the window will have to be repaired again in a couple of years. Cut across the grain, they will hold their shape for at least 10 years.
Wedges are cut from a piece of oak or mountain ash. Their width is 5-7 mm: depending on the diameter of the prepared pins, and their thickness is 1.5-2 mm. They are then driven along the fibers, wedging the hairpin and achieving excellent fixation.
If, as a result of the bulkhead, the hole becomes uneven, level it with a file, or with a drill. But try not to make it wider. Coat the seat with wood glue (it must be of good quality), drive in the pins. They fit well with the glue. Then use a screwdriver to make a groove along the fibers, into which insert the cut wedge, and hammer it in. Cut off the excess with a sharp knife so that everything is level.

So we change all connections, constantly controlling the geometry of the sashes. After everything is assembled, the flaps should be quite stiff, but do not wobble them too much: the glue has not yet dried.
After all operations, the sash can be of different heights. We level them so that they are the same both inside and out. Now we take the frame and put the sashes into it. They are definitely less than necessary. To make them sit tightly, glue strips of plywood of suitable thickness and width onto the frame on liquid nails.
All parts (and the frame) are laid on a flat surface, a load is placed on them. You can lay it on a flat floor, on top of several boards, and below them a solid load: about 100 kg. Leave to dry and level for two or three days.
After the glue has dried, we bring the frames to the norm, where necessary, by sanding and making notches. We mark the places for fastening the fittings, we make recesses for it.
Installing the seal
How to lay a seal in windows using Swedish technology, the shapes of these seals are described in detail in the video.
Impregnation
There are various ready-made impregnations. How to use them is described in the instructions. There is nothing complicated in the process: under certain conditions, you need to apply the composition and wait until it dries. There can be several treatments, one or different compositions.
But there are craftsmen who are sure that the polymers included in the impregnation deteriorate the thermal insulation properties of wood. They work only and exclusively with drying oil. Moreover, there are two processing methods: cold and hot.
With the cold method, the heated drying oil is applied with a brush to the frame and sash of the window. Leave until completely absorbed and dry, when the surface becomes non-sticky to the touch. The treatment is repeated four times. Such processing guarantees the excellent condition of wood and paintwork for 5 years. After you have to repaint.
 Linseed oil impregnation is a great way to preserve wood
 During hot processing, drying oil is heated in a vessel to high temperatures. This occupation is fire hazardous - drying oil can flare up. Therefore, we first prepare a piece of tarpaulin, felt, etc., with which it will be possible to cover the vessel. It is better to heat it on a heat gun or hot air from an electric stove (not on a stove, but above it): sometimes it is necessary to quickly remove the heat source in order to avoid a fire. Because the fire is not suitable.

After some time, the drying oil begins to bubble: air, moisture comes out. There is one important point: when the bubbles are already going, it happens that the smell of drying oil increases sharply. The heat source must be removed quickly. If you hesitate, the vapors will flare up, a mat will come in handy. If you have time in time, it will pass without incidents. Heating can be continued after a few minutes. When the bubbles are gone, you can saturate the parts.
The part is immersed in a heated drying oil for 3-5 minutes. At the same time, it is convenient to work with a crochet: they can hold it and pull it out conveniently. After pulling it out, carefully put it on a clean place to dry. Do not grasp the parts with your hands. Even in mittens: hot linseed oil will soak them in an instant, and burn your hands. The burn will be serious: the temperature is about 130 o C.
Craftsmen say that after such processing, wood can stand even on the street for decades. With good paint, its renewal will be required no earlier than 10-15 years. Like this.
Putty and sandpaper
Now the frames are rigid and fear nothing. Now we putty and sand them. For significant damage, we use a coarse filler with sawdust. For a thinner and softer finish. If you are going to paint the window white, take white putties. They will not be visible through the paint.
The technique is simple: fill cracks and crevices with putty, then remove the excess. Metal spatulas of small width are used more often. But in some places it is more convenient to work with rubber: they are designed for grouting when laying tiles, but they are also convenient to work with putty.

After the composition has dried, take a medium-grain sandpaper (sander) and clean off the excess, if any. At the same time, go through the entire frame, bringing everything back to normal, leveling out irregularities. Then, with fine-grain sandpaper, everything is smoothed to an ideal (as far as possible) state.
Dyeing
You choose the type of paint yourself, based on your preferences. The only thing you can advise is whether to take glossy or semi-glossy ones. They retain their color for a long time. This is especially true for white paints. Surfaces painted with matt white paint quickly turn gray: they have a porous structure, which gives them a “matte finish”. These pores are clogged with microscopic dust particles, which give a grayish tint. Therefore, for perfectly white windows, take a gloss or semi-gloss.
The first layer is a primer. This is one part of paint diluted with two parts of a suitable solvent. After the primer is dry, the base paint can be applied. There will be several layers, so everything will be painted over.

Do not take a lot of paint on the brush: there will be drips, which are not easy to deal with. You dip, squeeze, rub well. You need to move from top to bottom without changing direction. Only in this way the layer will be even. Apply the first layer by brushing from left to right, the second from top to bottom, and the third layer from right to left.
Each subsequent layer is applied only after the previous one is completely dry. If after the first application of the paint there are streaks and irregularities, after the paint has dried, take the sandpaper and clean them. Just don't rub it down to wood. Make the second layer more accurate, but here you can still sand it a little. The third should be flawless. Once the paint is dry, your DIY refurbished window can be reattached.
Glazing
Installing glass is not the most difficult thing, but it is responsible. Prepare a transparent moisture-proof and frost-proof sealant. You coat the seat with it, insert the glass. On the other hand, they are pressed with glazing beads. They are also treated with sandpaper, impregnated and dyed. Then they coat the glass with a sealant around the perimeter of the glass, press the glazing beads and fix them with small carnations.
Replacing rotted sections of a wooden frame
If the site is rotten, you can help grief in two ways:
- cover with a special reinforced putty, recreating the required shape;
- remove the damaged area by inserting a patch in its place.
 A sure way to eliminate rot is to cut out the damaged area
 The second option would be more correct in terms of durability: here it is possible to remove the entire infected area, ensuring that the rot does not spread further. The technique is simple. Saw out the affected area, grabbing some healthy wood. Cut out a piece of exactly the same shape. Coat the joints with wood glue, insert the patch, level it, if necessary, fix it, leave it until the glue is completely dry.
After that, it is necessary to putty the seam, sand and paint. Everything. The window frame (or sash) has been restored.
But it is not always possible (or willing) to cut out a damaged piece of wood. Then you can use an epoxy putty with reinforcing fiber. Once dry, it is tough enough to keep its shape.
The first step is to separate everything that can be removed. All the dust and rot. We blow off the dust, where possible, we get to a healthy tree. If you plan to use the restored frame for a long time, it is necessary to treat with antiseptic impregnations: to prevent the spread of rot as much as possible.

After that, the composition is applied to the damaged part with a spatula. Putties of this type have a rather thick consistency, you can mold any configuration. Give a shape close to the desired one, but slightly larger in size: after drying, it will be possible to sand and level the level. It takes about a day to dry, but the exact time depends on the composition, temperature and humidity of the air. After sanding and leveling, it remains only to paint the window. Then nothing will be noticeable at all.
Outcomes
You do not need any super-abilities to repair and restore wooden windows with your own hands. Not the most sophisticated tools are required, accuracy, patience and a fairly decent margin of time.