In this article, we will take a step-by-step look at how it is done correctly. Today, not every person is able to independently install interior and exterior doors, into doorways, or at least do it correctly. Turning to specialists will take a lot of money if you need to install, say, 10 doors to your new house or apartment. To save extra money, I advise everyone to read this step-by-step instruction. Particular attention: we will talk about wooden doors for internal use. Do-it-yourself door installation from scratch consists of 10 steps.
Step 1.
Do-it-yourself door installation.
We start by unpacking the purchased set of interior or entrance doors, and the door frame from it. This should be done very carefully, as often at this stage the door receives the first injuries. When opening the package with a knife, sometimes the surface of the door itself is touched, and if the above-mentioned door has a varnish or laminated coating, the defect is very noticeable, and it is not easy to eliminate it. Special attention: Initially, I advise you to unpack only the door frame. It is better to unpack the door itself before direct use, so as not to spoil its appearance even before use.

Step 2
Do-it-yourself door installation.
The unpacked door frame should be assembled. In the unpacked kit you will find three main components and one additional. Additional is a connecting wooden plank for temporary fixation.
At the ends of the door frame panels are plastic inserts hammered into special grooves.
These inserts must be knocked out, but this should be done very carefully so as not to damage the surface of the door frame. To do this, it is best to use a wooden peg, and not hit the insert with a hammer right away.

Step 3
Do-it-yourself door installation.
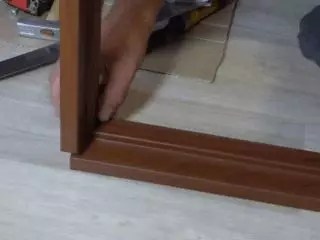
Details are assembled in a U-shape groove to groove. At this stage, it is important to keep the correct geometry. Irregularities are not allowed here! The connected elements are fastened with previously knocked out plastic inserts described in step 2. They are hammered into the holes formed when connecting the door frame. This work is done with an ordinary hammer. You should finish the bar using a peg, as before, so as not to spoil the wooden surface.


If, when inserting the insert, the elements of the box have shifted, they can be leveled with the same hammer. Beat on the body should be on the wooden plank attached to it.
The final result at this stage should be the same as in the photo.

Step 4
Do-it-yourself door installation.
At all subsequent stages, we will need a special power tool, which includes:
- screwdriver;
- drill;
- milling head.

Having completed all the steps described in step 3 and, thereby connecting the top of the door frame, we can move on to its bottom. The same additional element of the kit is used for this - a fixing wooden plank.
Having measured the width along the bottom of the box, we fix it with a wooden plank. We fasten it with screws in places that will subsequently be sealed with mortar into the wall. In this case, the screw should not be screwed in from the very edge of the bar, since at the place of fastening you will only split the bar. We twist at an angle approximately as shown in the photo.

See the photo below for the end result of step 4.


Step 5
Do-it-yourself door installation.
At this stage, you should measure the height of your doorway. It is necessary to take into account the height of the threshold or its absence. Having decided on the desired parameters, we cut off the bottom of the door frame. This is best done using a miter saw.


Step 6
We insert the door into the door frame prepared for installation for fitting. I remind you that even at this stage it is not necessary to unpack it completely. It is enough to cut out only the holes for the handles and the lock. How they are installed will be discussed later. If all is well, you can safely proceed to install the door frame in the doorway.

Step 7
At this stage, we proceed to the immediate. To do this, we need to set the door frame perfectly evenly in the opening. You can do this with a level. After that, we fasten the box to the opening. In our particular case, ordinary wood screws can be used, since wooden blocks are laid in the opening of drywall sheets. In other cases, you will have to use a dowel-nail, etc. materials.
Fasteners are screwed in at an angle in those places that will subsequently be hidden under the mounting foam and trim. In no case do not fasten your frame through the front side. This will greatly spoil the appearance, and can also cause the door to malfunction, for example, it is difficult to open or close.
The gap between the door frame and the opening is foamed with mounting foam. After that, a slope is constructed in this place using dry construction finishing mixtures.


Step 8
While the mounting foam, with which we closed the gap between the box and the wall in the opening, hardens, we will begin to prepare the door leaf. We will cut a lock into it, install handles and hinges.
Using a measuring tool, we outline the location of the door lock at the end of the door. Based on the shape of the lock, we outline the contour along which it will be necessary to remove a layer of wood so that the front part of our lock is flush with the surface of the door leaf. To remove wood, use a milling saw.
In the photo below, there is a lock used in our particular case, as well as a cut layer of wood necessary for the correct installation of the above-named lock.


For the working part of the lock, a deeper hole is needed, which is best done with a drill with a drill of a suitable diameter.


The work on installing the lock does not end there, since it is necessary to make more holes for the handles on both sides of the door to be installed. This is done with the same drill with a drill. As I said, it is important in both cases to take into account the desired diameter of the drill.
At the same stage, we install the door handles. In the hole in the canvas, in which the lock is installed, lay the core. We put handles on it on both sides. Next, we clamp all the necessary fasteners and clamps. In the described case, three screws and a bolt, which is screwed in with a hexagon, act as clamps and fasteners.


The final step in this step is the installation of loops. In the designated places, by analogy with the installation of the lock, loops are attached at the ends. As for the lock, a layer of wood is removed with a milling saw so that the attached surface of the hinge is flush with the door leaf.


Step 9
Having prepared the door, we return to the box. As on the door itself, on the box we mark the places for screwing the hinges with a measuring tool. Just as in previous similar cases, it is necessary to use a milling saw.
Next, we outline the place where it should enter the body of the door frame. In this place, using a chisel, we make a hole of the required depth and fasten the plug, which comes complete with hinges, a lock and handles.
Step 10
We hang the door leaf on the hinges screwed to the door frame and, admiring the result, we can deservedly praise ourselves.
The end result is shown in the photo below.

It is better to unpack the door itself before the very start of operation.
Generalization: In each of the stages where wood was sawn, drilled or cut, its bare areas must be covered with plain paint. This will enhance the look and also preserve and protect the surface of the wood. Do-it-yourself door installation is real. And also adds you experience in the field of repair.
I hope the article helped you gain the necessary knowledge and the necessary level of confidence in order to independently begin installing doors with your own hands. Good luck in all your endeavors.
Do-it-yourself step-by-step video for installing doors
Interior doors sooner or later become unusable and have to be replaced. This procedure is not too complicated, so it is not necessary to use the services of hired workers. To cope on their own is quite within the power of someone who has even the slightest idea about the saw, self-tapping screws and the level. In this article, you will learn how to install an interior door with your own hands.
Types of interior doors
The construction market offers a huge number of interior doors that are made from various materials. The most common are: fiberboard, MDF and natural wood. I would like to consider the advantages and disadvantages of doors made of such materials in more detail.
fiberboard doors
The frame of such a door is made of wood, and the sheathing is made of fiberboard sheets.
The advantages include:
- low price;
- lightness of the material, which allows you to easily bring the door from the store home;
- ease of installation.
Such advantages increase the popularity of these doors among the population. Hardware stores have a fairly large selection of fiberboard doors, as they are in the greatest demand.
Of the shortcomings, it should be noted:
- Fiberboard material is not strong enough, so the doors can quickly become unusable;
- Poor resistance to moisture, therefore not suitable for installation in bathrooms.

MDF doors
Doors made of MDF material are the most acceptable for the population and meet the price-quality ratio. Compared to fiberboard, such doors have certain advantages, namely:
- high resistance to moisture;
- high level of sound insulation;
- high strength material.
Of the shortcomings, only a higher cost can be noted, compared with fiberboard doors. At the same time, the quality more than justifies the means.

natural wood
Such interior doors have always been and are held in high esteem. The material is durable enough to use. The cost of a door will directly depend on the type of wood from which it is made. The classic interior and the author's design are perfectly complemented with the help of such doors.

Step by step installation instructions
For an example of how to install an interior door in stages, we will take doors from fiberboard.
Step 1
Before starting work, prepare the necessary tools and consumables, such as: a saw, a screwdriver, an electric drill, a tape measure, mounting foam, dowels, a level, wood screws, a handle, drills and drills of the required diameter.

Step 2
Make a diagram for installing the door frame in the opening. It is worth paying special attention to the threshold. If you cannot hide it on the floor, then it is better to choose a box without it, that is, in the shape of the letter P. Such a box does not have a crossbar at the bottom, which will ensure walking without any obstacles.
Step 3
Box installation. Before attaching the door frame, make sure that there are hinges. The door must have a cutout for the handle and for the lock. Gather all the pieces of the box together and fit into the opening. For convenience, fold all the parts on the floor as they will be installed in the opening.

Step 4
Installation of the door frame in the opening. At this stage, the assembled door frame is installed in the opening and leveled.
Step 5
Landing the door on the hinges. This process is quite simple. The doors are hung on the hinges by hand, it is better to ask someone to help you at this moment.
Step 6
Foaming the gap between the wall and the box.

Step 7
Finishing doorways. The type of finishing of such an opening is selected taking into account the type of the door frame itself and the width of the opening.

In order to perform the installation of interior doors without the involvement of hired workers, it is necessary to consider some steps in more detail in order to avoid unpleasant consequences in the future.
Box assembly
The most painstaking and crucial moment in the assembly of an interior door is the installation of a box. But before you install it, you need to assemble it correctly. At this stage, the proverb about measure 7 times is as relevant as possible.
So, to assemble a U-shaped box, you need:
- Feigned rack or bar.
- Loop bar.
- Ceiling plate.
To carry out the assembly as accurately as possible, you need to measure the size of the opening and the canvas itself down to every millimeter. Next, it is worth calculating the dimensions of the racks and lintels, taking into account the dimensions of the gaps. After that, saw off the individual bars and connect them into a single whole. It should be noted that the thickness of the timber should not be less than the thickness of the canvas. When taking measurements, do not change the tape measure, use only one. Having measured the canvas on the right side, measure it on the left as well, do not rely on the accuracy of the match. All deviations will be necessarily taken into account in further work.

Calculation of the installation of an interior door
When taking measurements, consider the following:
- On the outer sides of the entire beam (ceiling, hinge and feigned), which are in contact with the opening, it is necessary to leave a gap of 1 cm wide for mounting foam.
- There should also be a gap on the inside of the entire beam, but a little less, 0.3 cm. If the box has a threshold, then such a gap is necessary around the entire perimeter.
- The lower plane of the door frame and the floor must have a gap between them. On average, its height should be 1 cm. For linoleum, 0.8 cm is enough, and for fleecy coatings, 1.5 cm.
If the opening is not enough in size, it should be increased and vice versa, reduced if it is too large.

Insert hinges
Usually, two hinges are enough for interior doors, but sometimes three may be needed. The hinges are installed at a distance of 250 mm from the edge of the canvas. If both the canvas and the box are made of wood, then the place for the loops must be chosen so that there are no knots. Initially, the loops are attached only to the canvas.

The stitching order looks like this:
- We select the places necessary for the loops and outline them with a knife blade.
- You can work with a milling cutter or a chisel, in which case the material must be matched to the thickness of the loop.
- We prepare the recess and install a loop in it, the plane of which should be flush with the canvas.
- The loop that is already inserted into the hole must be fixed with self-tapping screws.
When you have installed the hinges in the door leaf, it is placed in the door frame and the necessary gaps are set.
On the side of the hinges, the gaps should be 5 mm, on the opposite side and at the top 3 mm.
When the gaps are set, they are fixed with wedges. It is also necessary to set the canvas itself, exactly horizontally and vertically.
When everything is exposed, the location of the mating parts should be noted. Sometimes it is more convenient to remove the installed loop and then reinstall it. According to the markup, you need to make a recess. The depth should be such that the surface of the door frame coincides with the hinge.

Hardware installation
Installation of interroom doors cannot do without installation of accessories. According to all safety regulations, interior doors should always open outward. The installation of handles, as well as loops, begins with markings, which should be carried out very carefully. First, mark the level of its height. Usually it is 90 cm. On one side, draw a line with a pencil, stepping back from the edge of 60 mm. Using a ruler, draw a line on the end and make a similar marking on the other side of the door. All marks must be pierced with an awl.

Drill a hole half the thickness of the canvas. Do the same on the other side of the door. At the end of the canvas you need to make a hole with a pen drill. Make sure that all measurements match and do not allow deviations even of 1 mm. Take a chisel and with light taps make a deep cut for the latch. Screw it on with screws. Now it remains only to insert 2 parts of the product. Bring the parts on both sides and try to get into the holes with the guides, then tighten everything with bolts.

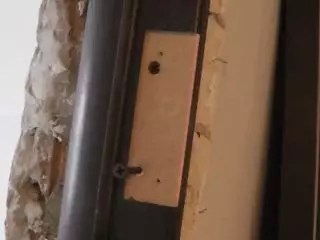
At the end, you have to install a metal plate on the end of the door frame. Cut out the cutouts for the plate. Make sure the frame fits snugly against the end and secure the frame with screws.
Box installation
How to install the box correctly? This process requires you to be extremely careful and patient. It is better if someone helps you, then the measurements and installation will be much more accurate.
Installing the door frame in the opening includes the following:
- The pre-assembled door must be carefully lifted, preferably with an assistant, and installed in the opening.
- In order to leave the necessary gaps between the wall and the box, you need to make wedges from the remnants of the material.
- Next, screw in the screws.
- We clearly align the base in all directions. There should not be any distortions and discrepancies in the gaps. But if there are any, they can be leveled by loosening or tightening the screws more tightly.
- We hang the door leaf on the hinges and check.
- Where the mounting foam will be poured along the box, we seal the canvas with construction tape. Insert cardboard into the gap and close the door.
As you can see, the process is not that complicated, however, it requires precise measurements and compliance in all sizes.

Foaming
This step is quite important. Filling the gaps between the box and the wall with foam should be carried out after the door is installed. Do not forget that as it dries, the mounting foam increases in volume. If you suddenly overdid it with its quantity, it may well pull out the screws and even bend the box, after which you will not be able to close the door. If this happens, then the installation of the door will need to be started again. During foaming, it is important to lay gaps between the wall and the box with something.

Applying construction foam for gaps is not hard work. The vertical seam must be filled from below. Be extremely careful with the amount of foam used.
Only a third of the opening needs to be filled. In addition to the deformation of the door, the foam can come out and spoil the appearance of the leaf.
Drying of the foam occurs in a day at a temperature of 20 degrees.
Finishing openings
When the door installation is completed, the openings require finishing to bring the overall appearance of the space in order. The type of finish should be selected based on the width of the opening and the door frame.
With a thin wall, when its width is equal to the width of the door frame, platbands can be used for finishing. This is usually how bathroom doors are designed. This option is the simplest and most common. A set of platbands is attached to all sides of the box and closes the building foam. If the platbands are made of wood, then first they need to be attached with screws and only then painted. If the platbands are laminated, then they must be fixed with nails without caps or with screws with caps.
If the doorways are wide, then you can finish them using the same platbands or an additional strip, which can be cut to the width you need. Such a bar is attached to the wall using building silicone. The plank and platbands can have a different color with the door. Recently, it is quite important to choose contrasting solutions.

If the door frame is made of wood, then it can be finished with slope plaster. Cement-sand plaster will perfectly emphasize the natural texture of your doors. But this method is not entirely suitable for finishing fiberboard boxes. This is due to their incompatibility with high humidity, which involves plaster work.
Thus, we can say that installing interior doors with your own hands will not take you as much time as it would seem at first glance. Detailed step-by-step instructions will help you avoid the most common installation errors. Correctly performed measurements will guarantee a successful installation of the door. In addition to your own efforts, do not forget to choose quality materials for the work being done so that your efforts do not become a waste of time due to the poor choice of building foam or self-tapping screws.
So that it will serve for many years, regularly performing its function.
Read in the article
How to choose and install an interior door in size and configuration
Manufacturers offer products of various widths and heights, which allows you to choose the right model for any opening. Cloths for swing structures, made in Russia and most EU countries, can have a width of 600 mm, increasing in 100 mm increments. The minimum width of French-made doors is 690 mm. The resizing step is 100 mm.

When choosing a door leaf, the dimensions of the door frame should be taken into account. If the opening is of irregular geometric shape, the minimum width is taken into account. Otherwise, it will need to be expanded, which will greatly complicate the installation work.
Attention! The standard height of interior doors is 2 m.
When choosing a suitable product, you should also focus on the purpose of the room for which they are intended. For living rooms, canvases with a width of 60-120 cm are purchased, for the kitchen - at least 70 cm, for a bathroom or toilet - from 60 cm.

Items sold may vary. In the maximum version, the delivery set includes a door block. The installer will only need to cut the sidewalls to size, level the structure and fix it. In the minimum version, all elements of the door system are purchased separately, and then mounted together.

How to install an interior door with your own hands, if you only change the canvas
If the door frame is strong enough, completely satisfied with the design and color of the owners, it is not necessary to completely change the system. It is enough just to replace the sash. Next, we will tell you how to install it yourself with a partial replacement of structural elements.

How to remove an old door leaf

How to install the interior door leaf yourself
When starting to install the sash, it should be raised to a small height and a board placed below. We combine the elements first of the upper and then the lower loop. When figuring out how to install it yourself, you should pay attention that it is better to do this work together. In this case, it will be possible to perform the installation better.

A video on how to properly install interior doors on your own will help you understand the nuances of replacing the door leaf.
Do-it-yourself installation of an interior door with a box - step by step instructions
If you plan to do the installation yourself, the step-by-step instructions will help you better understand the process. We offer you to find out the nuances that will help to carry out the installation qualitatively.

What tools and consumables are needed for work
The list of tools, equipment and consumables will depend on the design features of the installed system, and how it is planned to install interior doors. As a rule, you need to prepare:
- drill. If the work is carried out in an apartment building, then instead of a drill it is better to take a hammer drill;
- drills for wood by 3-4 mm and concrete by 4 and 6 mm;
- roulette;
- pencil;
- building level;
- for wood and concrete;
- mounting foam.

The procedure for dismantling the old door and carrying out work to strengthen the doorway
Do-it-yourself installation of interior doors should begin with the dismantling of the old structure. This should be done very carefully so as not to damage the doorway. For this:
- remove the door leaf from the hinges;
- we remove cash. To do this, we insert an ax between the product and the wall and gently squeeze the fasteners;
- dismantle the box, after removing all fasteners. It is usually located near the castle and in the area of \u200b\u200bthe loops. Screws should be unscrewed at low speeds;
- we remove the allowance.

Having dismantled the door, you should carefully examine the opening. Remains of old material should be completely removed. In the presence of mechanical damage, the geometry of the opening should be restored. You can do this with .

If a heavy interior door is to be installed in the apartment, measures may be required to strengthen the doorway, including:
- around the entire perimeter of the doorway;
- cutting to the size of the channels for the entire surface of the doorway;
- installation in prepared strobes of channels. To fix them in the opening, studs of a suitable diameter are used;
- in the corners, individual elements are welded together.

How to install an interior door frame
After the opening is fully prepared, we suggest figuring out how to install the door frame of the interior door. The procedure will depend on the form of delivery of this element. Manufacturers offer a box:
- assembled. In this case, the assembled structure can be immediately mounted in the opening;
- in the form of cut-to-size elements. By connecting them together, the structure is installed in the opening;
- like a curly bar. In this case, the elements of the desired size are first cut off, then connected to each other, and only then the box is mounted.
Let's consider the last installation option in more detail.

Taking measurements and assembling the door frame
We measure the parameters of the doorway using a tape measure of sufficient length. When determining the height of the uprights and the length of the crossbars, the gaps between the frame and the door leaf should be taken into account. They are selected from the range of 5-10 mm. The gap between the floor and the sash can be larger.

A comment
Head of the team of the repair and construction company "Dom Premium"
Ask a Question" Measurements of the same parameter should be made at several points.
"| Illustration | Action Description |
 | We cut off the elements, ensuring the formation of the selected angle. The elements of the box can be located at a right angle or 45 °. There are other more complex options that you should not resort to when doing the installation yourself. It is better to entrust them to the master. |
 | We mark up the elements. |
 | We cut off the elements using a tool with fine teeth. |
 | We form landing grooves and connect the elements together. We check the correctness of the work performed by putting the sash into the assembled box. There should be equal gaps on all sides. |
Hinge installation
We mark the place where the loops will be located. Usually it is 20-25 cm above the lower edge of the sash and below the top. We remove a layer of material to the width of the fittings. In this case, the fastening will be flush. This can be done with a chisel or a special tool.
Attention! When forming a place for the hinges of an interior door, you should work very carefully so as not to damage the decorative layer.

Mounting the box in the doorway
We install the assembled box in the doorway:
| Illustration | Action Description |
 | We provide the required spatial arrangement with the help of pegs or timber. Auxiliary elements can be fixed in level before installing the box at the level of future hinges. |
 | We fasten the box using suitable fasteners. The space between the box and the wall can be filled with foam. |
How to install the door leaf of an interior door
Quite a crucial moment for those who learn how to install interior doors. First, the counterpart of the hinges should be screwed to the door leaf or the mounting holes should be marked if it is decided to use non-separable fittings. How to insert an interior door? You just need to put it on the loops. After that, you should make sure that it opens and closes well.

Installation of additional elements

Platband installation
Before installation, the platbands are sawn at an angle of 45 °. They are nailed to the box with finishing nails or nails without caps.
Wanting to install an interior door with their own hands, many overestimate their strength. Without the necessary tools and certain skills in working with the material, it is possible to hopelessly spoil an expensive product. If the decision is made, you must first familiarize yourself with the installation rules and carefully follow the recommendations of professionals.
Do-it-yourself installation of interior doors: step by step instructions
The process of manually installing doors between rooms begins with certain actions. We describe step by step the stages of the work performed:
- Remove the old door from its hinges, then tear off the cashing. You can use a hammer and a wide chisel or a small hatchet for this. Using a bent crowbar, you should dismantle the old box.
- Then you need to prepare an opening for the door to be installed. If its dimensions are suitable, everything remains as it was. If necessary, increase the opening should be used puncher. The width of the opening must exceed the dimensions of the door leaf by 10 cm, and the height by 5 cm.
- To fit the box, you need to use a clean and even plane. First adjust the upper horizontal part. You can calculate its length by adding to the width of the doors twice the thickness of the vertical racks of the box and 6 mm as the necessary gap to ensure free movement of the door leaf. Then you need to adjust the height of the vertical racks. In this case, it should be borne in mind that for a door without a threshold, the length should be increased by 10 mm. Another 3 mm must be left for the upper gap.
- After that, they begin to cut into the canvas and the loop box. To do this, at a distance equal to 200 mm from the edges of the canvas, recesses must be hollowed out. Insertion of loops begins with their application to the canvas to mark the boundaries of the recesses. The work must be done with a milling cutter or chisel. It is advisable to treat the resulting recesses with varnish, otherwise the tree will dry out over time. Then it is required to put a loop in the prepared bed and outline the places for fastening the screws. It is best to pre-drill them using a drill slightly smaller in diameter than the thickness of the screw. After that, you can fasten the hinges with screws, while attaching their halves with a ledge to the box, and those with a hole - to the door.
- Now you can finally assemble the box by connecting its parts at an angle of 45 °. You can fasten the box with self-tapping screws.
- Gently lift the box and begin mounting it inside the opening. Carefully check the verticality of the product, the perpendicularity of its components and the horizontality of the bar from above with a level. The gaps formed in the opening should be eliminated by using wooden wedges, and then mounting foam.
- After installing the box, it must be secured with dowels.
Here are the steps to take. The video "How to install an interior door with your own hands" will help you finally understand all the details:
Installation of sliding interior doors

There are many different options for sliding doors. They differ in material, appearance, other characteristics, although the principle of operation and design remain unchanged. Any such system has a canvas, rollers and guides.
Important: Do-it-yourself installation of sliding interior doors is carried out in different ways, it all depends on the purpose for which the sliding door is mounted. Usually it is installed to save space, since the space that is needed to open the swing door is freed up.
Schematically, the installation of the structure is divided into the following stages:
- Installation of guides.
- Fixing holders and fittings on the door leaf.
- Door installation.
- Installation of closers and limiters.
- Fixing dobors and platbands.
- Final adjustment.
A detailed installation of sliding interior doors with your own hands is shown in the video:
Installation of interior doors with extensions
If the thickness of the existing opening exceeds the width of the box, then to add aesthetics, you have to use extensions, fixing them directly to the block. The advantage of such components is the uniformity of all structural elements, quick installation. Before fastening, it is necessary to determine the dimensions of the extensions. To do this, measure the required width of the bar by inserting a box into the opening and measuring the uncovered width of the opening.
Important: The door trim can be cut to size with a circular saw.
To fix the dobor, it is necessary to screw the mounting strips on the back of it and connect them to the box.
It is enough to use three fasteners on each element. Then you should install a box with an extension in the opening and fix it. After that, you need to go through all the gaps with professional foam.
Two ways to install interior door extensions with your own hands on the video:
Installation of loops "butterfly"

Overhead loops, referred to "butterflies"- do not need a tie-in, they are easy to install. It is enough just to attach the product to the door end and to the box, screw it with self-tapping screws so that the door is ready for operation.
Let's take a closer look at this process:
- We apply a loop to the door end, maintaining a distance of 20 cm from the edge.
- We mark with an awl the points where you want to make holes for self-tapping screws.
- The inner part of the hinge is attached to the door, and the outer part to the frame.
- We drill holes according to the marks.
- We fasten the loops.
Installing the lock and handles in the door leaf

To install the lock in the interior door with your own hands, you should perform the following procedures:
- Measure 90 cm from the floor, attach the lock body to the obtained point.
- Mark the place where the handles will be attached.
- Make a through hole with a drill in the place where the handles are attached.
- Mark the borders of the niche of the lock mechanism on the door end, then drill a recess under it with a pen drill.
- Check the depth, for which insert the lock into the recess. Then, with a chisel, make a small niche, which will include the mounting plate of the lock mechanism.
- Treat all recesses with varnish.
- Fasten the lock with screws and attach the handles to it.
- Embed the counterpart of the lock mechanism in the same way.
Fasteners for cashers
Installation work is being completed on the installation of doors between the rooms with fasteners for cashiers. This process is easy.
Sooner or later, it's time to make changes to the interior, it may be necessary to replace the doors if they are categorically not suitable for the chosen new style. And then the question arises of how to install an interior door on your own in order to save a round sum on the call of the master. To hold this event is quite accessible to anyone who knows how to work with construction tools, has carpentry skills and knows the step-by-step instructions for the work.
Not a single residential building can do without. If the wooden box in which the old door is installed is in good condition, then only the door leaf and facing panels (platbands) can be changed. This process is much easier to perform than completely changing the door frame along with the canvas. However, even such a large-scale alteration, with the replacement of the box, is quite feasible.
Tools for the job
For any carpentry work, you must have the following tools at hand:
- Planer for leveling end surfaces. You may need both manual, for small delicate work, and electric - if the fit is voluminous enough.
- Joiner's square - the longer, the more accurate the marking will be.
- Building level, plumb.
- Screwdriver with a set of nozzles (bit).
- An elongated screwdriver - you may need both a straight blade and a curly one, so it's better to have a set.
- One type of saw is a hand saw or an electric circular saw.
- Roulette, pencil.
- Miter box for the correct cutting of corners when fitting wooden parts.
 Miter box with a hacksaw - necessary for precise fitting of wooden parts
 - Construction knife.
- Hammer.
- Chisel, chisel for removing layers of wood when making grooves for hinges and a lock.

- Hole saw for cutting large diameter round holes.
 "Crowns" or hole saws - for cutting even holes of large diameter
 - Electric drill.
In addition to tools, you will need auxiliary materials and consumables:
- Wooden wedges for door frame spacers.
- Stain and varnish, primer and paint.
- Self-tapping screws, dowels and anchor fasteners.
- Mounting foam.
door drawing
It is recommended to draw up a drawing before starting work, on which it is necessary to accurately put down all the dimensions taken from the opening, door frame and door leaf. Such a scheme will help to quickly complete the work, without being distracted by the measurement of each detail during the installation process.

To get an accurate picture, it is necessary to measure the height and width of the installed old door, and the thickness of interior doors is usually standard and is 40 mm. Modern doors are sometimes somewhat different from older models, in which case it will be necessary to adjust the door leaf or completely change the door block.
Whatever decision is made - to replace the entire unit or just the door leaf, you still need to start by removing the old door from the hinges.
Replacing only the door leaf
Removing the door leaf
The hinges installed on the interior door can have different designs, which means that the door can be removed in different ways. However, all methods are not difficult.
As you know, door hinges consist of two parts, one of which is attached to the door, and the second - to the door jamb. In some models, the axial rod is permanently fixed inside the element, which is mounted on the vertical post of the jamb, and in another part, installed on the door leaf, there is a hole where the rod should enter. When removing a door hung on such hinges, you need to place a mount under its lower edge and apply a little force to lift the canvas. It is best if there is a second worker who will support the door in an upright position, and then help remove it completely.

Another type of canopy, in which the axial rod is inserted from above and passes through both parts of the hinge. In order to dismantle a door hung on such hinges, it is enough to pull out the rods installed in them, which have a kind of mushroom-shaped hat on top. A reliable wide screwdriver is substituted under it, and, tapping on its handle, pull the pin out of the loop. You need to start the process from the bottom hinge in order to avoid tipping the door, which, with its weight, can easily tear out part of the hinge installed on the jamb, damaging its surface. This is especially undesirable if the door frame is in good condition and will be used for a new door.
After dismantling the door from the opening, it is necessary to remove the hinges, handles, locks from it.
Fitting a new door
Provided that only the door leaf is replaced, the new door will have to be adjusted to the existing opening, based on the dimensions of the old one. From it you need to remove the exact dimensions and transfer them to a new canvas.

You can do it differently - the new door is laid on a flat surface, and the old dismantled canvas is placed on top of it. Canvases are aligned on top and along the vertical edge of the door on the side where the handle will be installed. If the new canvas is larger than the old one, it will need to be adjusted. With the help of a pencil, lines are drawn on it, along which an extra fragment is sawn off from the new canvas.

It must be remembered that a gap is left for the interior door, between the canvas and the jamb on all its sides, 5 mm each, and from below you can leave a slightly larger distance - 10 ÷ 12 mm.
Further, the excess part is cut off from the new canvas. The cut must be perfectly even and smooth, and this can only be done with a sharp and accurate tool, which can be a hand-held circular saw. The cut is made under a special ruler, which is designed for use with just such a cutting tool.

The saw is set to the desired notch height (usually with an output of 45 mm) and the door is sawn off exactly according to the markup. If there is no special guide ruler, then you can carefully cut with a circular and without it, leaving an allowance of about 1 ÷ 2 mm - this will be necessary in order to then cleanly fit the canvas with an electric planer.
Hinge installation
When it is adjusted to size, you need to mark the places where the loops will be attached. To carry out this process accurately, you need to put the old door on the new canvas and very accurately align them with each other. At the end of the new door, marks are made of the areas where the hinges will be installed, focusing on the old canvas.

In this case, the layout of the loops is first marked with a pencil, and then with a construction knife. The lines from the knife are clear, and it will be easy to make a selection from them when cutting out the recesses necessary for installing the loops.

Next, the door leaf is placed on the end, so that the side on which the hinge will be inserted is on top. With the help of a chisel (chisel) outline the depth of the future groove. The tool is installed on the lines marked with a knife, and it is hit with a hammer from above, observing how deep the cutting edge goes into the wood - it should go deeper by 2 ÷ 4 mm, depending on the thickness of the metal of the loops (this can be measured in advance with a ruler or caliper) .
It is recommended to divide the area planned for sampling into several fragments, for the convenience of extracting wood. Further, the chisel is installed at a slight angle to the end of the door, with the beveled part down. and, striking it with a hammer, an extra layer of wood is knocked out, forming the necessary recess.

The next step, in the prepared recesses, you need to install the loops. They must be installed so that the plane of the metal plate is flush with the surface of the end face of the door. If the metal of the loop rises above the surface, then the notch needs to be deepened a little. If by chance the recess turned out to be somewhat larger than necessary, then a piece of thick cardboard can be placed under the loop.
When it is achieved that the loop entered the recess intended for it, as if “poured”, right through its holes with a thin drill drill sockets into which it will be convenient to screw screws. Further, the hinges are tightly screwed to the door, and then the canvas is tried on in the opening of the door frame. This fitting will show the presence of gaps and their size, as well as how accurately, without distortions, the canvas fits into the doorway.
If you have a manual milling cutter at your disposal, then very carefully the grooves for the hinges (and for the lock) can be selected with it.
Video: inserting hinges on the door leaf using a router
Installing a lock or door latch
- When the hinges fit well, you can proceed to the device holes for and handles.
- Location The castle is also marked by an old door. It is very important to measure the exact distance from the edge of the door to drill the hole. If it is not executed exactly, and because of this it will have to be transferred, then the appearance of the door may be hopelessly damaged.
- If a new lock is installed, then a special stencil is often included in its kit, through which the size and exact relative position of all holes are transferred, but measurements are still necessary for control.
- If an old lock is used for a new door, then all parameters can be taken from the old canvas.
- On the end side of the door, where the latch will come out, a hole is drilled with a chisel drill ("pen"), and on the main plane of the door this is usually done with a hole saw of the appropriate diameter.

- After drilling the holes, the door leaf, if necessary, is decorated in the chosen way - it can be stained or stained with subsequent varnishing.
- When the paint (lacquer) dries, and the place for installing the lock elements is ready, first installed and the internal mechanism with a latch is screwed on, and then the handles are mounted and fixed.
Video: an example of inserting a lock into an interior door
Installing the door in place
To make it easier to put it in place, it must be raised from the floor to the desired height and a board (or several planks) of the appropriate thickness should be placed under it.

- Then, the loops must be carefully aligned with each other and carefully thread the lubricated rods into them, first into the upper loop, then into the lower one. The rods can, if necessary, be lightly tapped from above with a hammer
- If a different type of hinge is used, then the door suspension will be carried out a little differently. It is best to do this together, since at the same time you need to get the rods of that part of the hinges that are installed on the box into the holes located on the "reciprocal" halves screwed to the door leaf.
Find out how to do it with step by step instructions in our new article.
Complete replacement of the door - together with the door frame
If during the overhaul of the apartment it turned out that it was necessary to replace not only the door, but also the door frame, then you need to start dismantling the old door set. This task can be even less difficult than replacing only the door leaf, since the new door purchased is usually already perfectly fitted to its frame.
 How do you install a door from scratch?
 There are certain standards according to which interior doors are produced, single or double. True, no one canceled the possibility of individual ordering doors for openings of a different size or shape.
| Door leaf size standards and door opening sizes. | |||||||
|---|---|---|---|---|---|---|---|
| Door leaf size in mm. | Door opening size in mm. | ||||||
| Width | Height I | Height II | Height III | Width | Height I | Height II | Height III |
| 550 | 2000 | 2100 | 2200 | from 630 to 650 | from 2060 to 2090 | from 2160 to 2190 | from 2260 to 2290 |
| 600 | from 680 to 700 | ||||||
| 700 | from 780 to 800 | ||||||
| 800 | from 880 to 900 | ||||||
| 900 | from 980 to 1000 | ||||||
| 1200 (600+600) | from 1280 to 1300 | ||||||
| 1400 (600+800) | from 1480 to 1500 | ||||||
| 1500 (600+900) | from 1580 to 1600 | ||||||
Dismantling the old door and frame
Dismantling the old kit is as follows:

- As in the first case, the door leaf is removed from the hinges.
- Further, the platbands are removed as carefully as possible.
- The box is removed last. To make it easier to remove the bars of the box, a through cut is made approximately in the middle of one of the sides. In this case, the design of the box loses tension, given dimensions, deforms, and it can be easily dismantled in parts.
- Provided that the box must be kept in its entirety, with the help of a chisel and a hammer, the installed wedges are knocked out of the gaps between the wall and the jamb. This also reduces the expansion stress. If the jamb bars are fixed to the wall with nails (anchors, etc.), then you should try to carefully pull them out, and if that doesn’t work, cut them with a hacksaw blade or in another way, thereby freeing the box.
- The box is carefully loosened with a pry bar and removed from the opening.
- After dismantling the box, the opening must be cleaned of the old mounting foam, if it is present there, of dust and dirt accumulated during the operation of the door.
Production and installation of the box
When starting to assemble the box, you first need to install hinges on one of its sides, this process is carried out simultaneously with their installation on the door leaf. The hinges are attached in the same way as in the first case, which was described above. After that, proceed to the assembly of the door frame.

The joints of the box elements can have different connections - straight lines with an overlay of one beam on another, or end-to-end at an angle of 45 degrees.

The box is assembled according to measurements taken, which can, for example, be taken from an old set. Using a square to control the straightness of the corners, the elements of the box are set, marks are made if corners of 45 degrees are cut. Then, with the help of a miter box, the corners are sawn off, after which the box is laid out on the floor and knocked down with nails or fastened with self-tapping screws.
 The location of the details of the box "overlaid", at a right angle
 Prices for popular models of screwdrivers
Screwdrivers
If the elements of the box are connected to the overlay at a right angle, then they can also be knocked down with nails or twisted with self-tapping screws.
Both in the first and in the second case, the connection must be made very carefully, since the nails can inadvertently come out in a completely undesirable place.
When the box is assembled, hinges are screwed to both it and the door, and a lock is installed, there are two ways to go. So, you can put the door on the hinges right away, and then install it together with the box in the doorway. Another option is to install the box first and then hang the door.
Video: Installing the door step by step, with all the details
- If the first option is selected, then the door must be locked so that it does not open. Then, carefully, without distortions, install the entire set in etc oym, expose it with the help of a level and vertically in the longitudinal and transverse planes, and horizontally, carefully driving wooden wedges into the gaps between the wall and the box for fixing.

Then, it is necessary to fix the box to the wall using anchors, drilling through holes for them in several places, two on each side.
Holes are drilled under hide” so that the screw heads are recessed into the wood of the box. Then they can be masked with special decorative covers, matching them to the color of the wood, or covered with a compound made from wood glue and sawdust.

The resulting gaps must be filled with mounting foam, wait for the expansion and complete drying of the polyurethane foam, after which excess composition, which protrude from the gaps, it will be necessary to carefully cut.
- In the second case, only a new box is fixed in the opening, it is also leveled, fastened with wedges and anchor elements, but at the same time it is necessarily wedged with a wooden beam in the center - so that the vertical posts do not bend in an arc in one direction or another.
Then, the gaps are also filled with mounting foam and left until the composition completely hardens. After that, the door is installed on the box on the hinges.
Now it remains to carry out the final event - to install platbands.

The connection of platbands at the corners of the door can also be of two types - end-to-end (used very infrequently) or at an angle of 45 degrees. The right angle on the cladding panels is also cut with a miter box, and they are precisely adjusted to each other.
Prices for interior doors
Interior doors
It should be noted that you can save yourself from unnecessary problems with fitting the box and the door to it by ordering the entire set as an assembly, that is, with hinges and a lock already installed, as well as a canvas fixed in the door jamb. Before making a purchase, you need to take accurate measurements from the old set, and you can use them to make an individual order or purchase a finished model. The kit usually includes platbands of the required height and with correctly fitted joints.

Find out an easy way to do it from our new article.
You need to know that it is quite difficult to adjust all the elements of the door without proper experience, and the mistake made in this matter is sometimes very difficult to correct.
11 best manufacturers of interior doors
| Photo | Name | Rating | Price | |
|---|---|---|---|---|
| #1 |
|
EL "PORTA | ⭐ 100 / 100 | |
| #2 |
|
TRIADOORS | ⭐ 99 / 100 | |
| #3 |
|
STATUS | ⭐ 98 / 100 | |
| #4 |
|
SOFIA | ⭐ 97 / 100 | |
| #5 | ART DECO | ⭐ 96 / 100 1 - voice | ||
| #6 |
|
PROFILDOORS | ⭐ 95 / 100 | |
| #7 |
|
ONYX | ⭐ 94 / 100 | |
| #8 |
|
BELWOODDOORS | ⭐ 93 / 100 | |
| #9 |
|
MATADOR | ⭐ 90 / 100 | |
| #10 |
|
VOLHOVETS | ⭐ 91 / 100 | |
| #11 |
|
ALVERO | ⭐ 90 / 100 | |


Doors el'PORTA
Doors el'PORTA are doors with Italian architecture, produced in Russia. Models of modern design and trendy shades, materials of the highest quality. el'PORTA interior doors are manufactured using modern Italian and German equipment. Various decorative door coverings allow you to choose the best option in terms of price and performance.
 Doors EL'PORTA
 Specifications:
- 3D-Graf is a high-density structural decorative material. It has a pronounced texture, medium wear resistance;
- eco-veneer is an anti-vandal decorative material that imitates a cut of a real tree. High wear resistance, resistance to mechanical damage, fading, moderate resistance to moisture;
- aqua doors - doors that are not afraid of moisture;
- enamel - a multilayer material that imitates enamel, but has higher.
Doors EL'PORTA
– each product is an effective combination of the priorities of modern materials, trouble-free fittings, successful construction and design solutions. Such doors are very appropriate in rooms decorated in modern high-tech or minimalist styles.
Specifications:
- modern innovative coating Renolit (Germany) stands out for its strength, durability and environmental safety;
- carelessness. It is enough to wash it occasionally with ordinary furniture care products (not containing abrasives);
- doors can be installed in any room, even with high humidity;
- easy to use, as well as durable and reliable.
— Stylish minimalist design will appeal to the modern city dweller. A rich choice of textures and finishes allows you to harmoniously fit these doors into a new, as well as into an already finished interior. Telescopic door trim- this is a constructive solution of the door frame, which allows you to fit to the wall of any thickness.
Specifications:
- due to the telescopic effect, the design is suitable for walls of any thickness. Thanks to a tighter fit to the wall, the box does not warp over time;
- harmless material based on polypropylene;
- a jointed massif of Angarsk pine is used in order to ensure the stability of the frame, low weight of the canvas, as well as the environmental safety of consumers.
Sofya doors are an author's design product, impeccable European quality and prompt service. Factory "Sofya" performs a full cycle of product creation from the development of the design of each door collection with Italian designers, the development of manufacturing technologies with German engineers.