Let the dacha be a place where work comes first, and then rest, we do not forget about the beauty that helps us not to lose heart and enjoy every day spent there. Therefore, today we invite you to feel like landscape designers and build a pond in the country with your own hands.
DIY pond rules and material requirements
A pond in the country is not a luxury, but in some way even a necessity. According to the ancient philosophy of Feng Shui, water near your home brings financial well-being and soothes.

In addition, it allows you to maintain the relative humidity in a given area, pleases the eye and allows you to create an original solution in the allotted area. Therefore, more and more summer residents create ponds and ponds with their own hands, as in the photo.


Not everyone on the territory has a reservoir that can be put in order, surrounded by a stone and made an element of the landscape. More often, we create a pond in the country with our own hands from scratch, faced with many issues that have to be resolved during construction.
Let's start with the fact that it is necessary to determine the location of the reservoir. For this the following factors should be considered:
- relief of the territory;
- arrangement of trees and other plants with a powerful root system, as well as foliage;
- illumination of the selected area.
Study the terrain carefully. You may already have well-placed depressions, pits, or ditches that you made earlier. All of them will make it easier for you to dig up the pond itself.
In addition, do not forget that plants tend to grow and take up more and more space underground. Roots can spoil or even destroy the bottom of your pond over time, and foliage, falling into the water seasonally, will rot and give off an unpleasant odor. Which will require you to pay more attention to the care of the pond, but not the joy of having it. Therefore, before you start digging, it is worth considering how far the trees and bushes are.
Most landscape designers recommend placing a pond near your home. This will make it easier for you to illuminate it without requiring separate lights and lamps. In addition, there is always enough free space near the house with natural light, because there are no tall trees or dense vegetation to block the light.

If you have found a place suitable for the above requirements, then you can start work.
But first, you should stock up on materials and an approximate project of your future artificial reservoir.
Exists several ways to create a pond do it yourself in the summer cottage:
- from a finished bowl;
- made of PVC film, polyethylene or rubber;
- with the help of materials at hand.
Besides besides materials for the bottom device, you will need:
- shovel,
- measuring instruments,
- finishing and decorative materials,
- water.
After creating a pond, you can launch fish there. But then the depth of your artificial reservoir should be at least a meter so that the fish do not freeze in winter.

The order of work on the arrangement of the pond
If you decide to arrange the landscape, choose a place and think about the appearance of your future pond, then first decide the main question - what will it be? Will you choose a ready-made bowl or cover the excavated pit with foil? It's up to you to decide. And we will help you create it according to all the rules.
We dig in the finished bowl
The finished mold, cast at the factory, is an excellent and simple solution for those who want to enjoy a charming and tranquil view of the pond after a busy summer day.


Now in specialized stores they offer bowls of different sizes, types and contents. They can be:
- simple plastic trays;
- containers with several depth levels;
- bowls with complex contours of the shore.
Therefore, everyone will be able to choose the shape that best suits the territory and landscape without wasting time.
In addition, there are others advantages of ready-made bowls:
- the plastic form is durable and not affected by ultraviolet radiation;
- the bowl is non-toxic and easy to install;
- the average shelf life of this form is tens of years, which makes the pond durable and of high quality.
The main thing is not to damage the bowl while installing it in the future pond. The form cannot be repaired or restored. However, if you build for centuries, then you can pick up a fiberglass bowl, it is famous for its durability and lasts 2-3 times longer.


So, you have chosen a bowl, found a suitable place, cleared it and are ready to create a pond with your own hands in the country. What's next?
First you need to transfer the contours of the bowl to the ground so that it fits exactly into the dug pit. To do this, you need:
- bowl;
- pegs;
- shovel;
- rope.
To make the contour as similar as possible to the shape of the bowl, you need to install it on the ground and retreat 10-20 cm from its edge. Following the shape of the bowl, stick the pegs into the ground and pull the rope along them.
So you get the outlines of your future pond, under which you need to dig a pit 20-30 cm more than the height of the bowl.
Remember to keep an eye on the upper level. It is very important that the surface of your pit is level, otherwise the ground around the pond will be wet and sticky all the time, spoiling the appearance of the shore.
When you have achieved the desired depth and shape, be sure to sprinkle everything with sand and tamp it thoroughly. This sand cushion will be the foundation for your pond. After that you can place the mold and fill up with sand the free space between the side of the bowl and the ground.
When your future pond gains stability, you can start filling and decorating it.
You can lay a decorative stone on the shore, plant water lilies or other water-loving plants along it. Set up small or DIY figures of swans.


Making a film pond
If for some reason you do not want or cannot buy a ready-made bowl, then you can always make a pond with your own hands without it.


It is enough to stock up on:
- Shovel;
- a rope or hose to outline the contour of the future pond;
- thick film.
The rest (water, decorative elements and figures) you will need later, when the main stage is completed - the creation of a pit for the pond.
As with creating a pond with a ready-made bowl, first you need to decide on the size of the future reservoir and its outline. Then apply its borders to the ground using a rope or hose, which can simply be laid along the drawn border, or you can wrap it around the driven pegs.
When you are convinced that you like the shape and approximate appearance of the future pond, you can start digging. Here, the process will always be the same, because we just need a foundation pit.
The level of the pond should be the same. Therefore, check the evenness of the banks using a building level or a bar laid on both sides of the pit.

When you reach the desired depth, cover the bottom with sand, compact it well, and then lay it with geotextiles so that the film does not tear over time. To do this, you can use a special material sold in hardware stores, or you can do it yourself. Take, for example, old carpets, rugs, roofing felt or linoleum, suitable for the area dug.
Now that the bottom is ready, measure your future pond and calculate the size of the film you need to create it. Usually for this it is enough to know the area of the pit and its depth. Then add an allowance of 50 cm on each side to strengthen the film along the bank. And you can already go shopping.
The film must be very strong and dense in order to withstand the weight of the water that we eventually pour into the pond. Therefore, do not skimp on this paramount material and choose it wisely - the film thickness should be at least 300 microns so as not to tear under constant pressure.

So, barely the film is laid out on the bottom:
- Flatten it so that there are no folds and swellings.
- Stones along the shore so that when filling it does not collect at the bottom.
- Prepare the plants if you want a pond with water lilies or other living decor.
The trick on how to arrange plants and flowers in a film pond will be shared with us Maxim Maximov in his master class:
The film pond is quite economical and allows us to create it of any shape and depth, which is impossible to do with a finished mold, cast at the factory. That is why many people choose this option to create their own reservoir in the country with their own hands.


But do not forget that the deeper you want to make the pond, the more likely it is that the shore can crumble. That is why we recommend that you strengthen its walls after the foundation pit is dug. Depending on their height, you can use tiles or slate. And how best to do it, he will tell us Talla Khukhrianskaia in his master class:
When all the technical issues have been resolved, the pit can be filled with water. To do this, just throw a hose connected to the water supply into it.
In addition to the stone, which has an important function and keeps the film on the shore, you can put decorative figurines, flower pots and handicrafts made by you for giving with your own hands. Decorate your pond to reflect your creative personality and delight the eye.
Do not get carried away with the decor, because periodically the pond needs to be cleaned so that the water does not fade in it and does not turn the beautiful summer cottage into a large puddle. And for this, be sure to leave a place on the shore so that you can go to the pond. Better yet, provide a stream that will drain the water.

We create a pond in the country from scrap materials
Unfortunately, it is not always possible to find the right and high-quality building materials, but if the desire to create a pond with your own hands does not go anywhere, do not despair. Simple improvised materials will also come to the rescue, which are enough for any summer resident.
A pond can be made from a variety of things:
- from an old car tire;
- from an old bathtub left over after renovation;
- from a barrel, basin or bucket.

Bath pond ...

... from old tires ...

... and from the old barrel
If you really want to create an extraordinary and original reservoir, then the lack of capacity will not stop you.
We use old containers
As we said, a pond can even be made from an old bath. Indeed, in fact, it is no worse than the finished form.


The process of creating such a pond will be similar to the previous ones:
- dig a pit under the shape;
- cover it with sand and make a cement screed;
- insert a bath;
- fill with water.
Due to its weight, the bathtub will sag strongly in the pit, which is why it is recommended to tighten its bottom with cement - to strengthen it. So that over time the pond does not go deeper.
Also, spare sand and earth to stabilize the tub inside the excavation. For a snug fit of our handy bowl to the banks, fill in all the voids.
And do not leave the side of the bathtub open, it will not look aesthetically pleasing and spoil the appearance of the future artificial reservoir.

And how to dig in a bath and arrange it in a pond with your own hands will clearly show and tell Vitaly KIY in his video tutorial:
However, if your summer cottage is not so large as to have a full-fledged pond on it, do not be discouraged - a pond with your own hands in the country can be made from small containers, as in the photo.

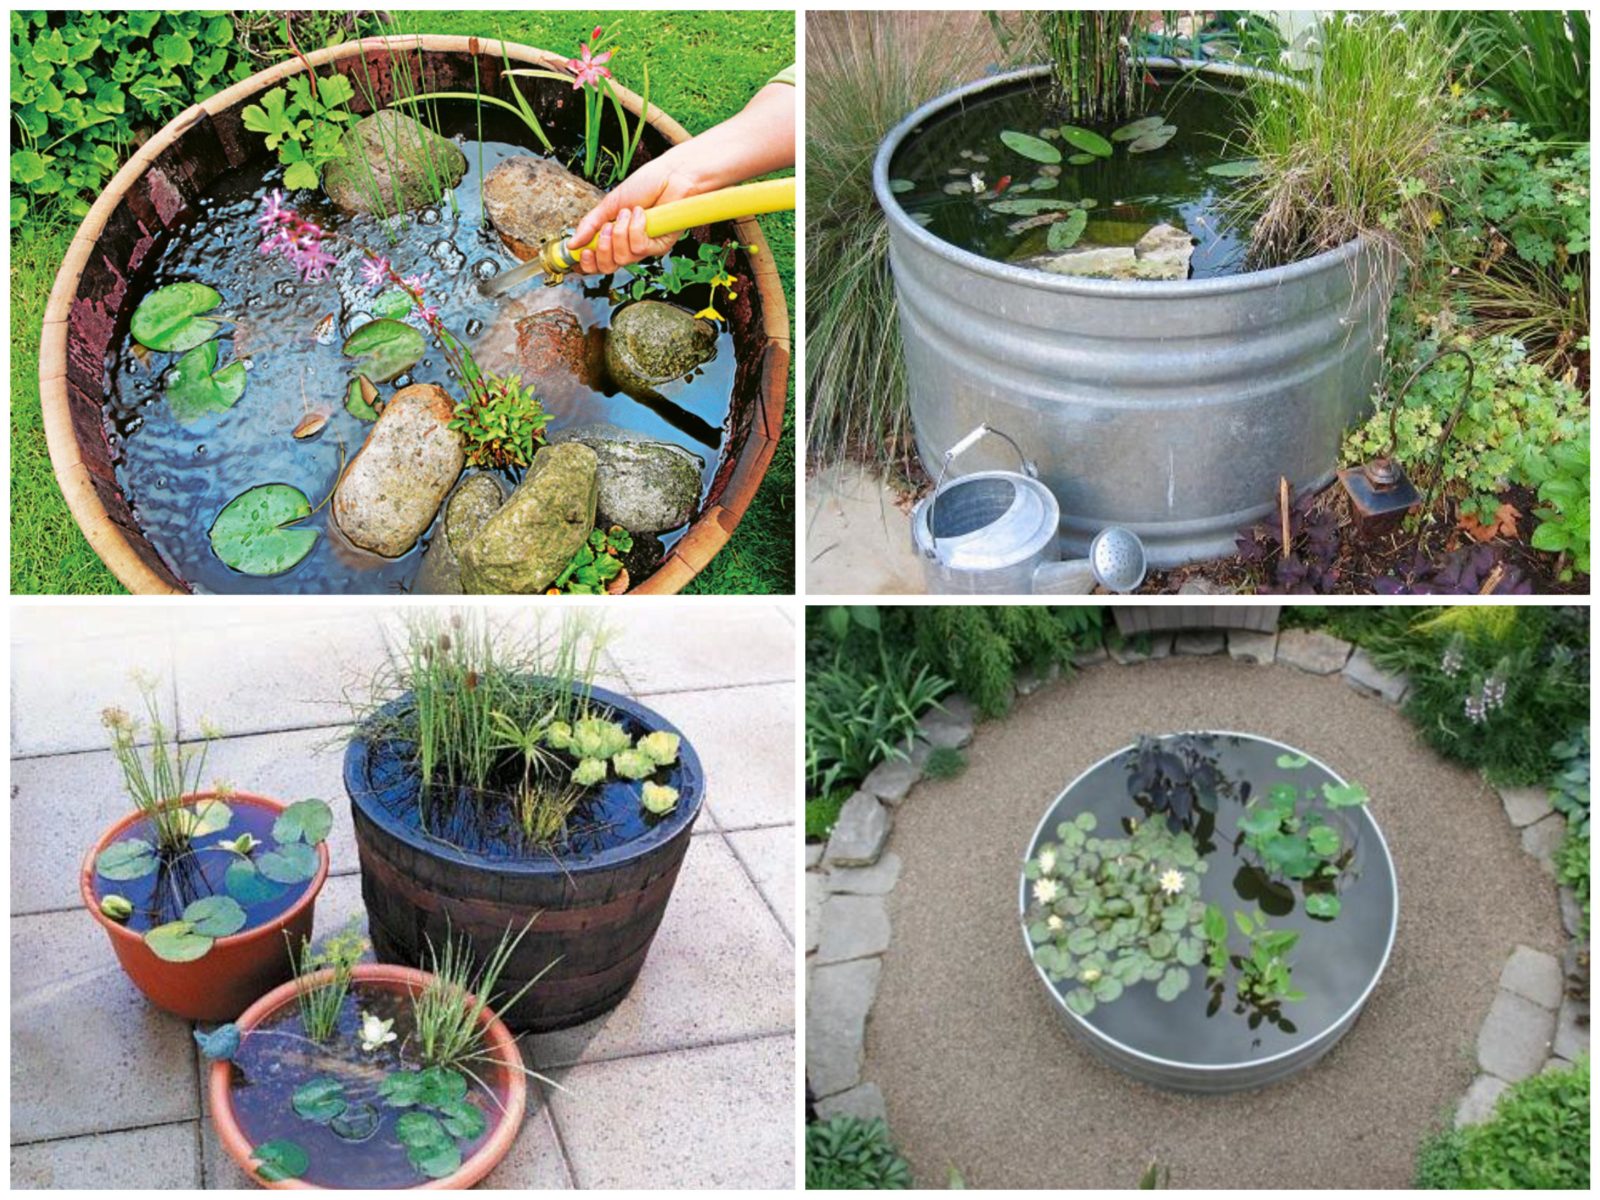
Take an old metal or wooden bowl, small barrel, or tub. All of them can become an original decorative reservoir, which does not even have to be submerged below ground level.
By the little pond from an old basin there are many advantages, so do not deny yourself the joy of creating a modest artificial reservoir if the area of the site does not allow more:
- does not require excessive costs - everything you need for its device is at hand;
- it will take a little time to equip it - from a few minutes to a couple of hours, but not a day or more;
- it can be positioned anywhere;
- if you installed the pond on the surface, and did not dug it in, then it can always be rearranged to another place by simply pouring out the water and refilling it after carrying it;
- it does not require special attention to care - it is enough to change the water from time to time and wash it from the inside to keep the bottom clean.
Ponds from a basin or small barrel can be placed on a hardened, level surface, filled with water and decorated with decorative figures or flowers.


But if your basin has long lost its decent appearance and there is no way to return it to its former gloss, then just dig a small pit for its size, install it there according to the principle of an old bathtub and overlay it with pebbles along the shore.

As you can see, old containers allow us to fantasize and create incredible ponds with our own hands in a dacha of any area. And it helps us to realize our creativity.
Pond to the dacha from the tire
However, if repairs in the apartment are not planned, and the old basins have long been leaking or turned into flower beds, do not despair, you still have a chance to acquire your own pond.
And for this you will need the most irreplaceable and accessible material - a car tire. Tires in modern dacha society have long turned into a universal substitute for building materials.

And nothing surprising - the strength and shape of the tire allows you to make anything out of it, including a pond. And the size of the future reservoir will depend only on the size of the tire you choose.
First you need to prepare your future container - cut it along the top edge so that only the sides remain. To do this, you will need a jigsaw or a sharp knife (if you have chosen a tire from a car).
After that, you can move on to the pond itself.
Installation steps:
- Contour the tire and dig a pit along the height of the prepared bowl.
- Cover the pit with sand and tamp the bottom.
- Insert the tire inside.
- Cover the cover and bottom of the future pond with a thick film.
- Fill the edges of the film with sand, and then decorate with turf, stone or embankment so that the film is well fixed.
- Fill the pond with water and decorate with pre-planned décor.
Your tire pond is ready. And it will not be inferior in beauty to either ready-made bowls or large film ponds located over large areas.

In addition, it is easier to care for and maintain its cleanliness, and it does not require a lot of water or effort to equip it.

As you can see, if you have long wanted to feel like a landscape designer in order to turn the cottage into a beautiful resting place, where you can not only work, but also enjoy nature away from the noisy city, you can always create a pond with your own hands at no extra cost.
If you like our ideas, read other articles in the series!
Many gardeners dream of at least a small pond on the territory of their garden, but not all of them are capable of deciding on the embodiment of the idea. This is due to the fact that the majority consider the very idea of arranging a reservoir unrealistic or, at least, requiring serious financial investments.
However, in fact, there is nothing particularly complicated about this. And we will try to convince you by telling in this article what kind of garden reservoirs there are and how they can be quickly and inexpensively built.
general information
To begin with, let's talk in more detail about what kind of reservoirs exist and which of them are quite realistic to equip yourself. It is no secret that, for example, a swimming pool will not only require serious financial resources and a large garden area from you, but also the mandatory observance of certain sanitary and hygienic conditions.

But decorative ponds will require the creation of a special ecosystem that will prevent the rapid turbidity of the water and provide excellent aesthetic characteristics.
Variety of styles
An artificial pond in the garden is most often constructed in two styles.
The classic style assumes the correct form:
- round;
- square;
- rectangular, etc.
This type is ideal for so-called classic landscapes.

Note.
To accentuate strict angles and straight lines, it is recommended to surround the pond with ceramic tiles or porcelain stoneware.
This will add even more rigor to the ordered style, making it more symmetrical.
The second style is landscape, which can have absolutely any shape and shape of the coastline. Ideal for garden areas with any layout.
To give even more naturalness, when arranging it is recommended to do:
- gentle slope;
- plant moisture-loving plants;
- lay stones on the bottom (preferably without sharp edges).

By the way, regarding moisture-loving plants, which can be located, depending on the species, both in the water and on the shore, the following are ideal:
- water lilies;
- fern;
- day-lily;
- loosestrife and others like them.
Seat selection
The overall atmosphere in the garden depends on the right place for the pond.

Therefore, when choosing a site, consider the following requirements:
- optimal illumination level- for example, in the first half of the day, the sun, and in the second - a light shade;
- Free access;
- availability of space for arranging the area around it and planting plants.
It is also important to avoid having trees nearby because:
- too much shade will quickly cover the pond;
- the root system, expanding, damage the sides;
- in the fall, falling foliage will constantly clog the water.

Ideal sizes
The size of the pond should be strictly related to the size of your site:
- a large pond in a small garden will look cumbersome, visually suppressing other elements - bushes, trees, lamps, etc.;
- too small in a large area will simply get lost, and will look like an inappropriate puddle.
Note. The lake to be created should be about one in ten of the size of the garden.
This will help you create a pond that fits perfectly into your garden plot.
Variety of decorative design

Choosing a design is not a problem - you can buy it in specialized shops for gardening goods, since the price is not so high. Or found in nature.
So, the following details will look most impressive:
- natural stones;
- natural stones;
- vegetation;
- fountains;
- waterfalls.
Note. If the depth of the lake is more than fifty centimeters, then the plants are recommended to be placed on the bottom in pots.
The pots should be filled with gravel mixed with sand.
So the plants will become not only a decoration, but will also provide water purification.

Water-resistant film pond
This section provides detailed instructions on how to make a pond in the garden with your own hands, using for this a special film that can withstand the negative effects of high humidity for many years. Follow the detailed sequence of steps carefully.
At the initial stage, it is necessary to make at least a schematic plan, which will indicate:
- location of the lake;
- its depth and width;
- possible presence of "shelves" for planting;

Advice!
Don't neglect creating a plan.
So you can foresee everything and avoid alterations, both during construction and after its completion.
In addition, this will allow you to calculate in advance the required amount of certain building materials.
The next stage involves creating a marking for a foundation pit - it does not matter how you will do it, the main thing is to outline the contour and make sure that the shores of the future lake are at the same level.
Excavation work must be carried out in the following sequence:
- dig a coastal line;
- mark the line for the next deepening;
- select the second layer of earth;
- re-lay lines for the deepest part of the lake;
- remove the ground.
So you can make a gentle descent into a pond or a kind of shelves for installing plants.
Note. To prepare the pit, it is best to seek professional help or use the services of an excavator.
If you decide to save money, then get ready for the hard work.
Although, if the lake is small, then its foundation pit can be dug in a few hours.
Many people have a question - what to do with the land?
There are several options for solving the problem:
- distributing it over the site for a general rise in the level of the garden;
- complete the construction of an alpine slide;
- create beds or flower beds.
The next step is to measure the depth of the pit. Use a regular cord and add at least fifty centimeters to the allowances to the depth obtained. Naturally, you need to measure both in width and in length - this is necessary in order to purchase a film of the size you need.

By the way, you need to be as careful as possible with the film so as not to damage it, including possible foreign objects that may be at the bottom of the pit:
- stones;
- roots, etc.
To do this, you must first lay an additional layer of:
- geotextiles;
- roofing material;
- or old linoleum.
You can also just make a bed of good, clean sand and tamp it thoroughly.
Before laying the film along the edges of the pit, at a short distance from it - a distance of a few centimeters is enough - dig a trench. In it you will lay the edges of the film. Spread it out to avoid clumps, squeezes and other defects.
Advice. It is recommended to install the film on a warm, sunny day.
So the film will warm up and become more elastic and pliable, it will easily bend around all the edges and protrusions of the pit and other obstacles that may be present at the bottom.

To securely fix the edges of the film in the trench, cover it with rubble. Now you can start arranging the edge of the pond.
First of all, it needs to be strengthened - use for this:
- stone blocks;
- plastic pipes - they should be attached to the installed wooden pegs.
Such reinforcement is necessary in order to prevent shedding of the earth under the film.
To decorate the edge, as well as to hide the crushed stone bedding that holds the edges of the film, use a variety of decorating materials:
- natural stone;
- porcelain stoneware;
- ordinary boulders.

The next stage is the arrangement of the pit:
- put rubble and boulders on the bottom;
- prepare plant pots;
- place them around the edges of the pit.

Now you can pour water into the prepared pond. If you have the opportunity to constantly replenish the amount of water, then arrange a kind of gravity flow - this will ensure the circulation of water and prevent its stagnation.
This requires:
- the source of the stream must be slightly raised so that it is above the level of the pond;
- a regular pump will help to supply water to the source;
- so that the stream looks attractive and does not spoil the overall picture, be sure to decorate it - natural stones and small plants are suitable for these purposes.

That's all. The reservoir is ready.
Now take care of him:
- remove dirt in a timely manner;
- use prophylactic agents for cleaning and disinfection;
- fight algae;
- for the winter, do not forget to remove the plants.
How to avoid mistakes
To make the man-made lake look as attractive as possible, the following are not recommended:
- to arrange the edges, use stones of exactly the same diameter;
- use only large stones for the coastal zone;
- create deep pits with sheer walls.

Before trying to realize your dream, think carefully about everything and evaluate your financial and labor capabilities. Be sure to develop a clear plan that will cover all the little things - this will ensure that you avoid possible mistakes.
In conclusion
A small pond will be an excellent decoration for a garden, although it can also be used as a functional element of the local area. We've given you a quick and easy method to create a body of water, and the additional video in this article will help you better understand all the information above.
Almost every garden has a body of water. And he certainly gets into the frame: the owners love their pond (or even the smallest pond), are proud of it and consider it almost their main garden achievement. And this is understandable. But the stern look of a professional often notes the annoying mistakes in the creation of reservoirs, which are repeated in many gardens with offensive consistency.

We asked the landscape designer Valeria Ilyina to analyze some of the typical mistakes of amateurs and talk about what you need to know in order to make a decorative pond, stream or waterfall in the garden with your own hands.
Are you building a reservoir? Make no mistake!
Perhaps there is no point in convincing someone that a pond in the garden is good. Water, like a magnet, attracts everyone's attention and even in photographs it always looks mysterious and alluring. Is it any wonder that today the reservoir has become an indispensable attribute of the "gentleman's set" of any design project for the development of a new land plot or reconstruction of an old one.
Unfortunately, as a result of a formal approach to business, one garden becomes similar to another. Professional designers churn out gardens like baked pies, and they actually turn out to be cloned. To be honest, I am closer to the gardens of amateurs, who, although they sin with some amateurism, still attract more with their ingenuous soulfulness. All actions of an amateur come from the heart, and therefore the path is often winding, but in the end the truth is found, and not least thanks to intuition.
To make the path to beauty shorter, let's try to sort out together the characteristic mistakes that are surprisingly repeated in many bodies of water, and analyze their nature. And after that, step by step, we will analyze all the subtleties and secrets of a quick, easy and economical creation of a reservoir that is ideal for your garden. So, the most common mistakes.
Wrong size
This is the most common mistake: the pond does not match the size of the garden and surrounding plants... A small puddle located somewhere near the fence or at the entrance to the garden and squeezed from all sides by lush and beautiful garden plants, no matter how hard you try, it will always look wretched.
Poorly chosen location
In no case should you place a pond against the background of unsightly buildings, a slovenly decorated vegetable garden, heaps of garbage, a rickety fence and you never know what else.
Old fence- not the best background for a pond
Water always attracts the eye, so by placing your body of water in an unsightly place, you thereby focus on the disadvantages of the garden.
Mistakes in the selection of material
When purchasing materials for arranging a garden, follow the law of similarity... If the house is made of brick or stone, then their color, texture, shape and size must be repeated in the material of the fence, paving, finishing of other buildings. The same applies to a timber or siding house.
It is often possible to observe a picture when individual corners of the garden are very good: beautiful plants are logically grouped, the reservoir is carefully and imaginatively decorated, and the overall impression of the garden is negative. You start to analyze, and it turns out: the brutal appearance of the house is made of red brick with white platbands of plastic windows, a powerful fence is assembled from ready-made concrete blocks painted with bright pink paint with white scallops on top, a carved gazebo is gilded with chiseled beams, an asphalt tape of a path leads to it, over which the rockers of openwork white arches for roses have spread, the picture is completed by the presence here and there of colored plastic, different-sized borders, flowerpots and, to top it off, like a gold medal to tastelessness, a plastic water lily on a living leaf of a nymphaea. As they say, comments are superfluous.
Output: while arranging the garden, introducing new elements into it, try to predict the final result, predict how the garden as a whole will look like. The pond should always match the size and style of the garden, buildings and surrounding plants, and be located in the most advantageous location depending on the look you choose.

Defeat against plastic mold
A common misconception: a ready-made plastic mold is the best choice if you decide to create a reservoir, as they say, with small means. Yes, indeed, manufacturers offer a large assortment of such "trays", and it seems that you can choose a shape for every taste. But it’s not that simple. Even the largest of them (and they are very expensive) will not be large enough in the garden, and the small ones just look like a misunderstanding. At the same time, all of them, with clearly small sizes, have a too intricate shape, which in place will never turn out to be natural.The edges of such forms have a rounded profile, on which it is impossible to fix neither soil for coastal plants, nor stone, and even less gravel. Some of the more expensive forms have quartz sprinkling glued with a wide tape on the upper edge, but most often it is so strikingly different from our local materials that it is still impossible to decorate it.
Plastic molds are made using a stamping method, and cheap products often have an annoying defect - distortion of the edges along the periphery, thanks to which, no matter how hard you try, you will not be able to dig in such a shape neatly and evenly in principle. Needless to say, a piece of black plastic sticking out above the water will nullify all your efforts. For clarity, such a pond can be compared to a luxurious suit, in which an inaccurately sewn lining puffs up in its most prominent place. The appearance of such a suit is regrettable, to say the least.

Black plastic of the finished form sticking out above the water- poor decoration of the reservoir
It is worth adding that transporting a finished form, especially a large one, is not easy and expensive, and as a result, the final cost of the structure increases significantly. I once had a chance to work with a plastic mold of a small size and at the same time an intricate design. She was hopelessly skewed. I spent a lot of time, effort and nerves to somehow neutralize this congenital deficiency, but, unfortunately, there are things that cannot be fixed.
However, rigid forms have a future. In Europe, for several years now, plastic forms of regular geometric outlines have been produced: round, rectangular, trapezoidal. They have a wide, flat, horizontally located edge, which makes them easy to mount under all kinds of flooring. It is advisable to use them for raised formal reservoirs, which are effectively decorated with stone, wood, plastic, metal; they can be located at different levels and combined with fountains and waterfalls.
Unfortunately, our trade still offers only round shapes, but we must not forget: there will be demand - there will be supply. The breadth of consumers' horizons shapes the market.

Output: before choosing one or another method of waterproofing, you need to thoroughly familiarize yourself with the positive and negative sides of each and conduct a comparative analysis. The lack of information on the qualities of waterproofing materials in the presence of a large supply on the market leads to the wrong decision.
Pond de-icer Pond Heater 500
4 550 rub
RosPrud
Fountain pump head Lilia SK 3 Sicce
545 rbl
RosPrud
UV filter for pond PU 18 Jebao
4 960 rbl
RosPrud
LR A120C RGB Circular LED Fountain Light
4990 rub
RosPrud
Attempts to adapt an old bath
Speaking of ready-made forms, it should be mentioned that amateurs often try to dispose of enamelled cast-iron bathtubs. Once upon a time, in a time of chronic scarcity and lack of available materials, this uncomplicated way of creating a garden pond was welcomed by many. However, few people managed to decorate a white bathtub so that the enamel pond looked more or less attractive.
More often, such a structure looks wretched: green white walls, piles of garbage at the bottom (after all, you can see everything on a light background!), Round cobblestones are artlessly laid out along the edge, and a collectible beauty of the host is planted nearby. An unattractive sight ...

But there are ways to embellish such a reservoir, you just need to stir your imagination. The easiest way is to paint the bathtub with any dark or black paint. Visually, the container will look deeper, the reflectivity of the water will increase, and the edges will practically merge with the ground. In the presence of all kinds of plasticizers and modern mixtures (for example, cement glue "Unis-plus"), the inside of the bath can be coated with a layer of 1-3 cm, give it texture, tinted by adding mineral powder or liquid color pigments or finely ground brown peat to the solution. If desired, if such an image fits into the overall picture, you can lay out a mosaic of colored pebbles or glass, pieces of a mirror, or simply glue pieces of crushed stone of different sizes on top of the cement.
If you have a whole arsenal of used household bathtubs, they can be dug in close to each other in a chain or in a square-nesting way, depending on the quantity, finish the inner surfaces as mentioned above, and mount a decorative edging made of tiles, clinker, wood over the joined edges etc. You will end up with a canal or a pool with separate cells, each of which can be decorated in a special way: somewhere plants, somewhere a gushing spring or a small fountain, somewhere fish or lighting - an unpaved field for imagination.
Such a structure can be made partially raised over the entire area, or the cells can be placed at different levels, and even to arrange the overflow of water from one block to another. So an old, primitive idea can be applied in a completely new way and a wonderful result can be achieved.

Output: old, worn-out containers can be successfully used to create reservoirs, you just need to be creative and never leave the inside out in plain sight.
Stone beads
The most common mistake in decorating a garden pond is a rounded cobblestone laid out around the edge like beads. Most often, such beads lie in one row, but some manage to stack two rows on top of each other.
This method of laying stone will never look natural, not to mention the fact that it is absolutely impossible to decorate the film or the side of a rigid structure. Here are the multi-colored "monists" on the monstrous black shores, and no matter what beauty you arrange around, such an aqua garden will serve as a silent reproach to the owner.
While resting on the banks of rivers and lakes, try to pay attention to how nature "lays out" stones, and what you like and remember the most. Usually, small fractions serve as a background, while larger ones are textured in contrasting groups.

The stone for decorating the reservoir must be carefully selected. Photo by Valeria Ilyina
Output: a stone for decorating a reservoir must be carefully selected. It is advisable to use a stone that is homogeneous in breed and color, but varied in size. This does not mean that the pellets are completely unsuitable, it is just that in order for them to "play", you need to work with them even more carefully.
Toys around the pond
Another typical drawback that can spoil the most beautiful, carefully thought out design: the simultaneous presence of a large number of decorative figures and various garden accessories in a small area.
An abundance of accessories and decor elements– a surefire way to ruin any body of water
Nobody argues, some bright gnomes and funny lafas can really decorate some corners of the garden, make you smile. But if there are already enough plastic frogs, papier-mâché ducks and clay mermaids, and you were also presented with an "overturned" jug with a Mayan painting for a fountain, white curved furniture in the Rococo style and black lanterns a la Montmartre, it is inevitable will be overkill. Any of these items can be quite attractive in and of themselves, but when put together within line of sight, they are likely to do you a disservice by turning your garden into a haberdashery.

Do not overuse accessories and decor. Photo by Valeria Ilyina
Output: The thoughtless use of decorations will break the harmony of the garden. Try to look at the garden as if from the outside, and if you tend to get carried away with "decoration", at least spread the decorative "gadgets" in space and time.
Next time we will finish the analysis of the most common mistakes gardeners make when creating ponds and think about which body of water - a pond, stream or fountain - is right for your garden. Read the article. landscape design,
When decorating a pond in the country, you should not restrain the flight of your imagination - everything is permissible here: both frivolous cascades and heavy boulders covered with mossy vegetation.
It all depends on how you imagine your summer cottage, and in what style the surrounding ones are decorated.
But here, too, everything is relative - even outright dissonance can be presented as a special idea of the author.
There are two main styles of decorating a pond in the country with your own hands: landscape (as close as possible to nature) and design (deliberately artificial and more fantasy).

There are also landscaped swimming pools - these are landscaped ponds, but you can also swim in them. They will be described in more detail on another page of the site. In general, the decorative design of the pond should correspond to its shape and size.
How to decorate a pond in the country with your own hands in a landscape style

How to decorate a pond with your own hands in a landscape style, if the existing situation on the site allows for a free style of design, close to natural? The reservoir in this case is made of arbitrary shape with a curved coastline, which can then be decorated with natural stones.

Of the existing types of natural and artificial stones for decorating ponds in a summer cottage in a landscape style, preference should be given to crushed granite, river pebbles, decorative onyx.

Beige sandstone, decorative tiles, and similar materials will also work. The size of the stones should depend on the size of the reservoir: for a small pond, you need to use stones of medium size and small, and for large ones - larger stones, in combination with medium and small ones, then the coastline will look more natural than if you use stones of the same magnitudes.
Look at the photo of the design of the ponds with your own hands - each of them is beautiful in its own way:
Photo gallery

The landscape style can be taken as a basis. In the ancient Japanese garden, the pond was made with strict forms, but with an elaborate composition of stones. No brightly colored plants were used here. In Japan, due to the limited territory, there has always been a desire for minimalism, which is reflected in the design of the reservoir.

According to tradition, all elements must be present in such a garden, including water, so the reservoir here existed in the form of a tsukubai - a small vessel with water. True, a stylized stream flowing from hollow bamboo pipes, as well as dwarf trees along the banks of this stream, were necessarily attached to it.

Sometimes the pond in the garden took the shape of a square or rectangle, which was also supposed to emphasize the asceticism of the Japanese.
Here you can see the design of a pond at a summer cottage in the Japanese style:
Photo gallery
When decorating a summer cottage pond, you can achieve a special effect if you lay out the bottom of the reservoir with small stones. Especially if the pond is shallow, then the stones, beautifully spread over the entire bottom surface, will be visible through the water layer.

Such a reservoir, in addition to stone, can be laid out with decorative strict tiles, making a pond path from it. Another idea of how to design an artificial pond is to make a path passing over the surface of the reservoir: either in the form of a monolithic concrete bridge, or by installing separately stones or slabs that rise above the water, which create a single line of movement.
Making a pond at a summer cottage with plants (with photo)
The composition of natural stones should be supplemented with carefully selected plants so that the overall picture creates the illusion of natural natural beauty.

When decorating a pond with plants, before planting them, you need to draw up an approximate placement scheme, distributing crops by type at different levels and steps. Coastal plants can also be placed in the free space between rocks.

The main thing is not to plant too many plants. A fern will perfectly fit into the coastal landscape, and water lilies can be put on the surface of the water.

To make the composition look beautiful and complete, it is necessary to use cultures that are different in their appearance. Strongly overgrown aquatic crops should be partially weeded out so that there are no strong piles and thickets.
These do-it-yourself photos of a pond in the country house show which plants can be planted in a garden pond:
Photo gallery
If the depth of the pond is more than 50 cm, then the aquatic crops must be planted in pots, and only then placed on the bottom of the reservoir. Deep plants grow well in the shade, and at sufficient depth they will purify water well.

And how to arrange a decorative pond in the country, if the reservoir is of modest size? A small pond also requires careful decoration, here it is important not to overload it with too many elements.
Plants in this case are recommended to be selected more simply. You can use deciduous: perennial herbaceous or shrubs with hanging shoots, tall ornamental grasses, as well as wild species that always grow in nature near water bodies.
It can be creamy white or pink meadowsweet, aquilegia, basilis and daylilies.
It is also good to plant marigold and forget-me-not marsh, Siberian and coin-chanted along the edge of the reservoir - they will perfectly decorate the border of the pond.
As you can see in the photo, when decorating a country pond with plants in a small pond, you can settle a frog or snails, which will help maintain the natural balance of the ecosystem:
Photo gallery
Frogs will eat gnats and mosquitoes, which are usually found in water bodies, and snails, as you know, feed on underwater litter, which means they will come in handy.
How to arrange an artificial pond with your own hands

When designing a large artificial pond, the reservoir can be divided into three main zones: for coastal plants, for shallow-water plants (water lilies), for deep-water plants.

At great depths, fish can live, which perfectly complement the style of a landscaped pool. If the reservoir is not very deep, then especially for wintering fish, you need to dig a hole 1.5 m deep.

You can supplement a landscape reservoir with a decorative stream, a waterfall, a cascade, build a rock garden nearby, decorate the coastline and a path to the reservoir in the same style, using the same tile material, which will also reveal the concept of the entire garden area.

You can create multi-level reservoirs with cascades, then an unusual reservoir will not only decorate the landscape, but also fill the garden with a pleasant and pacifying murmur of water.

Before you arrange a pond in the country, consider where it is located in the garden. A landscape reservoir with natural outlines can be located not far from the terrace of the house or in the depths of the garden next to the gazebo (where all the communications necessary for the reservoir are also connected).

Conveniently sitting in a gazebo or on the terrace of the house, you can comfortably and with pleasure watch the water surface and listen to the splash of water.

When choosing a style solution for decorating a garden pond, you need to focus on the already existing architectural, plant and design design of a summer cottage, but you can also trample these norms by creating a bright oasis on a strict territory.
How to decorate a decorative pond in the country in a designer style

Another idea of how to decorate a pond in the country with your own hands is to decorate in a designer style.

The design pond is distinguished by the correctness of the forms and the rigor of the design. Usually it embodies some kind of general concept (for example, a Japanese-style pond with a rock garden) or is made in the same style as the country house and plot.

If there is no specific style solution at all, then it is better to choose a free landscape style for the design of the reservoir.

A designer pond can be of a strict classical form or, for example, in the shape of a flower or a butterfly - but with respect to the geometric lines.

The most laconic in form is a formal pond with rectangular outlines - it will go well with a patio or patio, especially if there are straight or round flower beds nearby, linear paths are laid, etc.

Round ponds are also categorized as formal ponds. They can decorate a lawn or open lawn, they can be supplemented with a pergola or placed near a picturesque group of trees.
And a pond. Even a small body of water pulls people around like a magnet. Water is mesmerizing even in small quantities ... Moreover, you can build a pond with your own hands in a few hours. But this is a small artificial reservoir. It will take both money and time to build a large one.
Where to dig
Small artificial reservoirs are best viewed from above. Therefore, if there is a corresponding depression on the site, it is best to do it here. There is, however, a negative side to this: you will have to raise the edges of the bowl higher so that rainwater does not get inside. The second option is to come up with a water drainage system (make a drainage system above the reservoir).
If there is a key somewhere on the site, it is logical to make a natural pond by digging or deepening the existing bowl, laying out its borders with cobblestones or stones, and planting plants. The trickle, which is obligatory in this case, can also be refined by laying out its edges with cobblestones, drowning them in the sodden soil, you will give greater strength to the bank, between them you can plant moisture-loving plants.
Even a small waterfall is a magical sight How to dam up a pond, if there is a natural stream on your site - dig a pit, line it with a stone and direct the stream into it
Not everyone on the site has such a luxury as a stream or a key. We have to make artificial reservoirs. With the proper design, they look no worse than natural ones.
How to make an artificial pond with a bowl (no film)
The easiest and fastest way to make an artificial reservoir in the country is to bury the finished bowl in the ground, decorating and decorating its edges. There are plastic bowls - ready-made in various shapes, sizes and colors (mostly blue, green and black).

The device of a plastic garden or country pond is a simple matter. Here's a step-by-step guide:
- It is necessary to dig a pit in the shape of a bowl. If the shape is very non-standard, you can turn it upside down at the installation site, outline something with a contour (at least dig it with a shovel). The bowl is taken to the side, a foundation pit is dug. It should be slightly larger in size - slightly wider, but not deeper. The edges should either be flush with the ground, or protrude slightly. If you manage to raise the edge a little, it will be even better: when it rains, dirty water will not flow.
- After the desired depth is reached, the bottom is leveled into the horizon: it is leveled first with a shovel, then compacted and the excess is removed with an even bar. The surface must be flat and hard: the plastic must have good support. If the ground is poorly leveled (clay), you can pour 5-10 cm of sand, wet it and tamp it.
- The next step is to install the bowl in the pit. If the bottom has been flattened, the edges of the bowl will be level with the horizon. Now the space that remains between the wall of the bowl and the pit needs to be covered with soil or sand and tamped well.
- Now it's up to the design: the installation is complete, you can fill in the water.
How to build a pond in the courtyard with illumination using this technology, see this photo report (you can flip through the photo gallery yourself by clicking on the thumbnails below).
Digging a pit. We decided that the sides will be 1-2 cm above the level of the track - there will be less debris inside, and we will decorate the edges with stones. From this side, just below the maximum level, a pipe was cut into the bowl so that excess water would drain. She was taken down the drain
But it is not always and not everywhere it is possible to constantly add and drain water into the pond. Then you will have to either plant such plants that will clean it, or periodically change it.
The pond from the old bathroom
You don't have to buy a bowl. Any container can be used. Even an old bathtub. It turns out very well. All actions are the same, the foundation pit is dug first, a bath is placed in it, what goes on, look at the series of the following photos. On them, the pond from an old bathtub is transformed into a truly delightful corner.
The site was still entangled with wire - so that the clay does not float and the site does not sink. It's such beauty in a month - a garden pond built with my own hands makes me happy
A pond from a car tire (with a film)
A mini pond can be made from an old car tire, or rather from a tire. The larger it is, the larger the reservoir. The hardest part in this business is to cut off one side part. If the resulting edges are sharp, sandpaper them. The second most difficult task is to dig a hole of a suitable size. The difficulties ended there. The rest is quite easy.
A trimmed tire is installed in the pit, covered with earth on the sides, and compacted well. Also, earth or sand is poured inside, the bottom is leveled. Take a piece of thick plastic wrap, which can be folded in half, and cover the resulting tank. Do not try too hard: pour water, it will straighten the film itself.
Instead of polyethylene, you can take a banner film (available in advertising companies that produce outdoor advertising) or a piece of special for pools and ponds. They are much stronger (but more expensive).
The protruding ends of the film are tucked around the walls of your pond and decorated with stones. The pond is finished, then - decorating and planting plants. See how to make a pond from a tire in the photo report.
The next stage in making a mini-pond for a summer residence is decorating the edges with stones
There is certainly nothing complicated in such a device. Anyone can build such a reservoir in the country with their own hands, and the investment is minimal.
In general, mini-ponds are made from tanks, barrels, pots, even flower pots. The main thing is that there is a corps, but it is not very difficult to arrange it: experience gradually comes. They put them in the garden, in the country, near the house. There is an opportunity to bring water, make a trickle, it can be planted under trees, for example, or shrubs. And beauty and benefit at the same time.
Making a pond with a film
By creating this artificial pond from film, you almost exactly repeat the work described above, only without installing the bowl:
- mark the shape of the future pond;
- digging a pit, forming, if necessary, ledges;
- clean the bottom of any sharp objects: roots, stones, etc.;
- level the banks of your pond;
- spreading a waterproofing film;
- fill the pond with water;
- fix the edges of the film;
- decorate.
A summer pond created using this technology may already be of a more solid size. An important point: on loose soil, it is easy to make a foundation pit and it will not work to put the film. We'll have to come up with some measures to strengthen the banks. In this case, you will have to either put a bowl, or make a more serious structure - of brick or concrete. Next, let's look at examples of how to inexpensively make a film pond.
First project: sides flush with the ground
Eight simple steps and your pond in the country is built. How to dig and equip a pond in the country, to make it look like a natural one, see the photo report.
Second project: the sides are raised
The second version of a homemade pond in the first stages is built in almost the same way as the first. Only after the pit reached the design depth, the sides were raised, laid out along the edge with bricks and concreted. The result is a reservoir with raised sides. A water circulation system has also been made. It is shown in the figure below.

As you can see, this pond is more multi-layered and its capacity is more serious. If you want to have a reservoir of at least medium size and not build a serious bowl at the same time, you can do as shown in the figure: pour the created pit with sand, cover it, and only put the film on top. Geotextiles evenly distribute the load and prevent the germination of plants. This is especially true if you are building a pond in your garden and there are shrubs or trees nearby.
Serious projects: brick and concrete
If you want to have a large pond in the country, and you want to build it yourself, you will have to study the topic of building pools. First, the construction of the bowls - one to one repeats all the stages. Even the forms are sometimes made stepwise. True, the banks are not decorated with plants, and they are not planted in the pool itself ... But the construction process itself, with reinforcement, plaster, and waterproofing, is the same. Moreover, the water supply and water treatment system is also similar. Except that no chemical cleaning methods are used in ponds, but filters, scrimmers and ultraviolet light can be used.
In general, a large pond is not a cheap pleasure. Moreover, costs are required only for construction, but also for maintaining a large reservoir in a normal state: filters need to be cleaned regularly and cartridges or backfill changed. But the pleasure, of course, is great ...
Not the largest pond, but 10 bags of cement, 30 bags of sand (20 coarse and 10 fine) were used for it, a hydrophobic additive - 5 bags to make the concrete water-repellent. Plastered on a grid fixed in the ground
Plants for the pond
When shaping or choosing a bowl, consider not only its shape and depth. If you want plants to grow in your pond, you need a swampy coastal area. If you form a reservoir with a film, you can make about the same profile as in the picture.

It is more convenient to do this if you fill the foundation pit with a layer of sand at least 15 cm thick. With its help, you can make the relief the way you like. To make it easier to work and the film does not break, lay geotextiles on the sand. This thin membrane is very tear resistant. You can do whatever you want without tearing it. Having formed the desired bottom relief with it, you can line the film and lay stones on it, fill it with water and plant plants for the pond at different levels.
To ensure that there is enough oxygen in the water, you can plant Canadian Elodea, hornwort and swamp. They are in the photo below. They are planted in water - these are aquatic plants.
