Happy owners of their own land plots, be it a summer cottage or a private house, almost immediately face the problem of competent zoning of the territory. Now there are a lot of specialists in landscape design, but our person is closer to planning a garden with his own hands. A house, a garden and a vegetable garden are their own and here it is important to take into account all the nuances from the beginning, because it will be problematic or even impossible to redo it.
Common types of planning
Advice: in the overwhelming majority of cases, when designing a standard garden and vegetable garden with their own hands, experts adhere to proportions according to which residential buildings account for 10% of the territory, 15% are taken by the recreation area and outbuildings, 75% are given to plants.
Despite the apparent variety, the layout of the garden site can be performed in four main ways.

- The most common is straight or parallel-perpendicular.... They choose him not because he has some special beauty, but rather because it is easier that way. Plus, this arrangement is subconsciously associated with order.
Important: parallel-perpendicular forms, in terms of landscape design, create the effect of reducing space.
Therefore, in this way, the planning of a garden plot of 10 acres or more can be performed.

- The exact opposite would be the circular arrangement.... Let's say right away that this is a rather specific method, and it requires certain knowledge in landscape design. A fruit garden and flower gardens can be entered in this way, but it will be more difficult with a vegetable garden.
- The diagonal arrangement can be called universal to some extent.... Thus, it can be performed as a layout for a garden plot of 15 acres or more. So is the arrangement on a standard six hundred square meters. The diagonal orientation creates a visual volume and at the same time makes it possible to easily arrange the location of various zones on the site with your own hands.
- The fourth option can be safely called creative... There are no definite laws here, as a rule, it is a symbiosis of several types described above. Most often it is used in areas with an incorrect configuration and broken perimeter lines.

Advice: before starting the implementation of your project, you must definitely draw it on paper.
If you have purchased a ready-made plot on which there are already some buildings and plantings that you do not plan to remove, they should be noted first and then based on the resulting picture.
Rational distribution laws
Of course, planning the location of buildings, a garden and a vegetable garden on 10 acres is much easier, this is the same critical square, on which such landscape delights as an open reservoir or a separate playground will already look appropriate. But the owners of smaller plots shouldn't be upset either; with a competent approach, a masterpiece can be made from any territory.

In any project, the house is the main object, they pay attention to it first of all, so you should start with it. The approach here can be twofold, depending on the overall focus.
If the site is being developed for the purpose of growing a good harvest and in the future it should be overgrown with fruit trees and a rich vegetable garden, then the buildings should be located on the outskirts. Moreover, from the north or northwest side, so as not to block the sun from the plants.
On the territory intended exclusively for recreation, with lawns and flower beds, it is more reasonable to locate housing in the center or closer to the front part. Outbuildings, in both cases, are recommended to be hidden in the depths of the territory, if this is not possible, then they should be decorated with a bush or vineyard.

It is better to place a recreation area with a barbecue and appropriate furniture closer to the house; in small areas it is appropriate to make a covered terrace adjacent to the house; in large areas, you can equip a gazebo. So it will be more convenient to bring the necessary communications. But, undoubtedly, such a zone should be hidden from prying eyes.
If you want to regularly get good harvests and enjoy the beauty of your flower beds throughout the season, then all green spaces should receive as much sunlight as possible. Also of great importance is the do-it-yourself layout scheme for the orchard and vegetable garden, because the price of an incorrect planting is a lack of harvest.
Arrangement of an orchard
Suppose that all the pains of creativity associated with the arrangement of various zones in your country house or in a private household are already behind and it is time to buy seedlings. The most common mistake young owners make is the desire to plant more and more.
But do not forget that the fertile land is not dimensionless and no more than 7 tall, fruit-bearing trees can fit on one hundred square meters.

A low or flat planting can accommodate up to 15 healthy trees while still leaving room for a small vineyard and shrubbery. In this case, it is much better to plant less than to invest in high-quality seedlings, the price of which can be rather high, and after a couple of seasons to uproot trees, because they do not develop well and interfere with the growth of neighboring plantings.
Revise your list.
Think about whether you really need all the plants that you plan to plant.
- Sea buckthorn is certainly useful, but after the first harvest, interest in it drops sharply. Intensive growth, thorns and problematic collection will quickly discourage growing it, it is easier to buy 1 - 2 cans on the market.
- A cultivated undersized walnut is a rarity, in 80% of cases you will be sold a regular one. Its crown will cover a large area, and the roots are able to pull out a light strip foundation. It is appropriate for large areas or next to a capital cottage, creating a shade over the barbecue area.
- Hazelnuts will take up a quarter of a hundred square meters and will give a lot of growth.
- Viburnum is enough one, it is better to plant it on the outskirts, near the fence. The plant is unpretentious and tolerates shade normally.
- Chokeberry or chokeberry, for a big fan. The fruit is good for pressure relief, but this plant loves the sun.

Any plant is drawn to the light, and until it reaches its goal, it will not bear fruit normally. Therefore, by planting a seedling in a deliberately shaded area, you thereby doom yourself to a lack of harvest, and the plant to an eternal struggle. In this case, even the best, grafted seedlings will not save you.

The size of the shadow is about half the height of the tree. Conditionally shaded is an area where there is no sun for half a day or more. But do not worry in these places you can place paths, design elements or flower beds.
Important: trees planted near high walls will "shy away" from them, they will need to be molded.
The only exception is the southern direction.
If the goal is a large harvest, then it is better to form trees with a height of no more than 2m, in some cases the height can reach up to 4m. A comfortable distance between the trunks should be two tree heights, in other words, there should be at least 4m between two-meter plants.

Try to arrange lines of trees, trellises of vineyards and rows of shrubs from north to south. Thus, you get an additional opportunity to plant between the rows of tall plants and also low-growing crops, there is enough sun for everyone.
A few words about the garden
Ease of movement is important in the garden. The comfortable size of the tracks is made at least 40 cm. It should be convenient not only to walk along them, but also to import fertilizers or harvest.
Based on many years of experience, we can safely say that the parallel-perpendicular arrangement of the tracks is inconvenient in this case. You will constantly stumble over right angles and curse sharp turns.

In vegetable beds, the law works, the shorter the path, the better. Therefore, feel free to combine diagonals, semicircles or any other configurations convenient for you.
The width of the beds can be different, but a good bed should be raised to a height of about 20-30 cm and edged with a border. At the same time, the internal space is completely filled with fertile, fertilized soil.
Cabbage, root vegetables and some bush legumes love beds at least 1 meter wide. Beds for climbing beans, tall branchy tomatoes, cucumbers or melons can be made 60 cm each.
Mutual love or dislike of cultures should also be considered.
- Rhubarb, sorrel, perennial onions and horseradish are recommended to be planted separately from the general array.
- A variety of greens such as dill, parsley, spinach, ruula and other salad greens will find their place between the main beds.
- Cabbage cannot stand being near tomatoes, strawberries, onions or potatoes. Onions have a negative attitude towards legumes or turnips. Cucumbers don't need to be paired with tomatoes, rhubarb, or carrots.
- If we talk about a favorable combination, then legumes, corn and sorrel get along well with zucchini. Tomatoes love growing next to parsley, beans, carrots, or onions.
Important: do not forget about the crop rotation.
Related plants should not be planted in the same location for more than 3 years, after which redevelopment should be carried out.
Otherwise, land depletion may occur.

The video in this article reveals some of the secrets of landscape design and do-it-yourself garden planning.
Output

The layout of the garden and vegetable garden on 15 acres belongs to the category of the layout of large areas. Unlike the miniature 6 acres, there is already a place for creative thought to roam. But we do not advise you to neglect the above recommendations, it can take a lot of time to fix the errors.
How to start shaping your garden? How to properly arrange trees and shrubs in the country?
The garden has always been considered a wonderful decoration for any home. And one of the wonders of the world - the Hanging Gardens of Babylon - was a truly magnificent and unique creation. These gardens were tended around the clock by several thousand slaves. Nowadays, gardens are planted mainly to provide themselves with berries and fruits for the winter. It is very important to correctly plan the garden, since on a small plot of land you want to place as many different trees, shrubs, berries, etc. but also the biological characteristics of each type of fruit crop.
❧ The Mesopotamian king of Uruk Gilgamesh (beginning of the 3rd millennium BC) was famous for its gardens. The courtyards were shady and had many flower beds. Fruit trees in the orchards abounded with a variety of exotic varieties. The pools were surrounded by date palms. Bulls, lions, ostriches and monkeys were bred in enclosures in the far corners of the gardens.
So, for example, when placing trees in a garden area, it must be remembered that different crops have different requirements for light. There is a general rule for planning plants in a summer cottage. Plant height should increase from south to north. In other words, in the southernmost part of the site you need to plant vegetables and strawberries, and in the northern part - apple and pear trees. In the middle of the plot, medium-sized breeds are placed, such as cherries, plums, as well as a variety of berry bushes.
In addition, when planting various fruit crops in your summer cottage, you should pay attention to the fact that in the future, when the trees grow, they do not shade the neighboring garden plots. When planting trees on the site, follow certain rules - for example, the distance from trees to the boundaries of the site should be at least 3 m.And at a distance of 1 m from the border (fence), you can plant several bushes of raspberries, currants or gooseberries. These crops do well with partial shading.
Among other things, you need to place plantings on the site in such a way that they do not impede the movement of air. If the site is too densely planted with trees, this will interfere with the outflow of cold air, which in turn will lead to difficult wintering conditions for trees. It often happens that in densely planted areas, trees and shrubs die from frost even in the coldest winters.
There are two main styles of garden planning: regular (or geometric) and landscape (or natural).
With regular garden planning, plantings are placed symmetrically with respect to the main axis of the composition, while also maintaining the straightness of rows and paths, maintaining equal distances between trees of the same species. In this case, you can choose a scheme for planting fruit trees, both square and rectangular, or even place trees on the site in a checkerboard pattern. Staggered trees make good use of sunlight. If the plot is located on a slope, then the direction of the rows should be done across the slope. The square pattern is suitable for areas that are square or nearly square. Rectangular placement is suitable for parcels that have an oblong shape. There is also a kind of rectangular pattern. It is characterized by a wide-row, dense planting of plants, and unlike a rectangular pattern, trees are planted more densely in rows, but a rather large space is left between the rows.
If you prefer the natural style, when the plants grow the way they want it, then the second style of planting is suitable for you - landscape. Using this scheme, you can place plantings on your site the way you want. Trees and plants in the free-style plot make the plot more attractive. In addition, the use of the landscape style provides for the widespread use of a variety of ornamental plants. The landscape style is very suitable for those areas that have natural unevenness, small slopes and depressions, etc. All these features of the relief can be used to create an interesting landscape composition in your garden area.
Thinking over which fruit trees you will plant on your site, you should pay special attention to the apple tree. In Russia, the apple tree is, perhaps, the main fruit crop, which is unpretentious to weather conditions and gives a rich harvest.
When choosing varieties of fruit trees, one should take into account the fact that a certain variety of any species can be grown on the site only on the condition that trees of other varieties grow in the neighborhood at a distance of no more than 50-70 m. Otherwise, trees of the same variety will not be pollinated and fruit set.
When choosing berry crops, you can pay attention to berries such as garden strawberries, colloquially called strawberries, black, red and white currants, gooseberries, and raspberries. Strawberries are good because they multiply easily and begin to bear fruit as early as the second year after planting. Currants, especially black currants, are very rich in vitamins, and therefore several bushes of this culture should grow in each garden plot. Raspberries also grow quite quickly, so if you want to get a harvest of berries as soon as possible after setting up the garden, then start with these crops. And if we talk about the volume (harvest, then the richest harvest is harvested from the bushes of red currants and gooseberries.
❧ Scientists have found that fruit trees that grew near heating mains develop faster and better, in contrast to trees of the same species and varieties that grow in other places. I wonder if it is possible to grow a garden that will yield a rich harvest in a short time if you install a root heating system?
When planting a variety of berry crops in the garden, it should be remembered that they can be placed under trees only when the seedlings of fruit trees have just been planted and are still very small. As the trees grow, berry bushes should be removed from under them, as this makes it difficult to control pests and diseases. If any buildings are planned on the site, then it is better not to plant fruit trees or shrubs too close to the buildings. Over time, as crops grow, they can make it difficult to approach buildings, in addition, even a low structure will shade trees or shrubs, stunting their growth.
When planting fruit trees, note that it is best to plant each crop separately. This is necessary to optimize plant pest and disease control. Since it sometimes happens that the timing of spraying trees of one species coincides with the time of fruiting of other species. Considering that all work on the care of fruit trees is carried out manually on the garden plot, it is possible to leave the aisles not very wide.
When planning a garden on a personal plot, you should think carefully about all the moments associated with planting fruit shrubs and especially trees, because the garden is laid once and for many years.
Consider the following when planning your garden:
❧ what species of fruit shrubs and trees are suitable for a given climatic region;
❧ in order not to be mistaken with plant varieties, it is best to estimate their yield in advance. This will help determine the number of seedlings;
❧ if you want to get rich yields, you need to take into account that placing nearby trees of different varieties of the same ripening period will ensure cross-pollination during the flowering period, which in turn will serve as a guarantee of a good harvest in the future;
❧ it is best to find out information about the compatibility of different varieties of fruit trees and shrubs, since the proximity of some crops can lead to a decrease in yield;
❧ In order to avoid problems with the placement of trees on the site, you can first create a planting scheme on the plan. Draw a plan of the site on paper, cut out circles of the desired diameter from another sheet of paper, which will represent shrubs and fruit trees. For example, an adult apple tree of the Antonovka variety has a crown diameter of 3 m on average. So, when planting apple trees of this variety, it is necessary to calculate at what distance from them fruit trees of other species or shrubs can be planted;
❧ it is useful to know that, as a rule, a very good microclimate is created from the south-western side of any building, which is expressed in long-term illumination and protection from cold winds. This means that the temperature regime here will be the most optimal for thermophilic plants;
❧ If on your site groundwater runs close to the soil surface, then use this circumstance to your advantage. On a site with a close location of groundwater, you can plant shrubs or set up a vegetable garden on it;
❧ when planting a new garden in place of an old one, you must remember about crop rotation. If you plant a young apple tree in place of an uprooted one, then it will grow poorly.
The best option is to plan the planting in the garden in advance. But if, in addition to the garden, buildings are also planned on the site, then the garden should, of course, be planted after the construction work is completed. Otherwise, the technique will remember the newly planted trees and level the strawberry plantation to the ground.
Inexperienced summer residents, having planted their own garden, often complain that it does not have that abundance of fruits that they hoped for. And they begin to cut down trees, replacing them with ultra-modern seedlings. But people themselves are to blame for poor fruiting in 90% of cases! Probably, the planting was done chaotically, according to the principle "the more the better", there was no garden layout, and this is the result - useless sick trees.
Video: how to properly plan a summer cottage
Creating a garden, like creating a home, starts with design. Remember how they choose a building project: they study the climate, the terrain, the availability of free space, family members, etc. And only taking into account all the factors makes it possible to create the most comfortable and warm house.
Where does the garden begin
The garden also begins with a study of the land on which the plants will live, and the climate, which directly affects the number of fruits. If the soil is too clayey or one sand, it is necessary to enrich it with black soil, peat and other useful components, on which the nutrition of the roots will depend.
In the climate, frosty winters, late spring frosts and excess moisture are the main factor destroying fruiting. Therefore, it is necessary to select an assortment of trees based on the climatic conditions of a particular area.

Choosing trees
Apples, pears, cherry plums and locally bred cherries are the most temperature-resistant trees. They adapt in almost any area and bear fruit, if not annually, then after a year.
Southern guests - apricot, peach - are afraid of damp springs, because early flowering in high humidity does not end with pollination. The pollen, along with moisture, settles to the ground. Spring frosts are also dangerous, which just fall on the apricot blossom.
Sweet cherry absolutely does not tolerate nearby groundwater, and if you do not carry out reclamation, then in a couple of years it will wither away. A damp spring also leaves its mark: the fruits crack and rot before they ripen.

Therefore, when choosing an assortment of trees, take into account their future productivity. Is it necessary to allocate precious meters of five to six acres for trees that can bear fruit once every six years (under optimal weather conditions!). Wouldn't it be better to go to the nearest supermarket and buy a couple of kilograms of apricots or peaches, which will not be very expensive during the season, and plant only those plants in the garden that will provide seven vitamins in winter?
Making markup
To determine how many trees to plant and how to do it correctly, you need to draw on paper all the existing and planned buildings on the site: a house, a bathhouse, a gazebo, a fence, electric poles with wires (if any) and old trees that you do not plan to uproot.

Garden in a small summer cottage
Why is this needed? Every object towering above the ground casts a shadow that affects the development of nearby plants. Trees, bushes, garden plants will begin to stretch out into the zone of constant lighting, spending their energy not on planting fruits, but on the struggle for light. This will continue until the tip is above the barrier. And since a house or a bathhouse is not always within the power of trees to outgrow it, you will not wait for the fruits even after 10 years. Therefore, on your plan, mark with a number the height of each building, as well as the cardinal points. The shadows will be located to the west and east of the objects, tapering towards the south. Draw with strokes where there will be shadow for more than half the day. This distance is equal to half the height of your buildings.
Anything that turns out to be shaded on paper is not suitable for a garden. There you can lay paths, arrange flower beds, break a lawn, a pond, etc. In order for the trees to produce crops, the shade zone is excluded from the plan of the future garden.
Planting plants
First, decide how many trees and shrubs you plan to plant. If you don’t want to prune pears or apple trees, then you can “plant” a maximum of 7 trees per one hundred square meters. Why not thicker? Because as they grow, they will begin to cast a shadow, interfering with each other in their normal development.
If trimming is still planned, then the number of trunks can be increased to 15 (per hundred square meters). The most "advanced" summer residents should spend money on columnar forms of trees, which are planted at intervals of a meter.

Layout option for a rectangular plot with a garden and a vegetable garden
It should be noted!
Pruning reduces the number of fruits only in cherries and apricots, because they are located throughout the twig. It is not customary to cut them off. The rest of the trees are in great need of pruning. The fruits from this will become larger, the extra branches will not take away the light. It is best to keep trees about 2 meters in size, forming a crown like a ball or a flat wall (if you plant trees near a fence).
Trees are planted in four meters, if it is planned to restrain their growth in the area of 2 m in the form of a ball, and in three meters, if planted with a wall. The distance between shrubs (currants, gooseberries, etc.) is 1.5 m.
The rows should be located from south to north. So the plants will cast less shade, and shade-tolerant crops can be planted in the aisles.
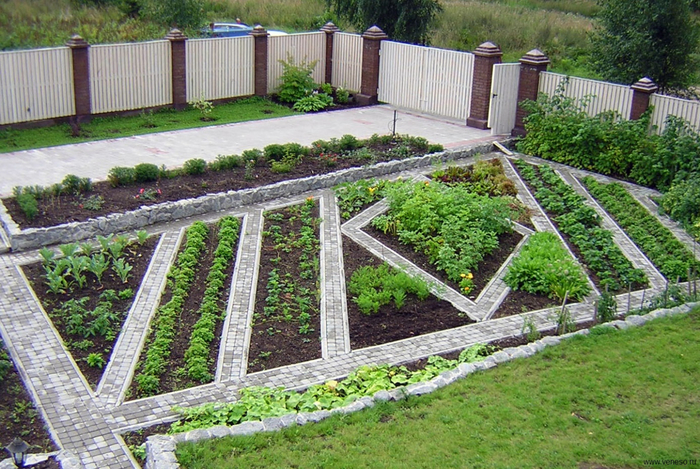
Garden layout
The modern layout of the garden and vegetable garden has ceased to be strictly rectangular. And all because right angles are inconvenient to go around, moving with a wheelbarrow. Therefore, mark garden paths and garden beds in such a shape that it is convenient to walk with equipment. Interesting examples of garden and vegetable garden planning can be seen from other summer residents, on the Internet or specialized reference books.

But there are general laws that should be followed so that a minimum of beds give a maximum yield.


Those owners who did not suffer with the layout are suffering with the cultivation of horticultural crops. By panting once, planning your garden and vegetable garden, you will save yourself a lot of unnecessary work.
A garden plan is like a sewing pattern for a dress. To begin with, we will measure the site or take as a basis the plan given to you in the BTI. Next, we transfer the plot plan at a scale of 1: 100 to a graph paper sheet, that is, 1 cm on paper will correspond to 1 m of land. The plan should indicate the boundaries of the site, a gate and a gate, a house and other garden buildings (bathhouse, shed, gazebo, etc.), those trees and large shrubs that you decide to leave, hedges, if any, doors and windows of the house. Be sure to put on paper the location of the well, electrical cables, manhole and other necessary things. We will transfer the paths and paved areas to the plan, but only those that we intend to leave. Let's outline the functional areas on the plan. The routes for moving around the garden should connect them with the house and with each other, as well as provide an approach to those places from where we will admire the garden.
Preliminary sketch after site survey
Necessary:
- disguise a bad view of neighboring buildings from the windows of the house;
- check the views from the windows to the garden, make them especially picturesque;
- find a place for a reservoir and a gazebo near it;
- arrange a small herb garden near the patio;
- plant two apple trees (early and medium ripening).
Home is the dominant element of any site. It sets the style and scale of the garden, for example: if the house is large, the paths cannot be narrow, and the flower beds cannot be small. The garden and the house should look organically together. Trees and shrubs that cover the house when viewed from the gate, as well as decorating its facade with vines, will not only not damage your home, but also make the overall impression of the garden more interesting, and if the house is very modest, this is the only way to ennoble it. Ideally, one should strive to ensure that the house does not stick out like a finger, but is, as it were, dissolved in the landscape, forming a worthy duet of architecture and wildlife. It does not at all follow from this that the house should be small, and it does not have to be one-story, even if the plot is tiny.

But it is important to decorate the corners of the building, this can be done with the help of a tree and shrub group, it is also necessary to cover the basement of the house, the plants should not close the windows of the house, and taller plants can also be placed in the walls.

The founder of Muskau Park, the largest English-style landscape park in Central Europe, Hermann von Pückler-Muskau believed that in order for buildings to create a harmonious impression, they should be visually covered with plants by at least a third.

There is another extreme, when the house is completely hidden from view by vegetation. Such a house gives the impression of abandonment, and I don't want to look there.

The uniform color scheme of the house and the space around it contributes to the creation of a particularly complete impression of this part of the garden. White balusters of the terrace, flowering jasmine bush, white border of Elegentissima deren leaves, while greenish, but soon whitening caps of tree hydrangea inflorescences - what a harmonious and elegant garden picture, and the plants are the simplest and most common.

A large, solid house looks very dignified, but does not overwhelm the space around it due to the fact that adult conifers hug it, visually covering a considerable part. The house and its respectable surroundings do not compete with each other, but produce exactly the impression that is required.
You can also fit a house into a garden with the help of plants shaped like palmettes, as well as with the help of vines.
You need to put on the plan everything that you want to add to it. After the plan is at least roughly sketched, let's try to wander around it. A harmonious garden is a series of alternating views. It is very important to control which garden pictures open from the gate, from the front door and windows of the house, from the recreation area, etc.

In the garden, you should not plant every square centimeter of the area; it is important to ensure the alternation and the correct ratio of open and closed spaces. Open space is anything below human eye level, such as a lawn, paving, or body of water. Closed space - what is above eye level, these are trees, high hedges, etc. There is a rule: in northern countries, including in central Russia, the ratio of closed and open spaces should be 1: 2 (house area from consideration excluded), that is, the area of open spaces should be approximately twice as large as the area of closed spaces.
In a well-planned garden, you want to take a walk, sit in those places from where the most beautiful views open up, and see interesting garden plants.
Getting started planning a garden with your own hands, you need to correctly measure the size of the area adjacent to the house with the ideas you have. The smaller the size of the plot, the more difficult it is to lay out the garden, since you will have to take care to perform competent zoning without overloading the territory with excesses. Here landscape tricks will come to the rescue, they are simply irreplaceable when planning a garden. And one of them is planning with a scale grid.
How to properly plan a garden on the site (with photo)
Before you properly plan a garden, pleasing with proportionality and strict cleanliness of lines, you need to carry out functional zoning and thereby make the space suitable and comfortable for your family.

When planning a garden, the design of which is dominated by clear lines, it is convenient, logical and comfortable, geometric solutions are especially suitable for small areas, in addition, this is a good way to connect the house with the garden. The smaller the area of the garden, the more laconic its plan should be.
Photo gallery
Look at the photo: a garden layout using simple geometric shapes such as a circle or a square is characteristic not only of the classic regular version, it is also suitable for a completely modern garden.

Before planning the garden on the site, stock up on a large-scale grid. Its step can be chosen based on the architectural features of the house, if any, often this is the distance between the windows of the house. The size of the grid can be different, but it is always based on the size of the house: if the house is large, then the grid is large, and vice versa. You can take the distance between the fence posts as a step.

A garden plot designed with unnecessarily fine mesh will be overwhelmed with details. For small gardens up to 6 acres, its size is 2-3 m.

The grid is just a tool, but an extremely important tool, with its help you can try to create a harmonious and logical garden project, it will tell you where to start designing.
Types of garden layouts using a scale grid
There are three types of grid layouts. The most common is the rectangular version, it is the most obvious, often very simple, sometimes almost primitive, but extremely functional.

The grid in a rectangular version always starts from the facade of the house, in this version all the lines of the garden (paths, borders of flower beds, paving, lawns) are parallel or perpendicular to the facade of the house.
Photo gallery
Pay attention to the photo on how to plan a garden using diagonal lines: this type of layout not only allows you to come up with original design solutions, but also helps to visually enlarge the garden space, as if to expand its boundaries, because the diagonal is always larger than the side of the rectangle. In this case, the garden lines are also straight, but at an angle of 45 ° to the front of the house. The plans made with diagonals bring lightness and dynamics to the garden design, they are always interesting.

The third garden layout option is circular, designing a garden using circles is not easy, but the result is impressive, so it's worth trying.
When designing your own garden, I advise you not to be too lazy to make all three possible options and even their combinations, and then choose the most impressive one.

If you are thinking about how to plan a garden, but categorically do not accept straight lines, then, having designed a garden using a scale grid, you can easily make them smooth by rounding the corners.

Form is the most important part of any object, information about color, texture, size in relation to the form is secondary. Any design work should begin with the choice of the form. Of all the existing forms, the circle and the ball are closest to man, because such forms are created by nature itself - let us recall, for example, the apple, the sun, the full moon, the wheel and the millstone have long been known and familiar. The circle symbolizes enlightenment, perfection, the yin-yang symbols are also enclosed in a circle.

The round shape is suitable for decorating any garden element - a lawn, a paved area, a flower arrangement, a reservoir. If a recreation area or lawn is given the shape of a circle, and the paths are designed in the form of smooth lines, representing parts of circles of different diameters, such a garden looks spacious and cozy.

The round-shaped playground looks great against the background of a round-shaped lawn, it is paved with rectangular clinker bricks in a circle, which once again emphasizes its shape. The circle as an element of garden design creates intimacy and solitude that are so necessary in this place. By the way, there is also a round umbrella, which not only protects the owners of the garden and their guests from the sun, but also repeats the shape of the paved area. Paving is not the only option for covering the recreation area; a round wooden flooring, slightly raised above the ground, is also very good.

In a modern garden, pergolas are widely used, most often their pillars are located in a straight line, but this is not the only possible option, pergolas look interesting, the bases of the pillars of which are located in a circle.

A circle is the perfect shape for a lawn. It is this geometric figure that organizes the effect of spaciousness even in a small area. The dense environment of shrubs and herbaceous perennials creates ideal conditions for privacy in such a garden.
Garden layout: landscape design tricks
If you design a garden using geometric lines and shapes, they should be clearly readable not only on the plan, but also when taking it out to nature, everything should be verified down to a centimeter, even a slight negligence in this case is absolutely inappropriate.

A combination of the two is often used to properly design a garden. For example, in the case of a rectangular reservoir with quarter-circle cutouts in the corners, this is a combination of rectangular and circular options. Spectacular cutouts are accentuated by trimmed “hemispheres” of shrubs. In our climatic zone, they can be made from the Thunberg barberry, Japanese spirea, brilliant cotoneaster, Schmidt alpine currant, snowberry, and western thuja globular, for example, the Globosa variety, is good for this purpose. A recreation area in the shape of a circle with a round table with chairs in the middle adjoins one of the corners of the reservoir.

Another illustration to the theme of a successful combination of rectangular and circular layout. The paved area is shaped like a rectangle combined with an adjoining semicircle. It is adjoined by a reservoir, consisting of two symmetrical parts, each also used straight lines and quarters of a circle. The "roundness" of the composition is emphasized by boxwood balls in ceramic pots, in our climate the same effect can be achieved by trimming the dwarf Japanese spirea of the Little Princes variety, the leaves of which are as small as the leaves of boxwood.
Whether we realize it or not, our eye picks out geometric shapes in the garden, they are good for harmonizing space, the repetition of such elements allows us to make any design more stylish and calm.
Garden and vegetable garden are integral attributes of any suburban area. To break them, you do not need to be an experienced gardener - it is enough to have minimal knowledge of the matter and, of course, good instructions.
To begin with, making a garden from scratch is much more difficult, because it will not grow for a year, but for several decades, so many points have to be taken into account. Something, perhaps, will be planted in the wrong place, and after years these mistakes will make themselves felt. For example, a common mistake made by novice gardeners is an overly buried root collar of seedlings.

The process is quite laborious and consists of several important stages. Let's get acquainted with the features of each of them.
Stage one. Choosing a site
Much attention is paid to the selection of a suitable site - the relief, soil type, depth of groundwater, the degree of protection from wind and other important conditions are assessed. Thanks to agrochemical analyzes, it is possible to determine the level of soil acidity and the concentration of nutrients, which will further help with watering, fertilizing, and liming. Determination of the depth of the groundwater will allow determining the measures to minimize their negative impact. In a word, the laying of a garden should be carried out only after preliminary preparation, and gardeners are obliged to know about some points of the assessment of the land.

Note! A number of additional measures will help make land even unsuitable for trees suitable (for example, drainage).
Relief
Gardens grow best on slopes with a steepness of no more than 8 degrees. The direction of the slope is also important - it should be southern, which means it should be warm and well lit. Do not set up a garden in a depression, as water accumulates there and cold air stagnates.

But the relief of most of the suburban areas is flat, without depressions and slopes, so there is no need to choose.
The soil
Fruit trees, as you know, have a fairly powerful root system that goes deep vertically and spreads widely on the sides. This means that the nutrient medium is required in large volumes. It is for this reason that horticultural crops develop better on a powerful soil that contains the required supply of elements, is sufficiently (but not too) moistened. Swampy, rocky, highly podzolized and clayey terrain is completely unsuitable in this case.

As for the subsoil, it must be moisture and air permeable.
- Apple trees require black soil, sandy loam or sod soil. It is important that the earth is loose and wet, however, apple trees cannot tolerate excess moisture.
- Plums need moist and nutrient-rich loamy soil. They do not tolerate a lack of moisture and dry air.
- Cherries are best planted on not too steep slopes with sandy loam soil.
- Pears will grow best on light, loamy soil.

Ground water
An area with a high level of groundwater is dangerous for garden trees, since plants do not live in such places for a long time. The roots, reaching the water, die due to a lack of oxygen, then the ends of the branches in the crown dry out, and later the twigs. Plants grow very slowly and soon die.

If you plan to plant apple trees, then groundwater should be no closer than 2 m.For stone fruit varieties (cherries, sweet cherries, apricots), which have deep roots, this figure is 1.5 m. water can be even less.
About the companions of fruit trees
Some forest trees grow in the same conditions as fruit trees. It has been proven that if an oak, linden or maple grows well on or near the site, then fruit crops will develop quite successfully. But alder and horsetails indicate a boggy area, which means that it needs to be cultivated first. Thanks to all these signs, you can find out if the land is suitable for a garden.

Windscreen
Many gardeners know that the wind has a harmful effect on the garden. In winter, it blows snow off the ground, increasing the risk of freezing the root system. Large drifts around the perimeter destroy the crowns. As for the hot summer winds, they dry out the soil and prevent normal pollination by insects. Young plantings are swayed by the wind, which is why the roots of the seedlings take root more slowly. Finally, in a strong gusty wind, not only leaves and branches break, but the trees themselves fall.

Sharp winds are especially dangerous in productive years, when in just a day most of the fruits can crumble to the ground. Avoiding all of this requires windscreens - a great way to preserve crops and protect plants from damage. Fast growing trees and shrubs are best for shelter plantings, but they will only be effective a few years after planting. Therefore, wind protection should be taken care of at least two to three years before laying the garden. Also, the role of wind protection can be played by outbuildings, natural heights and the forest located nearby.

More than others, such tree species as oak, poplar, birch, linden are suitable for wind protection. If shrubs are used, it is better to give preference to yellow acacia, mountain ash, hazel and wild rose.
Note! There are clear distances at which protective trees and shrubs should be placed. For trees, this is about 1-1.2 m (within a row) and 1.5-2 m (between rows), for shrubs - 0.5-0.7 m and 0.7-1 m, respectively.
Stage two. Site planning
The land should be used rationally, and there should be no room for weeds and various pests. In other words, the area must be densely planted. Fruit crops need light, and their roots need soil nutrition. Moreover, with proper placement, the garden itself will be more attractive.
Before starting development, you need to plan everything. As a rule, gardeners use the same placement schemes, which may differ depending on the relief features, climate and the preferences of the gardeners themselves. One of these schemes is shown below.

Of the eight to ten apple trees, five should be of the winter variety, two of the summer and two more of the autumn. It also provides for the creation of a gazebo and recreation area, planting flower crops.
Note! Pears, apple trees should be planted 5-6x4 m apart, while plums and cherries - somewhere 3x2.5 m. You can plant low-growing representatives of the same varieties between the rows of tall crops.
These undersized plants are less durable, their fruiting will end by twenty years. At the same time, the crowns will reach full development, they will become too crowded, and you can get rid of the trees.
Stage three. Choosing a landing date
In the central regions, it is better to plant the garden in early spring, that is, before the buds swell (this is especially important for cherries). In the south, gardens are usually planted in the fall. What is also important, in the spring, planting should be carried out before the seedlings begin to grow, and in the fall - during the leaf fall.

Also note that you must remove the leaves before digging out the seedlings. The fact is that moisture entering the plant evaporates through the leaves, and if they are not removed, then the probability of successful survival will decrease. The leaves are removed carefully, while taking care not to damage the buds.
Stage four. Soil preparation
To obtain a good harvest, a deep arable layer of soil is required. As a rule, the root systems of fruit crops go into the ground to a depth of 0.8 m, which means that the same amount of treatment and fertilization must be carried out. For this, it is more advisable to use a small plantation plow.

Stage five. Selection of seedlings
They need to be purchased in a nursery located in the same region as the future garden, otherwise there will be a risk that the plants will not take root. The roots should be branched, long (more than 30 cm), not frosted, white in the cut. Quality seedlings have straight trunks, smooth bark and no visible defects. Finally, the crown should consist of at least three to four well-developed branches, which are directed in different directions, and without fail with a guide (i.e. leading shoot).

Gardeners have different opinions about the age at which to plant trees. Some plant mature plants (eight or nine years old), which bear fruit quickly, but are quite expensive, and it is quite difficult to plant them. Others buy two- and three-year-olds, which are slightly behind in terms of fruiting, but are cheaper.

Stage six. Preparation of seedlings
The procedure consists of two simple steps. Let's consider them.
Step 1. Roots
The largest roots are cut so that the cut area "looks" at the bottom of the pit. To do this, you need to use a garden knife (not a pruner, since it kneads the wood and does not give an even cut). If the seedlings were obtained in the fall, but will be planted in the spring, then after pruning they are immersed in a clay solution and buried in the ground for a while (this will prevent drying out).

Step 2. Crohn
The length of the roots of the dug out seedlings does not exceed 35-40 cm, while most of them (roots), and this is about 70%, remains in the ground. But the above-ground part remains the same, which is why the stripped-down root system can no longer properly "feed" it. Therefore, the branches in the crown should be cut by about a third of the length.

Note! It is more convenient to cut the branches after planting - this way a person can not only see their placement relative to each other, but also do the work with both hands.
Stage six. Digging planting holes
During the first two years after planting, the roots are located within the planting pit, which means that they use moisture and nutrients from there. Therefore, at first, young plants should be provided with the best conditions for development.

The diameter and shape of the planting pits may be different, but in order to uniform and correct development of the roots, it is advisable to make round pits tapering downward.
Note! There is an opinion that on clay soils the bottom of the pit should be covered with a sandy "pillow", and on sandy soils - with a clay one. This is supposedly necessary for water retention. In reality, this is not the case.
Pits for spring planting should be prepared in autumn, while for autumn planting - in about a month. Moreover, in the first case, before freezing, the pits should be covered with fertilized soil, but not tamped.
Stage seven. Landing
Let's make a reservation right away that it is not worth filling the root collars - when the soil settles, they should be flush with its surface. In principle, planting is the most important stage, it is on it that the yield, survival rate and life expectancy of trees depend. The mistakes made here are difficult to eliminate in the future, and sometimes even impossible.

The most common mistake is considered to be a deep landing, which can only be detected after a few years. It is difficult to lift a deep-planted tree, and a beginner gardener will definitely not be able to cope with this, moreover, he may even ruin the plant.
Note! If the groundwater is too close to the surface, then you cannot plant the plants in the pits - instead, mounds of soil are created. For this, the landing sites are first dug up, then mounds of fertilized soil are poured on them (width - 100 cm, height - 45-50 cm). Seedlings are planted on such mounds and tied to wooden pegs.

A few words about the boarding board
When the landing sites are marked, and the stakes are ready, you can proceed directly to digging. In order to avoid violation of straightness, a stake must be driven in the center of each pit.

It is not easy to do this "by eye", so you can resort to one simple device - the so-called landing board. For its manufacture, a board with approximate dimensions of 200x15x2 cm is used. A triangular cutout is made in the middle of one side of this board. Similar cuts are made at the edges, 75 cm from the center, as shown in the images.
Such a board will allow you to set the pegs to which the seedlings will be tied, exactly in the center of the pits. Next, the plants are tied to the stakes as shown below.

After planting, the trees need to be looked after, fertilized and watered, but here it all depends on the specific tree species.

Video - Features of caring for fruit trees
Creating a vegetable garden on the site
Ideally, the garden should consist of beds located in a sunny position and protected from the wind by fruit trees planted from the north, as well as comfortable wide paths. Making a vegetable garden from scratch is not as difficult as a garden, but you can still face certain difficulties. You should start with preliminary preparation.

Stage one. Seat selection
The place for the garden must meet certain requirements, let's get acquainted with them.
- The vegetable garden should be located in a sunny location. It is important that the plants are under the sun for at least six hours a day.
- Also, in the selected place there should be no strong winds or, as an option, the wind protection described above will be equipped.
- The beds should be at least ten meters away from trees and buildings.
- Finally, the selected area should be level and elevated.
Note! If the garden is inclined towards the south, then the harvest will be early, while on the northern slope the fruits will ripen later than usual. The western and eastern slopes are also suitable for a vegetable garden.
In the lowland, it is not worth breaking the beds, since water will accumulate there. If there is no other way out, then you should take care of the system of drainage grooves, and make the beds themselves at least 20 cm.


Lighting is not easy to control. The only way is to get rid of the objects shading the vegetable garden (except for the north side). That is, there is no need to plant trees. But if they serve as protection from the wind, then it is necessary at least to thin out the crowns so that they do not cast a thick shadow.

Stage two. Planning
In most cases, it only comes to the garden after everything else is ready. There remains only a piece of land on which you need to break out the beds.
You should start by drawing up a plan. What do you need to add to it? First of all, you need to designate the number of beds, as well as determine their shape. It is advisable to make the beds square or rectangular, but if desired, the garden can be divided into sectors. You also need to raise them somewhat (by about 15-20 cm, although the height may be higher), so that when processing plants, not overload the back. The width of the beds is usually about 80 cm.

In addition, the plan should provide a place for paths (for this, the distance between the beds should be at least 40 cm), as well as small areas for containers with water and equipment. Such tanks, by the way, are needed when planting crops that like warm watering. Most of the costs here are for the arrangement of the paths.

Note! Do not use roofing material or slate when delimiting - these materials release harmful substances into the soil, which can cause the crop to be hazardous to health.
A place is also required for the compost heap, where plant and organic waste will be deposited. After two years, this waste will rot and serve as a good fertilizer.
Stage three. Registration
If there is a lawn on the site of future beds, then the selected area needs to be cultivated. There may be several options, but the most effective (and at the same time expensive) is to cut the top layer of turf (no more than 3 cm) and then evenly scatter a mixture of sand, peat and manure. Then the site is dug up and the beds are created. Another option is to dig up the ground so that the top layer goes about 15 centimeters deep, and grow potatoes on it in the first year.
The very procedures for decorating the beds are as follows.
Step 1... First, according to the plan drawn up, pegs are driven in along the perimeter of the garden, between which the rope is pulled.
Step 2. The soil is then prepared using one of the methods described above.
Note! The location of the crops must be changed annually, otherwise the harvest will become worse over time, and the soil will become unsuitable for cultivation.
Step 3... The soil is loosened. It needs to be made soft and airy so that the plants sprout with ease.

Step 4. The boundaries of the beds are indicated. This can be done using the same pegs and rope, or by planting perennial plants around the perimeter.

Step 5. Tracks are formed at the end. They can be covered with gravel or laid out with tiles (in the second case, the earth is compacted and covered with a layer of sand, after which laying is performed).

Stage four. Planting plants
After creating the beds and paths, you can start planting plants. To avoid any future problems, you need to follow the compatibility rules shown in the image below.

That's all. As it turned out, if you do everything right, then it is quite possible to equip the house, garden and vegetable garden with your own hands. You can find even more helpful information in the video below.
Video - Garden planning and gardening