It is very important that at the dacha the eye rejoices not only with plantings, but also with the environment. About, and we have already told, it is time to talk about how to make fences for a summer residence with your own hands. Without them, the arrangement of a summer cottage is not complete, and therefore it is better to take care of creating a strong and good fence. And even better, it fits into the overall picture of what you are creating on your site.
Do-it-yourself fences for summer cottages cheap
Don't be put off by the length of the fence or its height. Let's start with the fact that the fence is easy to make with your own hands and quite budgetary, because if you have the desire and basic knowledge of the "fence theory", then you can safely proceed to the next step - the choice of materials.
Country fence can be made from:
- tree;
- picket fence;
- metal profile;
- grids;
- yes, anything!
You just have to choose what you like more and fit into the overall design.

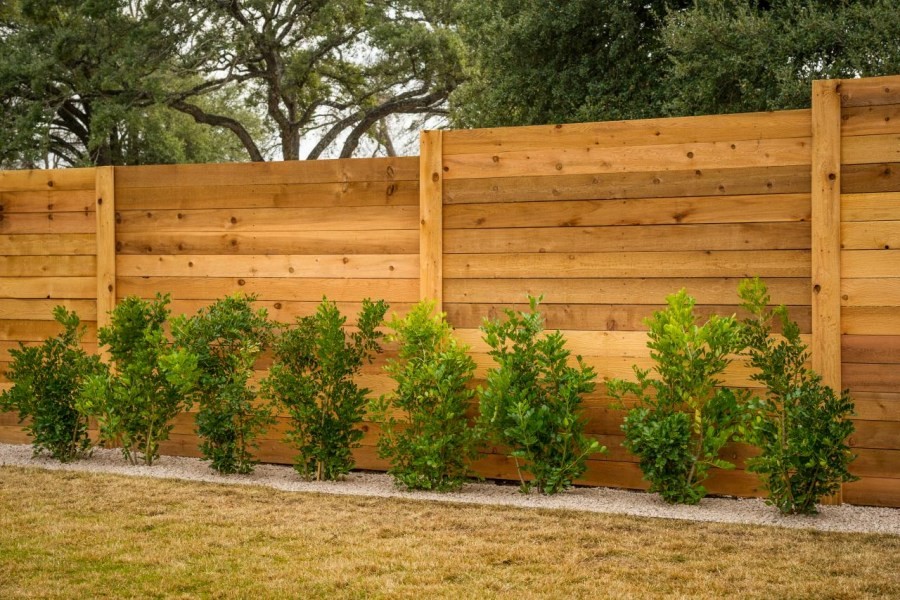
Wood fence
Wood is one of the best materials. It looks noble, withstands bad weather perfectly, it can be purchased without problems and at the same time it is environmentally friendly.

It is not necessary to purchase an already prepared board. It is enough to get stock and leftovers that have accumulated in the backyard and are still suitable for use - for example, ranch fences allow the use of untrimmed and uneven board. You only need to dig wooden poles along the intended path and nail the boards to them in a horizontal position.

This is a fairly simple and cheap fence for giving, and given its environmental friendliness, then it is worth giving preference to just such fences.
In addition, depending on the length of the board, you yourself choose its direction, so you can build both a ranch fence and a simple vertical or horizontal fence that has long proven itself.

To install a wooden fence with your own hands, you will need:
- beam;
- boards;
- nails;
- hammer;
- shovel;
- sand.
If desired, cement and bitumen can be added to this list if you want the timber to be installed as stable as possible.
The principle of installation of a wooden fence is very simple. You dig holes for the support beam and fill them with cement or densely cover with sand, tamping it down. So the supports will not deform under the load of the boards and become more stable.

Then you just have to nail the boards to the pillars. If you want to fasten the boards vertically, then between the supports you will have to stretch and nail two planks, on which the boards will then be attached. If you still want to see a ranch fence on your territory, then it is enough to immediately fasten the boards from pole to pole. More details - on the video Ivan Galkin:
Do not forget only that the tree has its own shelf life and does not like moisture. Therefore, be sure to paint the fence after construction and periodically inspect it for damage in order to repair or replace the board in time.

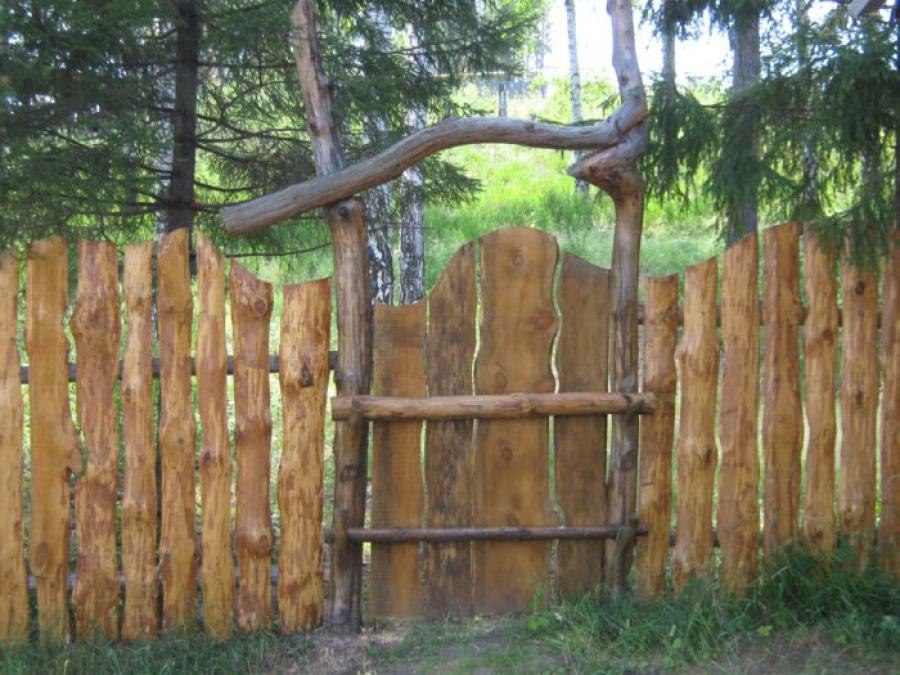
picket fence
Picket fences are the most popular type of wooden fences. And no wonder, because the fence is so easy to install, economical to purchase and beautiful in finished form.


Before proceeding with construction, it is necessary to mark the territory where the building will be located, determine its height and frequency of installation of the picket fence. Although we install a fence for protection, but if the area is tightly closed, then you can deprive the plants of light, which will lead to crop failure.

A set of materials for building a picket fence is similar to what we cited above:
- beam for supports;
- board for horizontal screed;
- cement;
- sand;
- nails or screws.
Tools can be different - from a shovel with a hammer to a screwdriver and an electric drill. Only the speed of construction will depend on this, but not the quality of the fence.
First you need to install the pillars, which will become the basis of the fence. Therefore, dig holes for the timber at an equal distance from each other, but no further than the length of the board, which will serve as a screed for us. After that, install the supports and fill them with cement mortar.
While the solution hardens (and this will take at least 3 days), you can proceed to the installation of sections. To do this, cut the board to a length sufficient to attach its ends to the support. We place the sections on supports with the help of nails or self-tapping screws and then attach the picket fence to them at an equal distance.
As you can see, the process of building a fence is quite simple and does not require special building skills - only patience to wait for the mortar to harden. After that, you can create a fence to your liking.


Well, in order to understand the intricacies of working with a picket fence and its installation, we recommend watching a video master class Andrey Krylov:
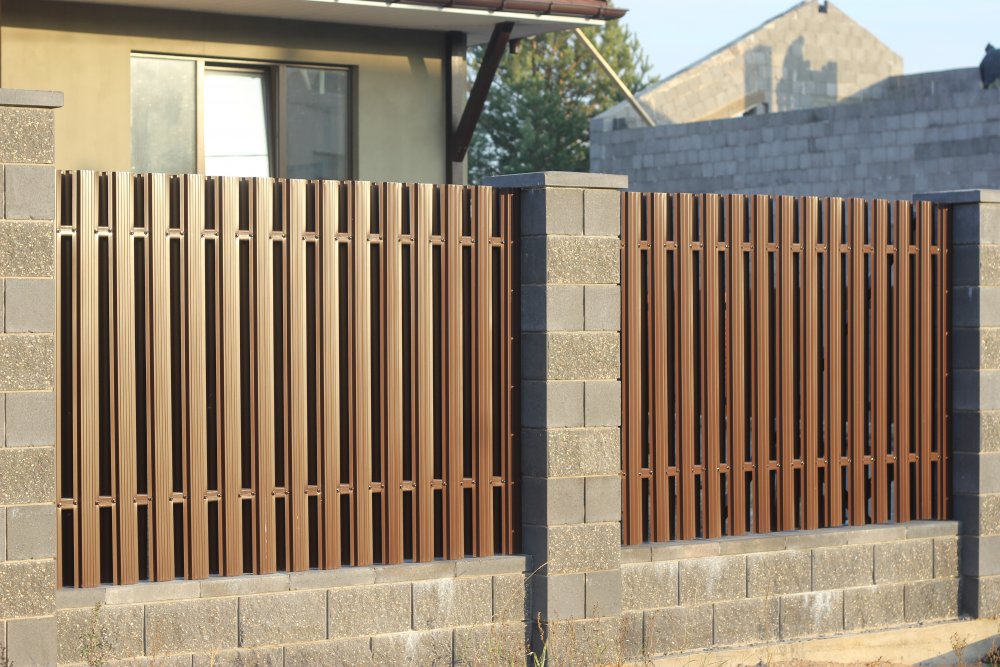
Metal profile fence
And yet, despite the beauty and cheapness of the fence and the tree as a whole, it has one drawback - such a fence is short-lived and its maximum service life is only 15 years. Therefore, many, wanting to save money, are looking for a more durable, affordable and strong material - a metal profile.

Due to its strength and availability, corrugated board has long been widely used by summer residents. It is used for beds, roofing and, of course, for fences.
The metal profile does not have the most aesthetic appearance, so most designers categorically bypass the profiled sheet when creating beautiful and original fences. But its accessibility and ease of use plays into the hands of summer residents, allowing you to make a good fence for giving your own hands.
The construction of such a fence is a little different from others. You will need all the same support poles and boards for a horizontal screed, on which the profile itself will be attached.

And since the metal profile is still not the most popular material for creating a fence, it’s worth dwelling a bit on basic requirements for its installation:
- The distance between the supports should not exceed 2.5 meters. And it is better to stop at a more frequent, half-meter installation. This is due to the fact that the profiled sheet is flexible enough and under the pressure of the wind it will deform, losing beauty and, most importantly, strength. Therefore, the shorter the sections, the better the fence will turn out.
- The supports must be immersed in the ground by at least 1.5 meters. Despite the flexibility of the metal profile, the sheet itself is quite heavy and requires stable support. Therefore, it is recommended that all supports be cemented at the base.
- It is best to use not a beam as a pole, but a pipe with a diameter of 6-8 cm and a wall thickness of at least 2 mm, such supports will definitely become a good basis for a stable and strong fence.
- It is recommended to use 3 horizontal lags when mounting the profile - top, bottom and in the middle. So the fence will be more resistant to deformation and it is better to keep its shape under any pressure.

And so that you are convinced of the simplicity of building such a fence, we suggest you watch the video master class of the channel Do it yourself 36, where they share with us all the tricks of working with a metal profile:
Mesh fence
And yet, one of the most budget options is a mesh fence. Like any metal product, the mesh perfectly tolerates most natural phenomena. And even rust can be prevented by timely processing. Therefore, fences from it come out quite durable.

There are several types of mesh for fences:
- chain link, which is sold in rolls, is treated with polymers to prevent corrosion and is easily installed between poles without unnecessary partitions,
- corrugated, formed from a wire with a cross section of 6-7 mm and bent by a wave. It has a strong weave. And it keeps its shape well.
- Welded, has a smaller wire cross section than in the case of corrugated, but due to welding it is stronger. True, using it for a fence will be more expensive than in the case of a chain-link.
Fencing from any mesh can be made in two different ways:
- Stretch the canvas around the perimeter and attach to the support posts.
- Pull the mesh onto the frame, and then assemble the fence from the resulting sections.


Allows you to keep track of your pets
Both methods have their own characteristics, so it is impossible to single out one of them as more profitable or simpler.
So, for example, with a simple stretch of the grid from post to post, you will reduce the time for preparing materials. After all, you will only need to drive in a support, determine the height of the future fence and stretch the mesh, attaching it to the posts with wire.

This method is easy to perform and practical if you are short on time and want to make a temporary fence.
And yet, it should be borne in mind that for the chain-link mesh, the posts will have to be placed at intervals of 1.5-2 meters, and this will increase the budget for the material. While for a corrugated mesh, a distance of 3-4 meters is sufficient.

But if there are height differences on your site, then this is the only solution if you have chosen the mesh as the material. The sections are already prepared metal profile frames, which brings us to the limitation - if you install them downward, there will be an open space under the fence, which does not add either security or aesthetic beauty to the site.
Installation of sections is easier than stretching the mesh fabric. Finished frames are simply attached to pre-installed poles equipped with the necessary anchors, or even welded to them.

As you can see, the choice of grid and method depends entirely on your desire to ennoble the site, the time you have and, of course, the budget allocated for this.
To figure out which material is right for you, you can familiarize yourself with a detailed master class on selecting materials and installing it in a fence.
If you want more clarity and understanding of how to do everything right, with explanations from an experienced master, then you should watch a video lesson from the channel RemontHelp.com:
The grid itself consists of cells, i.e. your site will be clearly visible from the side of the street. Therefore, it is usually recommended to use this material only between areas, so as not to cover the plantings from the light.

Original ideas for a fence in the country from improvised materials
Every practical summer resident will consider it his duty to save as much as possible and use everything that remains from other projects. Therefore, before undertaking the construction of a fence with our own hands, we suggest thinking about whether it is worth rushing to the store for a net or picket fence? Maybe get by with improvised materials?
Then let's see what we have accumulated over the entire period of ownership of the cottage? And is it possible to make worthy fences out of this rubbish?
There is only one answer - yes, you can.
And car tires, and, and covers from them can become a fence or its decoration. And it will be no worse and no more boring than assembled from high-quality materials.
Tire fence
Let's start with tires. A lot of this good always accumulates, so over time the question arises of where to put them. Disposal costs money, and a fence will also bring benefits. The choice is obvious.

Somewhat eclectic

It remains only to fill the territory well and start installing tires on top of each other in a checkerboard pattern, as if laying out bricks, or fix them on a previously installed chain-link fence.
By the way, if you build a pyramid fence out of tires, then the earth in the protruding parts can be used for flower beds, thus creating a whole green wall.

Fence from plastic bottles
Plastic can be considered an ideal material for a fence. After all, it decomposes in at least 60 years, which means that the fence made of it will not suffer from rain or sun. Although bottle plastic is still soft, and at first glance its shape is not suitable for building a fence, many began to give it a chance and use it for other purposes.
To surround the entire suburban area with such a "plastic fence", you will need to accumulate a lot of bottles to create a full-fledged fence.
The small weight of the material makes it easily deformed from physical damage. In addition, if you have accumulated mostly transparent bottles, then such a fence will not provide protection from prying eyes. But the cost of the finished fence will be small.
If you combine bottles of different colors, you can collect whole mosaics. Therefore, creative individuals are willing to endure shortcomings for the sake of an original fence that attracts the attention of passers-by.
To create a full-fledged fence from plastic bottles, it is recommended to take the same type of material size. And it can already be assembled into a wall, strung on a wire like a curtain, or exposed to each other, filling the voids with cement mortar. The result will depend entirely on your desire to strengthen the fence or make it more airy.

By the way, bottle caps will also come in handy. After all, you can make a movable fence out of them, and even with any pattern.
This will require many covers with four drilled holes and meters of wire. Based on the colors that you have, select a pattern, or rather a pattern for beadwork, and then simply string the caps in order, as in embroidery, in rows. After that, pass the wire through the vertical holes, thus connecting the rows.

If you just got bored with the old fence, but you still want to use the covers, then just screw them with self-tapping screws, creating a bright picture-panel on the fence. And now you already have an interesting wall on the site, attracting the attention of the kids and pleasing your eyes.
A master class from Soloremont.
However, an ordinary palisade or an old picket fence can simply be painted in an original way.


funny pencils


You create your own mood and desire to visit the country house more often!
Do-it-yourself wattle in the country: a master class for lovers of rural romance
And if you have ever seen a Ukrainian farm or met mud huts in the south of Russia, then your heart could not remain indifferent to this peaceful romance. And it’s not even these cute, like toy houses, with a thatched roof and whitewashed walls, that sink into the soul, but a wicker fence with clay upside down hanging on it.
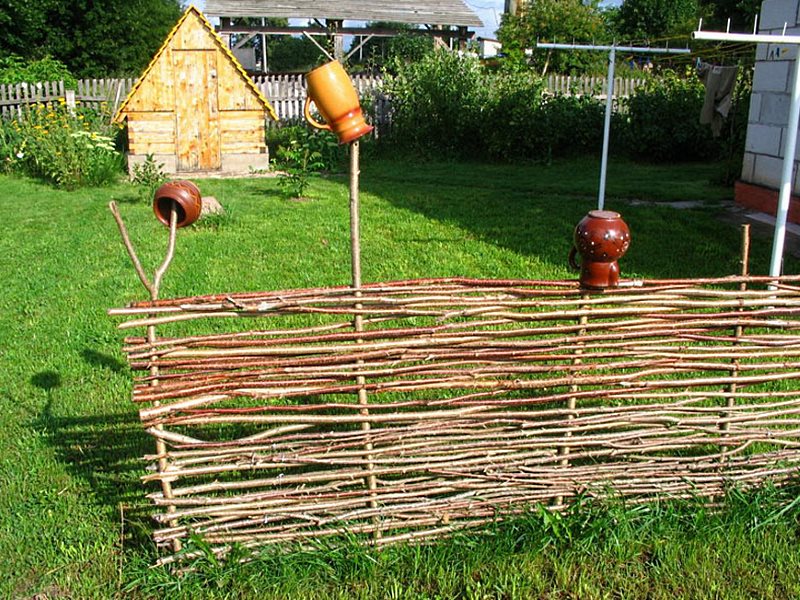
And yet, in addition to the decorative component, wattle is an excellent solution even for a modern summer cottage. Such a fence will not yield in strength to either a wooden or metal one. And in terms of beauty and attractiveness, it will be in the first place among them.
And from the point of view of economy, it fits well into our criteria. After all, weaving such a fence will allow you to realize your creative part, and save your budget.

Flowers are clearly visible
But first you need to prepare the material:
- timber or logs as a support and basis for weaving;
- material for weaving (willow rods are preferred, although rods of other trees are also suitable, the main condition is their plasticity);
- gloves;
- shovel;
- sand.
If you are going to weave along the already driven pillars, then first dig them in and fill them with sand, tamp. After that, you can proceed to the rods themselves. It is necessary to treat the rods with steam so that they become more ductile and do not break when deformed.

You can weave in different ways:
- horizontally, passing the rods in a figure eight between the pillars. This method was borrowed from weavers;
- vertically, between horizontally arranged lags. Such weaving comes out more decorative than practical. That is why it is used for fencing between neighboring areas, but not external ones;
- diagonally, forming the original wooden grid. This type of weaving is the most time-consuming, because the rods must be long so that the fence comes out at least of medium height. In addition, each rod is recommended to be dug into the ground for greater stability.

To understand the intricacies of simple weaving and try to make your first wattle fence, we recommend that you look at the video tutorial Oleg Bryukhanov, where he shares the secrets of creating a simple but beautiful fence.
If you prefer sectional fencing, then a master class will come in handy. Yura Kulakevich, where he shows how to create a wicker wattle base.
As you can see, a fence is not just a protective structure that hides a summer cottage from prying eyes, lovers of someone else's crops and stray dogs. A self-made fence is also a decoration of the territory, allowing you to enjoy every day spent in nature, among the plants planted by us with great love.
Spring work on the site is associated with the improvement of the backyard territory. At this time, summer residents prepare seedlings of flowers and home garden plants for planting, form flower beds and beds, enclosing them with small fences or borders. These fences perform several functions - they protect plants from trampling, decorate and zone the site.
Overview of finished decorative structures for fencing flower beds, front gardens and vegetable gardens
The range of decorative fences for flower beds allows you to purchase a suitable fence without any visible problems, which meets the aesthetic and functional needs of the summer resident. Conventionally, fences are grouped according to the material from which they are made, which accordingly affects the cost of the structure.
Types of plastic fences
Plastic fences for flower beds are presented on store shelves in the following forms:

Metal fences for flower beds, vegetable gardens and front gardens
Metal fences have a lot of advantages, and one striking drawback is the price (the countdown starts from 600 rubles). The fence looks great in almost any landscape composition, has a stylish and expensive look.

metal railings are suitable for open flower beds and front gardens
Forged structures are made according to the project to order, taking into account all the disadvantages and advantages of the territory. It makes sense to install such expensive fences if, according to the plan of the territory, an open flower bed or front garden is provided.
Concrete products
Concrete barriers perfectly tolerate high humidity, are resistant to aggressive environments and withstand sudden temperature fluctuations. The price for such fences ranges from 200 rubles, depending on the texture, size and decor of the structure.
Ready-made concrete structures for decorating flower beds, flower beds and front gardens are produced in two types:

- In the form of ready-made decorative borders of various shapes and sizes, which are installed on a mortar or sand cushion. Such fences are applicable in urban park areas, as well as in summer cottages for zoning the territory.
- Ready-made frames for flowerbeds, polyhedrons and separate sections for creating multi-level structures, flowerpots and bowls. They can sink into the ground or rise on a certain piece of land.
Ready-made decorative wooden fences
Wooden structures are a classic for fencing flower beds, front gardens and the basis for the formation of functional zones on the territory. Due to its naturalness and environmental friendliness, wood fences will organically fit into any classic, modern or rustic landscape.

wooden fences are effectively combined with lush greenery
The disadvantage of wooden fences for flower beds is the predisposition of the material to decay. To avoid damage to the structure, the fence should be varnished every season or with special means from decay and insects.
Interesting photo ideas for making fences for flower beds with your own hands
The arrangement of a summer cottage is not only a painstaking process, but also an opportunity to show your imagination and creativity, creating unusual and original fences for flower beds, vegetable gardens and front gardens. Often, the material that is used for the construction of decorative fences and flower beds is household items and used utensils.
Flowerbed of car tires

Tires from cars have long been used to improve the backyard area. At the moment, there are many technologies for turning an ordinary tire into a skillful flowerpot. The main thing in this business is safety.
Rope fences
An ordinary rope or a decorative rope will help to make an unusual fence from ordinary materials. Such a fence is easily mastered with your own hands, without using heavy tools. The main thing is to make the correct markup by placing wooden pegs around the perimeter of the fenced area. When laying the rope, you should slightly lower (do not pull) it.

DIY bamboo fence
Bamboo decorative fences are perfect for the landscape, made in the Japanese-Chinese style. To frame the flower bed, you will need a ready-made bamboo roll, which is dug a little into the ground and rests on pegs.

Making your own bamboo fence is pretty easy. The material you will need is two sizes of bamboo sticks (a large one for edging the fence and a small one for filling it), synthetic rope. Tools - jigsaw, crochet hook, drill.
Step-by-step implementation of weaving a bamboo fence:
1. Bundles of five or three rods form spans on the fence, the length and height of which is calculated depending on the size of the material (branches). So, for horizontal spans - 12 segments of equal length are used, vertical - 30.
2. For convenience, it is better to lay out the scheme of the future structure on the ground, fixing the necessary points with clamps.
3. Temporary connections are replaced with skillful knots using a hook and synthetic cord.
 the correct knot for bamboo tying bamboo with a hook
4. Fix the finished fence with a synthetic rope on pre-prepared bamboo columns. The underground part of the pillars is impregnated with a solution from decay, allowed to dry, and only after that they are dug into the ground. The distance from the bamboo columns depends on the size of the wicker fence.
Gabion flowerbed
The gabion is a mesh structure filled with stones. Gabion structures began to be used in summer cottages relatively recently, however, the aesthetic qualities of this fence have become very popular among summer residents. Making a flower bed from a gabion with your own hands is easy, you just need to prepare the materials necessary for this: mesh, decorative stones, scissors or tongs for metal, wire.

The process of creating a flower bed from a gabion:
- Pre-measure the site and decide on the design of the future flower bed.
- Layers are cut out of the wire, and, forming the desired structure, the ends of the mesh are bent for a strong connection.
- The resulting structure is filled to the top with stones, closed with a mesh and connected with wire.
Flower beds from clothes
Worn jeans can be a great tool for decorating flower beds, herbalists or a flower garden. To do this, completely fill the clothes with soil, mixed with stones and sand, then plant any plants in the resulting “vase”.

Furniture as a flower bed
Old decommissioned furniture, which only clutters up a city apartment or a country house, will be an excellent fence for flowers.

Original flower garden from a tree trunk
An eco-friendly and natural material for a flowerpot, which can be placed anywhere in the backyard, and, if desired, transferred to another location. The idea of a flower bed is simple: a hole is cut out in a tree trunk, which is alternately filled with stone, sand and soil and favorite flowers are planted.

Kitchen utensils as a fence for a flower bed
The composition of the kitchen sink, perfectly combined with the annual alisum and the decor of the plates and the faucet.

Plumbing as a fence for flower beds and flower beds
Using a bathtub or a toilet as a fence for a flower bed, the uniqueness of the fence will be provided to you.
Flower bed from the bath unusual fence for flower beds
Unusual fence made of plastic bottles
All kinds of crafts from plastic containers are pleasing to the eye and spur the imagination. There are a lot of ways to use plastic and glass bottles in the summer cottage, the main thing is to come up with your own original and unique fence.

Summer residents and owners of estates are constantly striving to ennoble the adjacent territory. Not the last role in this is played by a reasonable layout of the site, and a clear delimitation of the land with the help of fences helps to solve the issue of zoning. You can build a decorative fence with your own hands, using not expensive building material, but improvised means.
Functions and features of the use of a decorative fence
First of all, it is worth deciding what purpose the installation of such a fence pursues: protecting seedlings and flower beds, zoning the territory, or exclusively decorative?
The first function is the division of the site, the allocation of flower beds and flower beds, the definition of garden paths. All this can be achieved using a low picket fence.
The second function of decorative fences is to prevent unwanted intrusion into the "sacred" territory of the hostess - beds and flower beds. In addition, a clear definition of boundaries is not only functional, but also aesthetic.
So, if the site is small, then you can stop at a wicker fence - it looks beautiful and does not require special costs, it is easy to create, since it is made of durable flexible branches.
Advantages of installing decorative fences with your own hands
The first advantage of erecting a fence is the originality of the idea, which can be realized using one of the inexpensive materials - wooden slats or branches. In addition, the advantages are:
- delimitation of space - the entire site will be divided into separate functional zones;
- vegetation safety - the first sprouts grown with such love can damage the carelessness of pets or guests, and the fence, albeit low, will save your seedlings;
- grooming - especially for summer residents, whose main hobby is flower beds and flower beds;
- unity of style - the same decoration for all zones with decorative fences will emphasize the concept of landscape design.
Types of decorative fences from improvised materials for summer cottages and country houses
There are a lot of them, and you can use almost any material at hand: plastic, brick, wood, stone, rubber.
Plastic
The most popular material for a decorative fence is a plastic bottle, which we often just throw away. It can be placed both vertically and horizontally, thanks to which whole compositions are created on the plot.
It is one of the affordable and practically free building materials. The simplest type of decorative fence is dug upside down to the base of the neck of a bottle of mineral water, carbonated drinks or beer.
Perhaps the only thing to consider when choosing this type of fence is the same shape of the bottles. But you can choose the color yourself.
Tip: in order for such a fence not to be blown away by the first strong wind, the bottles must be filled with any bulk material - sand, fine gravel, earth.
In addition, plastic bottles can distinguish between the direction of garden paths.
Rubber
This "building material" is considered the second most accessible. And all because old car tires are used as a fence!
They will look good in the form of borders for flower beds - whitewashed, painted, painted. And if there are a lot of tires, then you can build a real high fence from them for the local area.
The advantage of such fences is their durability, moisture and frost resistance, availability and the possibility of using them as a "green fence". However, if there are not so many tires, then instead of a whole fence, you can make separate flower beds or even beds.
Tip: the lower crowns should be tightly filled with soil so that the fence does not sag over time and does not fall to one side.
Tree: picket fence, hedge
To make a wooden fence, it is not necessary to purchase lumber, it is enough to use boards, slats and even branches that are at hand.
Tip: wood breaks down faster than plastic, so before installing the fence, you need to cover the wood with a special antiseptic agent against rotting and pests. Processing can also be done with hot bitumen, covering the part of the tree that will be buried in the ground.
In addition to a decorative picket fence, you can make a rail fence by simulating a grid or a decorative fence with your own hands, for example, from a grapevine.
Brick
It is another inexpensive material for building a fence. If a brick and its fragments remain after the construction, then the problem with the fencing of the flower-bed zone will be solved.
Tip: a flower bed lined with bricks obliquely looks best.
However, such a fence serves only as a decorative fence - it cannot provide protection against the intrusion of pets.
Glass
Glass bottles can also be used as a decorative fence for flower beds and flower beds. It looks neat, does not require special costs, and will last longer than plastic and rubber.
A rock
Fences made of natural stone, such as granite, fit into any landscape design, because the material itself is natural. Pieces of material can be laid out in flower beds, garden paths can be marked with them, in addition, the path itself is laid out with it, which creates a unity of design style.
Tip: to increase the performance, a stone fence must be fastened with cement mortar, and luminescent paint should be used as a decor, with which an ordinary fence will turn into a luminous one after dark. This idea will be an excellent solution for decorating borders along garden paths.
Of the advantages of a stone fence, it is worth noting the possibility of erecting a fence of absolutely different heights, the strength of the fence and the durability of the structure.
Metal
For those who have a welding machine in their working arsenal, it will not be difficult to build metal fences on the site. On a pre-prepared frame, you can weld cut pipes or reinforcing bars. True, this option cannot be attributed to the budget, here you have to fork out both for cooking material and high-quality fasteners so that the fence lasts a long time.
There is also a more budgetary version of a metal fence - a decorative fence made of wire with your own hands.
In addition to the above fences, you can also use a hedge - the shrub grows quickly, serves as both a decorative decoration and a fence around the site from the curious looks of passers-by.
DIY decorative fence made of branches
You can make a decorative fence with your own hands from improvised materials in several stages.
Preparatory work
The preparatory work includes several stages, which should be considered step by step.
Main works
Before making the fence itself, you need to prepare tools and materials:
- manual drill;
- wire for fastening;
- small carnations;
- pliers;
- hammer;
- willow branches;
- secateurs;
- supporting material (rebar, pieces of metal pipes, wooden beams or even thick branches).
Now you can proceed to the direct construction of the fence:
- Installation of supporting pillars. Pegs are installed in a dug trench (you can use a hand drill to deepen it). The step between them will depend on the height of the fence. So, for small fences under a flower bed or flower garden, a fence 0.5 m high is sufficient. Therefore, the distance between the supports should be at least 0.5 m.
- After the reinforcement has been dug in, you should start weaving the fence. To strengthen the structure with the first rod, you can stretch the wire between the supports. It can also serve as a guide for young rods. The first row is necessarily fixed with the ends of the wire.
- Subsequent rows are woven in the same way. It is important to remember that they must go in a checkerboard pattern. And, of course, to strengthen the weaving, you can periodically skip a thin wire.
- At the end of the process, it is recommended to fix the ends of the rods with the same wire or nails (if wooden beams were used as supporting elements).
Video: instructions for making a grapevine fence on your own
"Shop" options
If the budget allows, then improvised materials can be replaced with purchased ones. So, various decorative fences are sold in construction and country goods stores, which will not be difficult to assemble on the spot yourself.
Fence made of plastic elements
- availability of ready-made parts and ease of installation;
- the ability to build fences both on a flat surface and on a site with a slope;
- flexibility of elements, a variety of shapes, colors and the ability to imitate any natural material (stone, wood, brick);
- light weight, making it easy to carry parts around the site.
- the impossibility of manufacturing individual elements on their own, so everything will have to be purchased in the store;
- if some parts are damaged, they will also need to be replaced with custom ones in order to maintain the unity of the design;
- poor frost resistance - plastic is destroyed at low temperatures, but this can be avoided by removing the decorative fence for the winter in the barn until spring.
Fence made of polymer products
These are polycarbonate sheets attached to a metal frame.
- aesthetic appearance;
- variety of sizes and colors;
- high quality material.
- high cost.
concrete fence
Decorative fences made of concrete are very popular today and are suitable for any style solution in which the house and outbuildings on the site are decorated.
- durability, strength;
- variety of forms, types of products;
- the possibility of painting in any color, decorating in any style.
- high price.
Despite the so-called budget, do-it-yourself decorative fences will also require some care (stone and brick structures are not considered).
So, a fence made of car tires needs to be restored once or twice a year - remove the old peeling paint and cover the rubber with new one in order to extend the life of the fence for a few more years.
If your fence is made of a picket fence, then the tree, like rubber, needs additional care, namely:
- timely treatment with antiseptic compounds that protect wood from insect pests;
- new painted fence.
To extend the life of a wire or other metal fence, repair of the paintwork is necessary. And this means that it will have to be sanded, degreased before applying new paint. In addition, as you know, any surface, cleaned of the old coating, much better (and faster) "grabs" new layers of paint.
As for the hedge, everything is clear. Timely watering, pruning and crown formation will help to grow a real "green fence" on the site.
The above methods of constructing decorative fences for a summer cottage and garden area are budgetary. Owners of private houses, as a rule, if possible, purchase ready-made decorative fences, which simply need to be assembled on site. However, it is worth remembering that a purchased factory product will not replace the original author's product.
25 great flowerbed railing ideas. Browse through these options and choose the right one for your site.
This semicircular shape was given to a small flower garden by a curb made of old brick. A completely simple solution, but incredibly practical!
Red brick laid on dry masonry flush with the lawn. Here it is - an affordable and functional solution! 
Landscaping not only forms the architectural and artistic appearance of a suburban area, but also improves its microclimate. 
An easy way to create a unique green composition on the site is to make a plastic fence. Plastic is durable, chemically stable, does not corrode, rot or heat up in the sun. Its only drawback is the feeling of cheapness, and sometimes clumsiness. However, modern manufacturers are trying to avoid this and offer plastic borders for flower beds, which are difficult to distinguish from stone or wood by eye. 
Here is an interesting solution for a built-in flower bed. I think it's very beautiful! 
But a combination of natural and artificial materials. 
A carefully thought out and tastefully laid stone border gives any plant arrangement a sophisticated look, as it emphasizes the tenderness and fragility of flowers. 
A single color scheme looks very stylish in the design of both fences and a garden fence. 
And this is a good example of using paving slabs as a fence for a flower garden. 
The main value of a tree is naturalness and complete closeness to nature. Decorative wooden fences for flower beds are used to create a rural style. The tree is combined with stone, garden figurines, benches and swings. 
The versatility of concrete borders allows you to use them in any corner of the garden. 
Agree, the part of the flower bed where the stones were used looks much more interesting. 
Space zoning is one of the main stages in creating an ideal landscape design. Tiled paths are a great idea not only for summer cottages, but also for decorating areas near trading houses and office buildings! 
A solid fence for one or more flowerbeds of small height can also be obtained from massive wooden boards. I just love this solution! 
To give the site volume, you can use the brick frame of the flower beds. It just turned out great, didn't it? 
And this is another one of my favorites! Decorative tiles and brickwork are materials that are often used in landscape art. And obviously not in vain! 
The height of the decorative fence is chosen based on the height of the flowers in the flower bed or lawn. Decorative monolithic blocks for paving sidewalks are ideal for fencing low flower beds. 
Bright fences for flower beds can be made with your own hands from almost any materials at hand. For example, in this version, multi-colored bowling balls were used as garden decorations. Who would have thought! 
For a neat fence of the flower bed, you can use a metal decorative fence from typesetting sections. Looks stylish. 
A special garden metal fence that prevents the growth of plant roots should be driven into the ground to the depth indicated in the instructions. So you get perfectly even borders of the lawn or flower bed. 
Wooden fences can be very diverse. An excellent solution can be a fence made of wooden cuts, which is easy to build with your own hands. Cross sections of logs can be dug in or laid to your liking, for example, in mosaic. 
And the creation of such a fence you will need to plan in advance. Of course, this is not easy to do, but the result is clearly worth it! 
I really like this idea. Stylish and modern! 
Unusual placement of a flowering lawn in concrete containers, which also serve as a support for the bench. 
And I just dream of such a design of the local area. Incredibly cozy and atmospheric! 
No matter how lovely and luxurious the flowers are, a flower bed without a fence will have an unfinished look. With a fence, the flower bed is transformed, it becomes neater and more attractive.
In addition to marking the boundaries, the fence also performs other functions: for example, it does not allow plants, especially ground cover plants, to actively spread (spread) over the site. The side also performs a protective function, saving the fragile shoots of plants from the encroachments of walking pets.