Gone are the days when people could do without amenities in the house and arranged them on the street. Now it does not matter whether it is a house outside the city or within the city, or whether it is a city apartment, each dwelling today is equipped with a bathroom.
When planning a future home, a lot of attention is paid to these particular premises, because having done it right once, in the future you can only enjoy visiting this room. When planning a bathroom, it is necessary to rely on the dimensions of the future room allocated for it.
In a private house, such a room can be made large enough so that you can easily make a bath complex or a small SPA zone in it. Here a huge selection of options opens up and you can dream up with the choice of style or the convenience of arranging plumbing, as the owners of the house like it.
To prevent the bathroom from delivering unforeseen troubles in the future, first of all, you need to think about its location. If the house has additional floors, then it is better to make a hygiene room on each of them. It will be convenient for families with small children and if there are people with disabilities in the family.
It is better to have such a room closer to the kitchen, which already has a ventilation outlet. This will help save on additional tap. When arranging a bathroom on the upper floors, you need to provide a place where it will not be located above the living space.
It would be nice to make a window in the room - this is both additional ventilation and saving light in the daytime. It is more convenient to plan a hygiene room not on the front side of the facade of the house, it is better if the window faces the courtyard.
Basically, bathroom planning is carried out based on what plumbing will be installed in it, which will also determine its size. Of course, the dimensions of the room are a purely individual choice, but still, it must meet the basic requirements and standards established for all residential buildings.
At its core, the arrangement of a hygiene room in private homes is not much different from the arrangement in a city apartment, unless you need to count the centimeters of space for installing furniture and plumbing.

But, in private households, you will have to think about laying out communications, plumbing and arranging sewerage. You should definitely think about the correct location of the engineering system, the power supply of the risers and ventilation. If you have the appropriate qualifications, all these works can be done with your own hands, otherwise entrust such responsible work to professionals.
In the hygiene room, the center of attention is always the bath. It is usually installed close to the wall, but if square meters allow, it can be installed in the center on the podium or built into the floor. This will depend on the layout of the room and on its design.
What color to choose?
The choice of color palette will play a role in the design of the room. To visually make the room spacious and voluminous, the shades should be light and airy, you can add images of water or sky.

Beige and brown tones will make the space visually a little smaller, but will make the atmosphere warmer and more comfortable.

Contrasting colors will help remove monotony, and plain materials can be diluted with contrasting inserts.


In addition to natural lighting from the window, the main overhead lighting will give the room a little space, and the backlight as spotlights will help illuminate certain areas and give the room a little romance.
If you plan the room correctly, choose the right shapes, sizes, color palette and materials for its decoration, you can get a result that will delight you with warmth and comfort for a very long time.
Bathroom design in your home - video
Bathroom in a private house photo gallery


To make a bathroom in a wooden house is within the power of any owner of a country house. To realize their plans for the arrangement is quite within the power of each person. This is where we spend most of our lives. But in order to do everything qualitatively, it is necessary to make every effort and carefully study the technology of construction and decoration.
An important constituent element when decorating a bathroom in a wooden house is a careful consideration of the design. The state of not one room, but the entire country house depends on how well the project will be done. Properly laid sewerage and drainage systems will not allow moisture to spread over the surfaces and save the premises from possible deformation. In addition, the external interior and bathroom amenities are of great importance for all family members.
Properly selected interior, material and equipment will help to realize the most daring ideas. It is necessary to start the arrangement of a room in a wooden house with waterproofing. Because of how well the protection against moisture is selected, further operation will occur.

The design of the bathroom can be planted by placing pots of flowers throughout the room.

Constant humidity and temperature changes can destroy the composition of even the hardest wood species, not to mention other materials. Therefore, it is desirable to prevent all the consequences of incorrect processing at the very beginning than to deal with troubles after the completion of all arrangement work.
Improperly installed waterproofing or its absence will lead to fungus infection of all surfaces of a wooden house and the development of mold, which can move to other surfaces, and the finish itself will begin to quickly collapse.

The flooring in the bathroom is made of ceramic tiles.

Modern bathroom design with bathtub lighting
Floor laying and its features
To protect surfaces from moisture, it is better to approach comprehensively. Careful layering will not only protect the surfaces from unwanted moisture, but will also help reinforce the floor structure - this is necessary because the equipment installed in the bathroom has more weight than ordinary furniture.
Accordingly, the bath will be filled with water, which means that the mass of the load will increase. Therefore, the design of the floor structure must be carefully considered.
To prepare the base for the future bathroom, we divide the space between the lags:
- Lay a special waterproofing film as the first layer. Spread a mixture of gravel and sand on it and compact it well. The height of the layer should be about 15-20 centimeters.
- Lay the next layer to the height of the upper beams with expanded clay, also carefully tamp and fill with liquid concrete or cement. The result should be something like a two-layer cake. Wait for everything to dry before moving on to the next step.
- Install moisture-resistant plywood on top of the beams and secure it. Choose a material with a thickness of approximately 15-50 mm. Apply a waterproofing film to the plywood layer and leave an additional 10-15 cm overlap on the walls to provide protection against leakage in the sides between the wall and the floor.
- Pour a special mixture intended for floor screed onto the laid insulation. Pre-arrange the beacons, after drying they can be removed and discarded;
- For convenience, you can make a slope towards the sewer or leave and connect the hole in the floor with the drain pipe. Additionally, equip the hole with a grate or cork - this is necessary so that small objects do not get into the holes, and a closed cork will become a barrier to unpleasant odors;
- The resulting screed is treated with a grinder and a waterproofing solution.
The choice of floor surface depends on the preferences of the owner. Many choose tiles because the laying process is not complicated and it will not be difficult for an ordinary person to lay. An alternative to a tiled surface can be a moisture-resistant laminate or linoleum.

A wooden bathtub will become the main highlight of the bathroom interior

Bathroom design made of light wood

The floor and shower are finished with mosaic tiles in different colors.
|
Building features When laying an additional top coat, contact the professionals. They will help to install the floor quickly and efficiently. |
Interior solutions To give the house its own special style, you can decorate the bathroom room with a tree. Larch, aspen, teak look good. The floor installed and treated with antifungal agents can also be laid out with mosaics or porcelain stoneware. The floor covering of their adhesive cork with a layer of shiny varnish applied on top looks very nice. |
Bathroom ventilation in a wooden house
The functionality of the room and the temperature regime depend on how correctly the system is installed. The ventilation pipe outlet installation is usually placed in the upper part of one of the corners of the wall and is led out through the ventilation pipe. You can connect it to an air duct, and then the flows will go out into a pipe in the attic or roof.
For additional supply of fresh air, a fan can be installed. It will help dry the room quickly.
In addition to installing an exhaust system in a wooden house, it is necessary to provide fresh air. For this purpose, a small gap is additionally installed between the outer threshold and the lower part of the door (approximately 15-20 mm). An improperly installed air vent system can cause condensation to accumulate on all surfaces, causing the material used in the decoration to gradually deteriorate and swell, which leads to the appearance of fungi and bacteria.


A chandelier in the interior of a bathroom in a wooden house will create a special atmosphere
Ceiling and walls - choose the material
Finishing surfaces that fit into the interior of a bathroom in a wooden house are various models of panels and drywall. In terms of their qualities, they are not inferior to other materials, but they look beautiful and are much cheaper than tiles or stretch fabrics.
Lighting for the ceiling of the bathroom consists of several lamps connected to each other. They are mounted in a canvas attached to the base, and help to evenly distribute the light rays inside the room.
If the room is large, you can hang a chandelier in the central part and hang several sconces (small lamps) separately in places where light does not penetrate. This design will give the bathroom comfort, warmth and an atmosphere of mystery.

Dark wood combined with white in the interior of the bathroom looks very beautiful.

The bath is made in the form of a barrel

Wooden bathroom design with shower
For wall decoration, in addition to high-quality waterproofing, wood materials are suitable. They fit perfectly into the design of the room and create a unified style. In addition to wooden panels, tiles are also widely used. It is a versatile finishing material and has long occupied a leading position among bathroom coatings. The main qualities and advantages when using tiles are:
- durability;
- practicality;
- big choice;
- ease of use and maintenance.
We install plumbing
Before you start installing the equipment, make a preliminary plan of the room in which places the plumbing will be located. If the area allows, you can install a bath in the middle of the room - it will look spectacular and beneficial in relation to other equipment.
Such an arrangement requires preliminary preparation for strengthening the structure and capital strengthening of the floor. This is necessary in order to reduce the increasing loads on the logs and beams.

Dark wood in the interior of the bathroom looks very unusual and beautiful.

Wood in the interior of the bathroom will harmoniously complement the design
If the floor has a regular base, place the equipment along the walls. Choose sinks preferably of medium size. If there are more than three people in the family, install two models.
If the walls of the bathroom are decorated in a wooden style, you can finish the plumbing with a similar material. To do this, use special coatings with impregnating substances that protect the finishing surfaces from moisture and fungus. If you install large tubs on separate legs or a jacuzzi in the middle of a room that has extra space, then they will look very impressive and stylish.

The design of the bathroom is designed in one color scheme.

The flooring in the bathroom is made of porcelain tiles.

Porcelain tiles combined with wood look very beautiful
How to choose furniture
In private houses, compared with the area of small apartments, the footage of the bathroom allows you to install sanitary equipment, as well as cabinets and open shelves for linen. The open environment allows you to beautifully put together various everyday things:
- towels;
- house dressing gowns;
- hair dryers;
- brushes;
- cosmetics;
- household chemicals.
When choosing furniture for design, pay attention to non-standard things. For small children, stable chairs or portable steps are suitable so that they can safely reach the sink. Modern manufacturers offer a large selection of different models for price and quality.

Finishing the floor in the bathroom can be made of porcelain tiles

Wall decoration in the bathroom is made of ceramic tiles in combination with wood
The mirror is an important attribute in the bathroom. Traditionally, it is customary to hang it above the sink in a wooden house, but you can hang it wherever you want. Installed in full height, it will make your interior elegant and emphasize its individuality.
In addition, you need to take care of the little things. The following details will fit the design well:
- boxes for storing various items (household chemicals, detergents);
- hooks for clothes and bathrobes:
- shelves and racks for bath accessories;
- laundry baskets;
- heated towel rail.
Little things and details thought out in advance will make your stay comfortable and enjoyable.

The wood in the interior of the bathroom looks amazing

Wood bathroom design looks very nice

The wood and white color in the interior of the bathroom will be very beautifully combined.
Room styles
Country
Most often, country houses are decorated in this Provencal style. Surfaces of walls, floors and ceilings are wooden. Windows (if any) with large checkered curtains or small flowers. Bathrobes and towels are also kept in the same range. In addition, you can install dark wood shelves, lay a woolen rug and add a holder for soap and toothbrushes, as well as other accessories on the subject.
Classic
This style is characterized by light colors. The walls and floor are usually tiled, the ceiling is stretched. Exquisite sanitary ware will perfectly fit into such a bathroom design. Furniture, bathroom accessories, linen will suit a light shade.

Bathroom wall decoration made of wood

Bathroom design in dark wood
Empire and modern
For these styles, bathrooms with a large area and where significant amounts of money can be spent on equipment and materials are suitable. Here it will be typical to use gilded parts of fittings, sculptural models in the form of angels and nymphs. Large mirrors, expensive chandeliers and floor lamps. The bath is usually placed in the central part on separate raised legs. This style is characterized by a combination of gold and white - this design gives the design of the bathroom a chic look.
A bathroom in a private house is an opportunity to create something more than what is usually found in an apartment. It can be arranged completely as you wish, providing enough space for creativity and the inclusion of elements that simply would not fit in a cramped apartment.
The modern design of the bathroom in the house begins to take shape already at the design stages. Even before building a house, you can choose the size of the premises, focusing on the desired parameters.

Communications
In order to make a bathroom in a private house, you need to run a lot of pipes through which water will rise and go. The difficulty in installing communications for owners of their own homes is that everything needs to be done from scratch.

If in apartments it is enough to connect to existing systems, then in the house you need to lay a new water supply and organize a drain system.
However, there are also advantages, for example, when organizing your own well, the owner ceases to depend on housing and communal services, in terms of water.

In order to make a bathroom in a private house with several floors, you need to purchase a powerful pumping station. She, powered by electricity, will quickly raise water to the desired area.

In order for hot water to appear in the tap, you need to choose a heating system. If you choose a simple heating system, then only hot water will appear in the house.

But if you make an effort and spend more money, you can combine heating and hot water, simultaneously making the floor in the bathroom heated.

Water diversion
Without a competent water removal system, all the work will be done in vain. Since the toilet and bath must dispose of the water somewhere, without a drain they will not work.

For homeowners who are away from the sewer wire, there are two types of systems, a fecal pit and a septic tank.
The first method is known to our ancestors. It involves digging a deep hole in the ground. For strength, the walls are reinforced with a metal sleeve or lined with bricks.

A septic system is a collection of treatment plants that will only release liquid cleared of large inclusions into the soil.

Ventilation
Ventilation in the bathroom must work well. Otherwise, fungi and mold will constantly appear in it.

The easiest way to organize ventilation in your own home is to create a natural air circulation system.

To create it, you need the ceiling in the bathroom to have two holes. Fresh air will flow through the first, and moisture will be removed through the second.

It is also a good solution to install a window in the bathroom, if conditions allow, then a constantly open window will create a healthy circulation.


However, this method is only suitable for relatively warm areas. If you leave an open window with a sufficiently large minus, you can not only get sick, but also disable the water supply system.

You can get rid of this danger and improve air flow by installing an extractor hood in the bathroom. Such ventilation will allow you to organize a constant temperature in the room, remove excess moisture and odor and prevent the appearance of mold and fungi.
layout
For a comfortable existence, everyone needs enough space. Therefore, you should not make a bathroom in a private house, the photo of which can be found below, is too small. The minimum area is 4 sq. m.

Also, do not place the bathroom on the other side of the building relative to the bedroom. It is much more comfortable when in the morning or at night you do not have to go far to wash or take a bath.

Choosing the location of elements and nodes is already on the drafting of the house. It is necessary to choose the right places for the outlet of the drain communications.

Peculiarities
In a private house, the bathroom is almost always located so that one of the walls is aligned with the street.

In order to avoid the formation of excess condensate and no additional difficulties, it is desirable to organize an additional layer of insulation in this area.

When choosing a suitable water heating system, you can organize a heated floor at no particular cost.

Do not forget about the protection of electrical circuits and electrical appliances from moisture ingress.

Appearance
In order for a trip to the bathroom or a simple brushing of teeth to deliver positive emotions, you need to organize a pleasant design.

The characteristics of the indoor environment require that all surfaces be easy to clean and free of pores. The most common way out is to use tiles.


But in order to make the appearance more modern, you can purchase plastic panels. Their large assortment includes not only different colors, but there are also models with original patterns.

Photo of a bathroom in a private house


Waterproofing is designed to protect the structures of a wooden house from the harmful effects of a high level of humidity, which is typical for a bathroom. Prolonged contact of wood with water and water vapor leads to the destruction of natural organic building materials.
From constant dampness, the structures of the floor, walls and ceiling of the bathroom unprotected by waterproofing materials begin to rot over time, mold and an unpleasant musty smell appear. Properly executed waterproofing of the bathroom in a wooden house will save the building from these problems. If you wish, you can delve into the essence of the issue, and, having figured out the technology, do all the work on finishing the bathroom with your own hands.
A wide range of waterproofing materials are presented on the construction market. All products can be divided into several groups, if classified according to the method of applying waterproofing.
Group #1: painting
This group includes all types of mastics and emulsions produced on a polymer or bitumen basis. After applying these compounds, a stable waterproof surface is created.
It is necessary to apply paint waterproofing in layers, maintaining a certain time interval between approaches.
Group #2: stick on
This group includes roll or film materials produced on a bitumen or polymer basis. Gluing materials on a wooden surface is carried out using hot or cold mastic, applied in several layers.
One of the significant disadvantages of using glued waterproofing is the presence of seams between the canvases, into which moisture can penetrate.
The problem is solved by overlapping the sheets, as well as filling the rolled waterproofing with waterproof cement-based compounds, such as hot bitumen or pitch.
Before applying heated bitumen, sheet or roll waterproofing is covered with reinforced glass cloth.
After the applied composition hardens, a seamless layer is formed over the entire surface, which meets all the technological requirements of waterproofing.
Group #3: impregnation
This group includes all impregnating materials, which include water-repellent cement with the addition of crushed sand and chemicals.
When applying such waterproofing, the surface of the tree is impregnated and made waterproof. This type of waterproofing is not recommended for residential premises.
Of the listed groups, only the first two are suitable for waterproofing a bathroom in a wooden house.
Often they are combined, using mastic for waterproofing hard-to-reach places, and roll materials for flat surfaces.
The wooden walls of the bathroom in the house are impregnated with a moisture-resistant compound, and a waterproofing layer is provided under the tiled floors.
How to properly apply waterproofing material?
Before applying waterproofing, the surface is cleaned and primed with deeply penetrating compounds.After the primer dries, a layer of bituminous mastic is poured, with special attention being paid to sealing the cracks present in the places of laying communications and smearing the corners.
Remember, while the mastic dries, you can not dust. A day after the bituminous mastic has dried, the next layer of waterproofing is laid in the form of canvases cut to the size of the bathroom.
Their number is calculated taking into account the fact that they will overlap, overlapping each other by 10-15 cm.
The floor in the bathroom is recommended to be lower than in the rest of the house. A small margin in height will save the entire house from flooding in the event of a sudden emergency such as a pipe break or a leak in the connection, a washing machine breakdown and other incidents.
Waterproofing the floor will prevent water from entering the basement or lower floor of the house. Water will stand until its level rises above the left stock.
Particular attention is paid to the so-called “wet” zone, which includes, in addition to the floor, walls near the bathroom, shower cabin, and around the washbasin within a radius of 50 cm.
The ceiling in the bathroom is suspended from moisture-resistant drywall or glossy PVC panels. Wooden structures, disguised behind the finish, are primed and smeared with mastics.

Scheme of mandatory places for applying waterproofing in a bathroom in a wooden house, taking into account the minimum distances around plumbing fixtures
Learn more about wood floor waterproofing
In wooden houses, as a rule, floors are also made of wood. Concrete screeds are not welcome, as they increase the load on the foundation of the house and are cold bridges through which heat flows from the living space.
Therefore, in a wooden house, the floors are laid on logs, which are thoroughly impregnated with waterproofing materials.
Before starting the processing of the log, the foundation is waterproofed by smearing it with mastic or plastering it with a special solution obtained from a mixture containing polymer additives.
On the logs impregnated with an antiseptic, a subfloor is laid, which is covered with rolled waterproofing. Floor tiles are laid on top of this material.
The technology of laying rolled waterproofing on the floor
One of the main factors influencing the choice of materials in modern construction and repair is the speed of their laying. This can be achieved through:
- reduction of interlayer laying intervals;
- reduction of intervals for the implementation of related technological processes.
The self-adhesive bitumen-polymer film used for waterproofing the floor in the bathroom of a wooden house belongs to such materials.
This option is also suitable for waterproofing interfloor ceilings, bathrooms, rooms with wet technological processes, kitchens.
The film is perfectly glued not only to concrete bases, but also to wooden ones. Therefore, this rolled material can be used for waterproofing horizontal and vertical surfaces in a wooden house.
The entire process from preparing the floor to applying ceramic tiles to it is carried out without interruption, that is, in one cycle. Waterproofing the floor in the bathroom can be done using this technology in one day.
Special attention should be paid to the preparation of the base, since the quality of laying the waterproofing membrane depends on this stage.

Schematic representation of the installation of moisture-resistant floor and wall surfaces in a bathroom arranged in a wooden private house, cottage or townhouse
Work execution algorithm
- First, sweep or vacuum all dust and dirt from the subfloor to ensure good adhesion of the waterproofing film to the wooden base.
- The next step will be the priming of the floor, during which a bituminous emulsion primer is applied to the entire surface with a roller, which does not have an unpleasant odor, as it is diluted with ordinary water, and not with a solvent. The primer is also applied to the walls along the perimeter of the bathroom, while the width of the strip is 20 cm. In the corners and hard-to-reach places for the roller, the primer is applied with a brush.
- Check the degree of drying of the applied primer with a cotton pad, which is applied to the treated floor. If the cotton pad remains clean, then the bituminous primer is dry. Note that the entire drying process at a 20-degree room temperature will take no more than 20 minutes.
- After the primer dries, immediately start laying the waterproofing membrane, which can be used as a self-adhesive bitumen-polymer roll material. For its installation it is not required to use an open fire, which is very important for wooden buildings. The material is easy to install on your own, in exceptional cases you can get by with the help of your wife or mother-in-law.
- When rolling out a roll, measure a piece of the desired length and cut it off with a sharp clerical knife, allow the material to rest a little. Then the web is twisted from both ends to the center, the protective film is cut, it is carefully removed by unwinding the roll in the opposite direction, while the material is firmly glued to the base.
- Air bubbles are removed with a brush, which is used to iron the laid canvas several times.
- The next sheet is overlapped, the width of which must be at least 100 mm. The overlap zone is treated with a primer or bituminous mastic. Carefully rolled with a heavy roller.
- After applying rolled waterproofing to the horizontal surface of the floor, they begin to process the walls adjacent to the floor. For this, canvases 30-35 cm wide are cut, of which 10 cm goes to the floor, and the rest to the wall. The incision of the film is made at a distance of 10 cm from the edge. First, the waterproofing material is glued to a vertical surface, that is, to the wall, and then it is placed on the floor, previously lubricated with a primer.
- After the installation of self-adhesive rolled waterproofing is completed, they immediately begin laying ceramic tiles on the floor.
Coating waterproofing: the optimal solution
To protect the surfaces of the floor and walls in the bathroom of a wooden house, water-repellent coating materials are ideal, produced in the form of various mastics:
- Polymer-bitumen mastics are easy to apply and durable in operation.
- Polymer-cement mastics are able to form a strong layer of waterproofing film, one of the properties of which is a good degree of resistance to bending.
- bituminous mastics are among the cheapest coating waterproofing materials with reduced quality, as they become brittle at sub-zero temperatures.
- Bituminous rubber mastic compounds have a higher plasticity, and therefore are able to withstand those low temperatures at which conventional bituminous mastics begin to break down. Naturally, bitumen-rubber mastic is sold at a higher price.

Another scheme for waterproofing a room with a high level of humidity, which includes a bathroom in a wooden house
Polymer-cement mastic consists of a powder containing moisture-proof binders and inert fillers. It also contains water-dispersion acrylic polymers.
After mixing all the components, a waterproofing material is obtained that has a high adhesion (adhesion) to any type of substrate.
Tip #1:
If a reinforced fiberglass mesh is additionally laid between the layers of polymer-cement mastic, then the waterproofing will be even stronger and more reliable.
Tip #2:
Seams adjoining vertical surfaces to horizontal planes must be reinforced with an elastic sealing tape.
Preparing a wooden floor for waterproofing
Before applying coating waterproofing to the surface of a rough wooden floor, a number of preparatory measures are required to close the cracks.
This will reduce the consumption of mastic, which will not seep through cracks, chips and crevices in the floor.
The rough floor must be cleaned of dirt, a crate of bars should be laid on it, a heater should be inserted into the cells, which is better to use polystyrene foam, which forms a hard and even surface after laying.
Joints between polystyrene boards and joists should be treated with sealant. Instead of expanded polystyrene, mineral mats can be laid, but they will have to be covered with waterproof plywood.

Preparing the wooden subfloor in the bathroom of a private house for applying the selected waterproofing material
Coating waterproofing technology
- Mix the liquid rubber with the activator, and immediately apply the resulting composition to the floor using a roller. Thoroughly coat the joints of the floor and walls with a brush.
- Wait for the liquid rubber to dry completely, and then evaluate the quality of the resulting waterproofing. The surface of the film should feel uniform and smooth to the touch. An additional second layer of waterproofing can be applied, so that the thickness of the protective film is about 2 mm.
The laying of the finishing floor covering in the form of tiles directly on the waterproofing layer is not carried out, since the tile adhesive does not adhere well to rubber compounds.
This shortcoming is corrected by pouring a thin concrete screed reinforced with a reinforcing mesh.

Coating-type waterproofing applied to floors, adjoining walls, bathroom screen, areas near pipes of water supply and sewerage systems
Coating waterproofing is used to protect wooden and concrete surfaces. This method is suitable not only for finishing bathrooms, but also for repairing rooms with an even higher level of humidity.
Such objects include swimming pools, water parks, washing departments of baths, etc. The undoubted advantage of coating technology is the ease of installation of waterproofing, which is very important when decorating a bathroom in a wooden house with your own hands.
Mastics, which are fluid masses, are simply applied to the surface, leveled and dry during the time required for this process.
After drying, the waterproofing film acquires excellent water-repellent properties and becomes capable of stretching with subsequent restoration of its original shape.
That is why coating waterproofing is considered the best solution for protecting a wooden floor in a bathroom.
Use of special tree species
In the bathroom, you can not cover the wooden floor with other materials.
In this case, for flooring, it is necessary to use special types of wood (teak, cork) or building material that has undergone heat treatment during its manufacture.
Excellent waterproofing qualities are characteristic of individual tree species. Wood treated in a special way acquires moisture-resistant qualities and the ability to maintain its original dimensions throughout the entire period of operation.
The cork coating is resistant to constant exposure to moisture, while it is very decorative and durable.
Teak floors are valued for their high content of essential oils, moisture resistance, durability, subject to the technology of laying floors and treating cracks with sealant.
The bathroom walls, finished with a board, are covered with deck varnish.

Wooden floors and decor elements in the bathroom are made of heat-treated moisture-resistant wood with high waterproofing properties.
Now you have a clear idea of the process of waterproofing a bathroom in a wooden house and can decide on the choice of how to carry it out. However, desire alone is not enough.
Still, it is better to entrust the finishing of the bathroom with all the accompanying processes to professionals, and to monitor the work yourself with knowledge of the matter, albeit superficial.
Waterproofing of the bathroom, which is being built in a wooden house, must be carried out for all surfaces: floor, ceiling, walls around the perimeter.
After assessing your options soberly, consider hiring specialists from a trusted company that provides bathroom renovation services.
Errors at the stage of waterproofing can render unusable not only the bathroom, but also the house as a whole.
The arrangement of a bathroom in an apartment loses in terms of its capabilities to a bathroom in a private house. Firstly, a private house has more free space than a city apartment. Secondly, many houses are being built according to a design project, and therefore, already at the construction stage, the necessary dimensions and the number of bathrooms in the future home are laid down.
Bathroom project in a private cottage
For owners of country private houses, the problem of arranging water supply and sewerage is very often relevant. Urban residents bypass these difficulties, because centralized systems are always at hand. And outside the city, as a rule, one cannot do without creating their own autonomous systems. First, consider the device of the water supply system.
First of all, it is determined which water supply system is more appropriate in a particular area. Modern equipment will help in the construction of any systems. If it is more profitable to make your own well, please, if a well is best suited - and there will be an assistant for him. The main thing in this matter is to weigh the pros and cons, and it is best to invite specialists.
 plumbing installation in the bathroom
 Equipment such as a pumping station will help in organizing the water supply of the bathroom, and it will do it without human help - in automatic mode. All that will be needed from a person is to turn on the water. Such a unit is not too demanding in terms of location, so installation problems should not arise.
After organizing the water supply, you can think about heating the water. In this case, it is necessary to choose either electric water heaters or heaters that work according to a different principle, for example, gas ones. Increasingly popular are double-circuit heating installations, which allow you to "kill two birds with one stone": with the help of them, heating and hot water supply are arranged.
When all issues related to the supply of water to the house are resolved, it's time to think about drainage, without which the toilet and bathroom in a private building will not do.
 Water supply scheme of a private cottage
 Each owner needs to decide which sewerage system is most suitable for the house. You will have to choose from the usual fecal pit and septic tank. It is a hole dug in the ground, lined with bricks.
The septic tank also consists of lifting tanks forming a kind of wastewater filtration system. Thanks to it, water purified from large parts goes into the soil.
The septic tank is distinguished by a longer service life and versatility with respect to the type of soil available on the site.
Ultimately, it remains to lay a pipeline between all the components of the water supply and sewerage system and the bathroom in a country house with your own hands will be ready.
Bathroom ventilation
Ventilation of the bathroom in your own home is essential for the comfort of the people living in it. Ventilation removes moist air from the room outside.
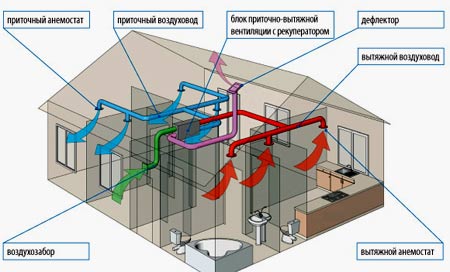 ventilation scheme of the bathroom and the whole house
 If you omit this moment, then ideal conditions will be created in the room for the formation of mold and fungus, which is fraught with damage to interior items and other components of the room, and can also cause health problems for households.
Read also
Projects of internal stairs in the house
There are several options for ventilation in a private house - natural and forced ventilation. With your own hands, it is easiest to equip the room with natural ventilation. It is created by organizing two holes on the ceiling, one of which will serve to remove humid air, and the second to supply fresh air. This type of ventilation can lead to excessive cooling of the room during the cold season.
In order to prevent excessive circulation, the exhaust or supply is equipped with an adjustable damper, which will ensure, if necessary, ideal conditions in the room.
 Different types of bathroom fans
 Forced ventilation differs from the type described above in that it includes a fan installed on one of the channels.
With the help of forced ventilation, it is possible to organize ventilation of the whole house, thanks to which optimal conditions for living will be created in all rooms.
Layout of a bathroom in a private house
In order to make a bathroom in the house, you need to know the recommended sizes of bathrooms. The dimensions of the bathroom in a private house should not be less than:
- 4 sq. m in the case of a combined bathroom;
- 3 sq. m in the case of a separate location of the bathroom.
The layout of the bathroom in a private house most often involves its location near the sleeping areas. If there are more than two floors in the house, then for convenience it is best to make several bathrooms.
 Layout of a small bathroom in a cottage
 At the stage of designing a house, it is necessary to provide for the necessary amount of free space in the bathroom, based on the items located there. If the layout is done correctly, then problems in the future should not arise.
How to make a bathroom in a private house
Among the features of bathrooms in private houses, one can note the fact that at least one wall will be in contact with the street, while in city apartments, as a rule, bathrooms border on the entrance.
As a result, the rooms have different temperature regimes. Given this feature, it is necessary to perform a number of activities at the finishing stage in order to organize a warm and cozy room. As a rule, you can limit yourself to one of them, for example, to qualitatively insulate the walls outside the building and the ceiling inside it.
You can also insulate the floor of the room by providing a "warm floor" system. If both were used to insulate the room, then there is no need to worry about violation of the thermal regime.
 Original bathroom interior in a private house
 It is worth noting that heated towel rails familiar to apartment buildings can also insulate the bathroom. Then you, for sure, will not be disturbed by condensation on the walls, which is formed due to cold walls, as well as mold and fungus, for which the insufficiently warm atmosphere of the room is an ideal place.
In order to solve the issue of how to insulate a bathroom, it is necessary to deal with existing heaters. You can insulate the room with mineral wool, glass wool or plaster with water-repellent properties.
For a safe stay in a humid bathroom environment, it is very important to ensure the correct operating conditions for electrical appliances, which consist in organizing a protective earth loop.
It is mandatory to use residual current devices (RCDs) that will prevent electric shock to a person. If you do not have enough experience to do these works with your own hands, it is best to turn to specialists, because this is a very crucial moment.