Experienced gardeners grow most crops through seedlings. Its quality, and hence the future harvest, significantly depend on the soil in which the seeds will fall. If you intend to get excellent yields from your site, find out what the land for seedlings should be like and how to cook it yourself from various components. Understand the intricacies of soil mixtures, how to prepare them for sowing, and your green pets will grow strong, persistent, healthy.
The most correct nutrient soil for seedlings is one that fully meets the needs of a particular crop. One plant needs fertile, moist soil, for another it is a real disaster - give it poor, dry land. Some specimens like acidic soil, and most react negatively to increased acidity. In a word, the dreams of gardeners-gardeners about a universal soil for seedlings are untenable.
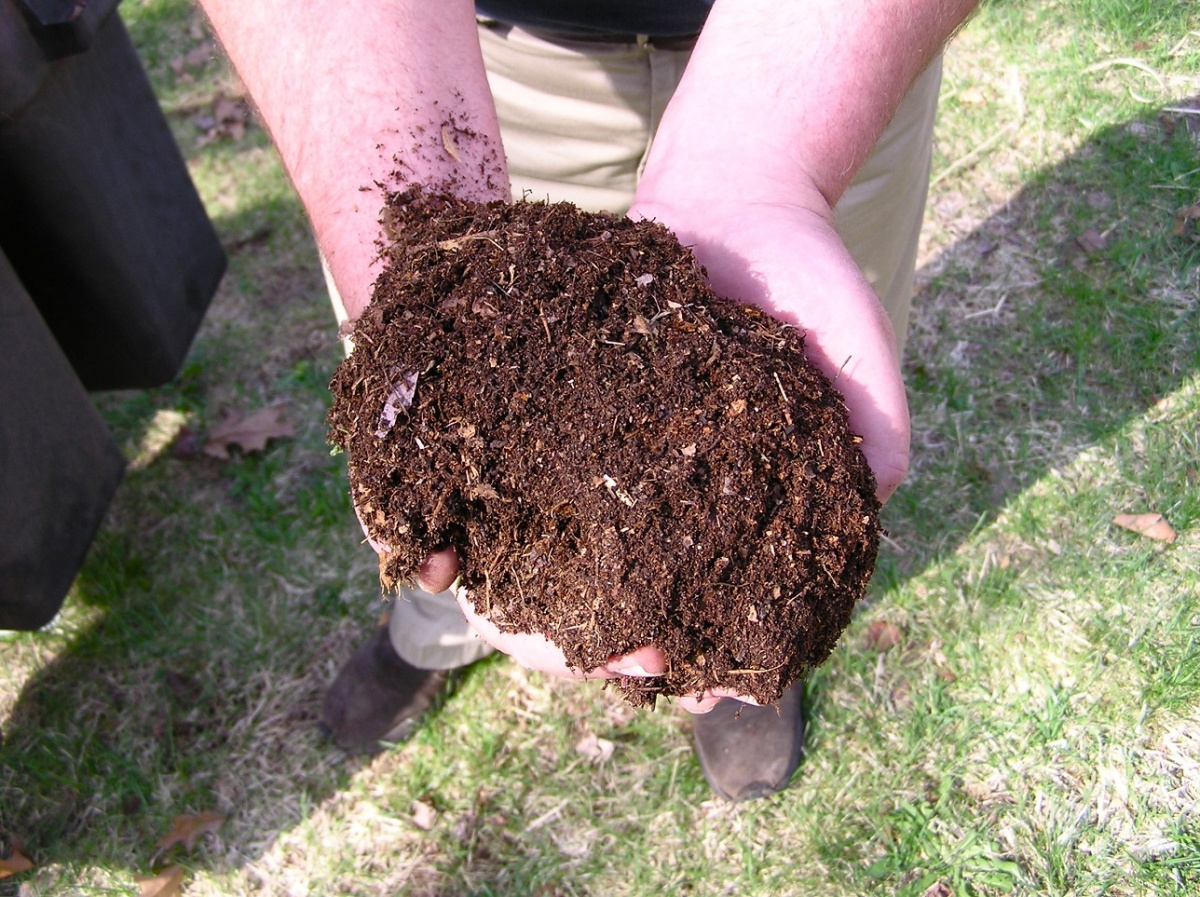
Young seedlings need better soil
However, there are some basic requirements for the potting soil in which you plan to sow the seeds. Do-it-yourself soil for seedlings should be:
- Moderately fertile, containing the substances necessary for nutrition and beneficial microflora.
- Balanced in the composition of minerals and organic matter, which should be contained in the soil in a form accessible to plants.
- Waterproof, able to retain moisture for a long time.
- Environmentally friendly - free from toxins, salts of heavy metals, hazardous waste products.
- With a neutral level of acidity.
- Having a good structure - light, crumbly, breathable, not containing lumps, foreign inclusions.

Soil for seedlings
- clay. When added to the soil mixture, clay makes it too dense, poorly permeable to air and water, which leads to seedling diseases.
- Plant residues, actively decomposing components. Unripe leaves or manure can begin to decompose, releasing heat and reducing the nitrogen concentration in the soil, which is detrimental to young plants. The lack of nitrogen negatively affects their development, and when the soil temperature exceeds 30 ° C, the roots may even die.
- Weed seeds. By themselves, they are not so dangerous, but pathogens can be present on them.
- Worms, insect larvae. After all, even an earthworm, so useful for garden beds, being in a seedling pot, can cause considerable harm to a young plant.

It is important to consider the requirements of plants
We prepare the soil for seedlings according to all the rules
All of the above requirements can hardly be met by ordinary soil, hastily dug up in your favorite garden, in a garden or in a forest. It is part of the soil for growing seedlings, but usually it is made multicomponent by adding peat, sand, humus and other components. However, the basis of the soil still remains the earth, which makes up 25-50% of its total volume.
Where is it better to take land - in the forest or in the garden
Forest land will become a wonderful component if you prepare it at the end of the summer season and leave the soil mixture prepared on its basis until spring. In this case, it is necessary to understand from which trees it is better to take land for seedlings from the forest in order to achieve an impressive result. In the role of a healthy basis for the best soil, sod and deciduous are most interesting.
Harvesting turf land is not an easy task. In vain, some summer residents believe that it is enough to remove the sod and dig up earth from under it. In reality, soddy soil refers to a substrate formed as a result of a long process with laying layers of sod in a pile or pouring with mullein. High-quality soddy soil can be obtained only after two seasons, just taking it and bringing it from the forest will not work.

At the end of the season - for the gifts of the forest
But you can dig up land from under forest trees. You should not take it where the trees and undergrowth are stunted, look sickly, as well as under trees whose foliage contains a lot of tannins: these are oak, chestnut, willow. Suitable land from under the trees of most hardwoods. Land from a pine forest for seedlings is also suitable, but it must be remembered that coniferous soil has high acidity.
Most summer residents practice harvesting land for seedlings in their own beds every fall. It is convenient, fast and, by and large, reliable, if you follow some "security measures". In addition, there is an opinion that is not devoid of rational grain that it is better to collect garden land for seedlings where a permanent place is determined for it in the future. In this case, the seedlings will be adapted to the soil into which they will be transplanted, and will take root better.
The security measures are simple:
- Comply with crop rotation requirements:
- do not use land from borage for seedlings of pumpkin crops;
- do not sow tomatoes after nightshade.
- Be sure to disinfect garden soil. Sanitation methods will be discussed below.
Ready soil - pros and cons
Not everyone has the opportunity to prepare and store soil mixtures. When deciding which soil to choose for seedlings, modern vegetable growers and florists often opt for beautifully colored bags of ready-made mixes from garden stores. The finished soil has the following advantages:
- prepared according to the standards of a conscientious manufacturer, it is completely ready for use;
- it is light, nutritious, moisture-intensive;
- deoxidizers, macro- and microelements needed by plants are added to it;
- convenient packing in packages of various capacities.

Ready soil
However, the purchased soil also has significant disadvantages:
- Manufacturers do not indicate the exact content of mineral elements on the packaging, it is given as a range.
- Soil acidity is often also reported as a large range (5.0-6.5) and it is difficult to judge the actual acidity.
- It happens that a soil mixture is packed into bags that contains not peat, but peat dust, unsuitable for growing plants.
- Sometimes the expiration date is not indicated on the packaging, and expired peat is capable of self-heating, which can kill plants.
Experienced gardeners advise using purchased soil, mixing it in equal parts with disinfected garden or turf soil and adding chalk, lime or dolomite flour as a deoxidizer (up to 3 tablespoons / 10 liters of the mixture). This is based on the not unreasonable opinion that the finished soil mixture usually consists mostly of peat and has an acidic reaction.
Studying the composition of the purchased soil, it is useful to have information about which peat is better for seedlings - high or lowland. This will help evaluate the properties of the purchased mixture and is useful for self-compilation. High-moor peat is more loose and acidic (requires liming), but less nutritious than lowland peat. Both types of peat are used to prepare seedling soil at home.
The composition of the soil mixture for seedlings
The quality factor of a do-it-yourself soil mixture is determined by the quality and ratio of its components. For seedlings, soil components are used, both organic and inorganic origin. From organic matter, in addition to the soil, you can use:
- Peat of any kind (lowland only processed).
- Mature compost, at least 2-3 years old. The best will be a product prepared using EM technology.
- Humus. For seedlings, the humus must be completely decomposed. In the composition of the mixture for plants prone to black leg disease, it should not be added at all.
- Sphagnum (moss).
- Needles, not forgetting that it increases acidity.
- Old sawdust soaked in a solution of urea.
- Furnace ash. This is a highly desirable component that enriches the soil with various elements, deoxidizes it, and suppresses pathogens.

Soil for seedlings is made up of several components
What can be added to the ground for seedlings from inorganic substances:
- Sand. It is better to use washed river sand of light yellow color, without clay impurities. In soil mixtures for seedlings, sand is an essential component that contributes to its friability and breathability.
- Perlite, agroperlite. The mineral is also added to loosen the mixture. It is also important that it, being an excellent absorber of moisture, prevents stagnation of water in the soil and is able to gradually release the moisture accumulated in itself to plants.
- Vermiculite, crushed expanded clay, packaging foam granules are also used for the above purpose.
Technology for the preparation of high-quality soil mixture
It is advisable to prepare all the necessary components in the fall and in the same season prepare the ground for seedlings with your own hands in the proportions required for the crops planned for planting. This is the best option: during the winter, all the components will have time to "make friends", certain metabolic processes will occur, due to which the soil will ripen and in the spring will feed healthy, strong plants. At home, you need to store it in closed plastic bags.
Various ratios of sand, peat and earth can be used for seedlings of various crops. But in general, these are the main components of soil mixtures, the recipes of which cannot be counted. Most vegetables (eggplants, cabbages, peppers, tomatoes) will suit a mixture of equal volumes of these ingredients. In the absence of peat, it will be successfully replaced by humus. A bucket of such a mixture will perfectly complement two glasses of ash.
Important! Seedlings do not need particularly nutritious soil. A school for sowing seeds can be created from disinfected turf or garden soil. And you need to dive plants into a more nutritious soil.

Soil for green pets
How to prepare the soil for seedlings
Now it's time to figure out how to prepare the land for seedlings at home in order to exclude the possibility of seedlings being affected by fungal diseases or insects. After all, it happens that from the black leg, barely appeared shoots die in full force. Awakened insects can also seriously harm seedlings and even grown seedlings.
Ways and methods of disinfection
Therefore, the prepared soil mixture must be disinfected. There are many ways to disinfect the soil for seedlings at home:
- Thermal:
- freezing,
- calcination,
- boiling water treatment
- steaming.
- Chemical:
- disinfection with potassium permanganate,
- treatment with special preparations,
- disinfection with copper sulphate.
- Biological:
- fungicide treatment,
- the use of drugs with effective microorganisms.

Quality soil mix
Each method has its pros and is not without its cons. You need to understand the features of the application of each method and choose the most suitable for yourself.
Thermal disinfection - freezing and calcination
The most natural way of do-it-yourself thermal disinfection is to freeze the ground for seedlings. This method is mainly applicable for processing soil harvested since autumn in regions with frosty (–15–20 ° C) winters and is as follows:
- In autumn, pack the soil mixture (or its components) into small cloth bags.
- Leave the bags in the cold - in a barn, on an open balcony, under a canopy.
- Three months before the seedling season, bring the soil into a warm room, let it thaw.
- Keep warm for 7-10 days.
- Again, send the bags to the frost, which will destroy the weed seeds, eggs and larvae of pests that have awakened by this time.
- This procedure can be done several times during the winter.
Important! This method is gentle on the soil, helps protect seedlings from many pests, but is unable to prevent some diseases. Therefore, before sowing seeds, the soil mixture should be treated with potassium permanganate or a fungicide: for example, Fitosporin.

Soil freezing in fabric bags
High-temperature calcination of the soil (above 100 ° C) allows you to rid it of all harmful microorganisms. But along with pathogens, beneficial soil bacteria also die, the soil loses its normal structure and fertility, and practically becomes dead. If you choose this method of rehabilitation, you need to clearly understand how to properly ignite the ground for seedlings at home:
- Spill the soil with boiling water. It is undesirable to calcinate dry earth.
- Put on a baking sheet in a low (up to 5 cm) layer, place on the middle level of the oven.
- Warm up at 90°C for half an hour.

Calcining the earth in the oven
The process described above is not only calcination, but at the same time steaming the earth for seedlings in the oven. There are other ways to steam.
Other methods of thermal disinfection of soil
The method of steaming the soil mixture for its sterilization is quite common among gardeners. If you spill the ground for seedlings with boiling water and immediately cover the container with a lid or film, this will be the simplest steaming option. But it is better to steam the soil by laying it on a slatted surface (metal sieve, colander) and placing it in a large container over boiling water for an hour and a half. The container should be covered with a lid.
Important! The smell that forms when the soil is heated (if it is not clean sand) is far from perfect. For this reason, sanitation of significant volumes is best done outdoors.

The soil can be steamed on a metal sieve
You can adopt an interesting method of calcining-steaming, invented by savvy summer residents. They use a baking sleeve: they put moist soil in it, heat it for 40 minutes in the oven at a temperature of 120-150 ° C. At the same time, the effects of calcination, steaming and treatment with boiling water are present, and the soil retains the existing moisture and structure.

Steaming the earth outdoors
After any type of heat treatment, you should:
- Give the cooled earth the opportunity to be saturated with air. To do this, at least diligently mix the soil in the storage container. And it is better to scatter the mixture on the film with a layer of up to 10 cm so that it becomes looser and restores its normal structure.
- It is desirable to “revive” the soil with biohumus and some biological product (“Baikal”, “Renaissance”, “Shine”). Give her a rest for a while, determined by the instructions for the drug.

The soil after steaming must be saturated with air
Chemical methods for sterilizing land for seedlings
It is easy to see that do-it-yourself heat treatment of the soil is a troublesome task that requires a serious investment of time. It is easier to disinfect the ground for seedlings with solutions of various chemicals that effectively deal with soil pests. When preparing soil for ornamental plants at home, you can treat it with Aktara or Aktellik. But it is unlikely that any of the modern summer residents will use such compositions when preparing soil mixtures for vegetables.
Soil cultivation for seedlings with potassium permanganate (potassium permanganate) and copper sulfate is used by many. Manganese copes well with disinfection, being also a kind of potash fertilizer. Disinfection with potassium permanganate should be carried out in this order:
- 1-2 weeks before sowing the seeds, prepare a clear raspberry permanganate solution. It is enough to add 5 g of the substance (a teaspoon without a top) to a bucket of rather hot water, but not boiling water.
- Mix well, making sure that no undissolved crystals remain.
- Spill the soil mixture with a hot solution, cover the containers with a film.
- Repeat these manipulations 3-5 days before sowing.
- Treatment with copper sulphate is carried out once, 3-4 weeks before sowing the seeds. The dosage is the same as for potassium permanganate.
Important! Copper sulphate and potassium permanganate are powerful oxidizing agents suitable for the treatment of alkaline and neutral soils (soddy calcareous, chernozem). It is not necessary to disinfect the soil with an acidic reaction with them.

Potassium permanganate solution for soil sanitation
Take note is also the best folk remedy for soil sterilization - ordinary mustard powder. It will protect seedlings from bacteria, viruses, fungi, nematodes, thrips. All you need is a tablespoon of dry mustard powder per 5 liters of soil. It is good to combine this additive with nitrogen fertilizer.

Mustard powder is an excellent soil sanitizer
Biological methods of seedling soil treatment
In recent decades, manufacturers have been delighting gardeners with qualitatively new preparations for soil disinfection that are safe for plants and humans. These include:
- Biological fungicides:
- Alirin-B,
- "Gamair",
- "Fitosporin-M",
- "Trichodermin".
- EM drugs:
- "Baikal",
- "Revival"
- "Gumat EM",
- "Shine".

Biofungicides and EMs
Biofungicides contain cultures of bacteria that are effective against pathogens of bacterial and fungal diseases. The composition can also be supplemented with humic substances. The listed and similar fungicides effectively suppress diseases, relieve soil fatigue, reduce soil toxicity, and restore its microbiological balance after thermal or chemical treatment.
Using these tools is easy. In general, you need to act according to the recommendations of the manufacturers indicated on the package. Options may vary. For example, when preparing the soil for seedlings with your own hands, you can simply mix 1 g of Trichodermin with 1 liter of soil. Experienced plant growers-practitioners are advised to use Gamair and Alirin-B together:
- 3 days before sowing seeds, dilute 1 tablet of Alirin and Gamaira in a small amount of water - 1.5-2.0 cups.
- Bring the volume of the solution to 10 liters.
- Spill the soil mixture, cover with a film before sowing.
EM preparations have a remarkable effect on the state of the soil. They contain useful living microorganisms, as a result of which the earth heals, acquires a good structure, becomes fertile, literally comes to life. There is no room for pathogens in such soil. To improve the soil (using the example of "Baikal EM1"), you can do this:
- Bring the soil stored in the cold into a warm room 3-4 weeks before sowing the seeds.
- A week before sowing, fill seedling containers with soil mixture.
- Spill prepared according to the instructions with a solution of the drug 1:500.
- Cover the containers with foil, keep in the dark.
Important! Biological products contain live bacteria and require strict adherence to instructions for use and storage.

Purchased soil bags
Is it worth it to process the purchased soil
Theoretically, multi-colored bags from garden stores should contain soil that is completely ready for sowing seeds - fertile, free of pests, pathogenic fungi and bacteria. Unfortunately, practice shows that confidence in this is far from always justified. If you are convinced of the quality of the purchased soil and the integrity of its manufacturer, the contents can not be decontaminated.
If in doubt, you need to decide how to cultivate the purchased land before planting seedlings and how to do it. In principle, the rules are the same as for self-made soil mixtures, which have already been mentioned. You can also use this technique: lower the purchased package into a bucket of boiling water, leave it in it under the lid until it cools completely, then repeat the procedure.
Some summer residents use the heating of the package in the microwave at maximum power until the soil begins to soar. At the same time, the package is pierced in several places so that it does not explode. After such treatment, it is necessary to populate the soil with beneficial bacteria with the help of biohumus, EM preparations in order to restore its vitality. You will get acquainted visually with the process of processing purchased soil by watching an informative video.
Video: Do-it-yourself soil preparation
The process of creating land for seedlings with your own hands is not an easy, but exciting task. Explore various soil mixture recipes, choose the ones that you like. Treat their preparation consciously, responsibly, and green pets will thank you for your care with an excellent harvest.
With the advent of the new year, summer residents begin preparations for the new summer season. Already in January and October, they begin to grow seedlings of peppers, tomatoes, eggplants and other vegetable and berry crops. During this period, more than ever, the problem of preparing the soil for seedlings is relevant. Someone decides to buy ready-made, and someone cooks it on their own, with their own hands.
Requirements for purchased soil
A very convenient option for planting seeds of nightshade and flower crops for seedlings is the acquisition of ready-made nutrient soil. In stores you can find two main varieties:
- seedling soil (soil);
- Seedling substrate.
The first is a soil mixture, which includes components of organic (earth, peat, crushed bark) and inorganic origin. The nutrient substrate consists of sand, sawdust, perlite and everything that can replace the soil - for example, mineral wool.
Regardless of the composition, all commercially prepared seedling soil must meet the following requirements:
- It should be loose and breathable;
- It is good to absorb moisture;
- Soil acidity (pH) should be in the range of 6.5 ... 6.7 units;
- Contain in an accessible form all the macro- and microelements necessary for each culture;
- Possess a basic set of nutrients - potassium, phosphorus and nitrogen.

IMPORTANT! If you purchased a package of soil whose acidity is below 6 units, then it should be deoxidized using one of the components: lime, dolomite flour or ash.
When choosing a ready-made soil mixture for sowing seedlings of tomatoes, eggplants, peppers and other crops, pay attention to the content of Nitrogen, Potassium and Phosphorus. Their quantity should be less than 300…400 mg/l. If this value is exceeded, the soil can only be used as a component. In it, you can transplant the picked plants and plant adult seedlings.
With a significant excess of the content of the main nutrients, it is strictly forbidden to use ready-made soil for seedlings. Sprouted seeds will actively grow, gain green mass. At the same time, the formation of flower brushes and buds will proceed at a slow pace.
How to cook on your own?
Those who know how to prepare the soil for seedlings prefer to do the mixture with their own hands. There is nothing complicated here, we wrote an article about this, with which you can. The main thing is that the substrate is light and loose. It should not contain coarse lumps and dense large particles. Do not sift it through a sieve with a small cell. Such a substrate will not lead to anything good. The sifted soil, when watered, swims and turns sour.

To prepare classic soil for seedlings, only four components are needed:
- Garden land - 2 parts.
- Humus or rotted compost - 1 part.
- Lowland peat - 1 part.
- Hardwood sawdust or river sand - 1 part.
All components are mixed, resulting in an excellent quality substrate suitable for growing basic vegetable crops. In order for the seedlings to receive all the nutrients, 40 ... 80 grams of complex fertilizer are added to a bucket of prepared soil. The following types can be used as top dressing:
- Azofoska.
- Nitrophoska.
- Agricola.
- Kemira.
ATTENTION! To neutralize the acidic environment of lowland peat, use lime or ash in small quantities. If you use sawdust instead of sand, then they should first be shed with a solution of urea. In proportion to 1 liter of water, 10 ... 15 grams of urea are taken.
For those who are not satisfied with the universal composition, we recommend preparing soil mixtures for seedlings of each individual vegetable crop. On the one hand, it will take a lot of time. On the other hand, each plant will receive everything necessary for successful growth.
How to prepare soil for seedlings of cucumbers?
Summer residents with experience try to avoid ready-made substrates for growing seedlings of cucumbers. Despite the full range of mineral fertilizers, such soil contains processed peat, which is the main problem. If you forget in time to water the plants, it forms a dense lump that cannot be moistened. At the same time, all the moisture intended for young seedlings will go by.

It is best to prepare the soil for seedlings of cucumbers yourself from the following components:
Composition No. 1
- Lowland peat - 2 parts.
- Humus - 2 parts.
- Hardwood sawdust - 1 part.
Composition No. 2
- Leaf land - 1 part.
- Sod land - 1 part.
- Rotted compost - 1 part.
In both compositions, 3 tablespoons of wood ash and 1 tablespoon of complex fertilizer are added to a bucket of the mixture. Before sowing, before fertilizers are applied, the soil mixture is disinfected from mold and spores of various fungi in one of the following ways:
- Pour boiling water over;
- Using a water bath, steam the soil for one and a half to two hours;
- 2 ... 3 hours, heat the composition in the oven at a temperature of 200 ... 220 ° C.
Preparing soil for cabbage
A nutrient soil mixture for cabbage seedlings is prepared from humus and lowland peat. The ratio of the main components is 1:1. Here, based on one bucket, add 1 glass of fluffy lime. But since there are very few nutrients in such soil, the following fertilizers are added:
- Superphosphate - 3 matchboxes;
- Potassium sulphate - 1 matchbox.
If desired, both fertilizers can be replaced with wood ash at the rate of 3 cups per bucket of soil mixture.
Some summer residents for seedlings of cabbage prepare soil from two parts of sand, five parts of garden soil, one part of ash and 1/4 of fluff lime. After mixing all the components, the mixture must be disinfected by steaming for 2 hours.
What should be the soil for tomatoes and peppers?
Seedlings of peppers and tomatoes require a slightly different soil composition. Here you can use:
- 1 part - rotted humus;
- 1 part - garden or forest land;
- 1 part - washed river sand.
All components before mixing must be sieved through a sieve for a homogeneous composition. The optimal cell diameter is 5…6mm.
The mixture thus prepared is steamed in a water bath for about 2 hours. After that, the steamed soil is poured into a trough, where it is allowed to cool. The next step in preparing the soil for seedlings of peppers and tomatoes is to fill it with mineral fertilizers. As such, ash and crushed egg shells are used. On a bucket of substrate take 200 grams of sifted ash and 100 grams of crushed shells.
This soil composition is best prepared in the fall, since the ash used in it can burn the tender roots of seedlings and destroy plants. During the winter period, it is completely neutralized. If the soil is prepared immediately before sowing, then it is better to use an extract from the ash. It is prepared as follows: 100 grams of wood ash is taken per 10 liter bucket. The solution is infused for 2 days. After which it is ready for use.
A good harvest is always several components. All of them are important: the quality of the seeds, their proper preparation for sowing, the choice of variety, conditions and care. But there is one parameter whose influence is most important. This is the qualitative composition of the soil in which seedlings are grown. The yield of all seedling crops (and in our climate most vegetables are grown through seedlings) depends to a large extent on properly composed seedling soil.

There is no one universal soil that meets the needs of all plants. Each garden crop requires an individual approach. Any plant makes its own demands on the soil mixture. But there are general rules that allow you to create a base soil, so that you can then optimize it for one or another crop with minimal effort.

Initial requirements for seedling soil
Depending on the type of plants that are grown by seedlings, the soil mixture can be composed of different components mixed in various proportions. But in all cases, it is necessary to comply with the initial requirements for seedling substrates.
- Fertility. The soil must contain in sufficient quantities all the substances necessary for sprouts for rapid and successful development.
- Nutrition. This means that the content of all components is balanced, organic elements are present in the soil and there is a mineral component, moreover, in the form and compounds available to plants.


Soil constituents
In the land intended for sowing seeds, components of organic and inorganic origin must be present.

Organic Ingredients:
- soil - soddy, leafy, garden;
- vegetable compost;
- decayed cattle manure;
- peat - lowland and highland;
- sphagnum, coconut fiber, seed husks, bark, sawdust;
- wood ash.
 Peat is one of the most popular components of seedling soil mixtures.
It is not necessary that absolutely all the components from the list be present in the soil, but most - yes. It is better to mix the soil from three different soils: garden, which can be taken directly from the ridge (unless, of course, diseased or insect-affected plants did not grow there); leafy (from leaves that have rotted with the ground); turf (which is obtained by cutting turf). The soil is the basic element of the seedling substrate.

Compost - rotted plants - is necessarily mixed with rotted manure, which is called humus. This is the supplier of the necessary substances.
Advice! Do not sow vegetable seeds in manure, compost or lowland peat. Too much organic matter will cause the seedlings to overgrow leaf mass at the expense of rooting. As a result, seedlings will not take root well when planted on a garden bed or in greenhouse soil.

Peat is required, it is he who makes the soil fertile. The lowland contains about 70% of organic matter, the horse, consisting of sphagnum, makes the soil structure loose.
Peat is found in most potting mixes for seedlings. It is mined from swamps. This is not to say that it is a non-renewable resource. From decaying organic components under the influence of natural processes, it is formed in swamps, but very slowly - over thousands of years. In addition, peat is part of the natural ecosystem - if you completely remove it from the swamps, or at least create a serious deficit, the ecological balance will be disturbed.
That is why scientists over the past decades have been trying to find a replacement for peat. And finally found. More and more producers of seedling soil mixtures are switching to use today.

Benefits of Coconut Fiber.
- It is 100% organic with no chemical additives.
- They are able to absorb and retain water, working like a sponge, retaining moisture for plants and not removing nutrients from the soil.
- A layer of earth in a pot or container with a substrate that includes coconut fiber remains dry, which prevents soil fungi.
- Coconut fiber has a pH level of about 6, so it normalizes the overall acidity of the entire substrate.
- The fiber contains phosphorus, potassium, as well as other substances necessary for plants in significant quantities.
coconut fiber prices
coconut fiber
Also, sunflower seed husks, tree bark, rotted sawdust, dry moss and other rippers are used to loosen the soil. Wood ash is added to normalize soil acidity.

Advice! Do not add nutrients to the soil more than the norm - an abundance of dressings is appropriate during the growing season, the seeds, inside which the plant embryo, have a sufficient supply of substances to form and release a full-fledged sprout. Enhanced nutrition of the seed is not required.
Inorganic components:
- river (in extreme cases, quarry) sand;
- perlite;
- vermiculite;
- expanded clay;
- mineral supplements.
Advice! Do not grind the components of the soil mixture too much and do not sift the mixture through a sieve with small cells - the fine-grained substrate will turn sour and “float” after each watering.

It is an excellent component of seedling soil mixture. This substance has a number of significant advantages.
- Sterility - spores of fungal diseases and pathogens of infectious diseases do not settle in perlite.
- The absence of insects - they simply do not start in the substance.
- The absence of weed seeds - they do not take root in the soil mixture with perlite and do not germinate.
- Preservation in its original state for a long time - perlite does not rot.
- Light weight – perlite is very light.
Vermiculite- a porous, environmentally friendly material that contains a record amount of magnesium, potassium and calcium necessary for sprouts already at the initial stages of life.

Drains the soil, acting as an organic leavening agent and helping to improve the structure and moisture capacity of the soil.

- a polymer compound, which, due to its properties, also serves to maintain a high moisture capacity in the soil.
Advice! To simplify the irrigation procedure and maintain the required moisture, add a hydrogel to the prepared soil before sowing.

hydrogel price
hydrogel
In addition to the required components, the following elements are also included in the soil mixture:
- ash;
- urea;
- potassium sulfate;
- chloride and potassium sulfate;
- ammonium nitrate;
- superphosphate.

What should not be in the soil
This small but important point is often overlooked. Amateur gardeners neglect it, as a result, all efforts to compile the right soil are wasted.
The following components should not enter the soil mixture:
- clay;
- fresh manure;
- not rotted plant residues;
- tea leaves, coffee grounds and other similar waste;
- salty sea sand.

Clay will make the soil heavy, impermeable to moisture and air, dense. Not rotted organics and coffee / tea will cause decay processes - they can begin to decompose, raising the temperature of the substrate, which will be detrimental to many seeds and seedlings. Also, the decomposition of organic matter will entail the release of nitrogen, which will evaporate, depleting the substrate.

Soil for various crops
The table below shows the composition of the soil for each of the most commonly grown vegetable crops.
Table. The composition of the soil mixture for common vegetable crops.
| culture | Soil components and their proportions |
|---|---|
| About 2 kg of garden soil, 1 - humus, ½ kg of sawdust (rotted), fine-grained wood bark or coconut fiber. For 6 kg of finished substrate - 40 g of ash, 20 g of superphosphate, 10 g of urea. |
| 5 kg of soddy soil, 5 kg of high-moor peat, 2.5 kg of sand, 2 kg of humus, 1/4 kg of lime, 1/2 kg of ash or dolomite flour. |
| 6 kg of peat or 3 kg of leaf earth and coconut fiber, 2 kg of soddy soil, 1 kg of humus, 1 kg of sand, ¼ kg of lime. |
| 4 kg of peat, 2 kg of soddy soil, 1 kg of rotted sawdust or coconut fiber, 1 kg of humus. |
| 2 kg of peat, 2 kg of soddy soil, 2 kg of humus, 1 kg of coconut fiber or rotted sawdust, 1 kg of sand. For 6 liters of the mixture - 40 g of ash and 15 g of potassium sulfate and superphosphate. |
| 8 kg of peat, 2 kg of sod land, 1 kg of river sand, mullein or humus, or 2 kg of vegetable compost, 1 kg of sawdust or coconut substrate. For 6 kg of the mixture - 10 g of ammonium nitrate and potassium chloride, 20 g of superphosphate and 45 g of ash. |
| 2 kg of sheet soil, 2 kg of humus, 2 kg of peat or coconut substrate, 1 kg of sand. For 6 kg of the mixture - 50 g of ash, 15 g of potassium sulfate, 20 g of superphosphate. |


How to prepare the soil mixture
In the process of preparing the soil for sowing seedlings, it is recommended to follow the instructions and follow the step-by-step recommendations. It is necessary to start harvesting components in the fall. Also in the fall they are mixed. Then the finished soil is sent for freezing, which will serve as additional sterilization.

Important! At the stage of mixing the soil components, do not add nutritious mineral additives. Nutrient additives are introduced into the soil in the spring, after the main sterilization, before planting seeds, in the form of solutions.
Soil preparation step by step instructions
Step 1. Prepare all the necessary components that you plan to add to the substrate. They must be dry and in different containers.

Step 2 Spread an oilcloth or other suitable bedding on the floor in the utility room, or take a large container (basin, trough, bath, tray) in which you will mix the soil components.
Step 3 Take a measuring container (glass, mug, etc.) or prepare the scales. Prepare tools - a spatula, small rakes - and put on gloves.
Step 4 Measure the required amount of the necessary components, place in a container or pour on oilcloth, mix thoroughly.

Step 5 Pour the finished substrate into small bags (ideally - no more than 20 liters). If the bags are plastic, make a few small holes at the top so that the soil “breathes”.
Step 6 Install bags of soil in a barn, utility room, where sub-zero temperatures will be kept in winter.
If we talk about the middle lane, then watermelons here (as well as some other crops - for example, melon) are preferable to grow through seedlings. In fact, there is nothing complicated in this process, the main thing is to know how to do it.
Decontamination procedure
Harmful microorganisms contained in garden, leafy, soddy soil, peat, sand, humus and other essential components of the seedling substrate can harm the seeds, introducing an infection and reducing their germination. To prevent this from happening, the substrate must be disinfected. This is a very important procedure that should not be neglected if you want to get strong, healthy seedlings and productive plants.

There are four ways to disinfect a substrate:
- freezing;
- steaming;
- calcination;
- pickling.
You can limit yourself to one method, but it is better to combine any of the first three with subsequent etching.
Important! Freezing is carried out during the winter. All other methods begin to be applied in January - February, when it is time to prepare the soil for sowing.
freezing
The method of disinfection by freezing consists in the fact that a bag of soil is left in a room where sub-zero temperatures are maintained in winter. If there is no such room, closer to spring, the soil is taken out to frost and left for a week at a temperature of about -10 ° C ... 15 ° C. Then the frozen soil is returned to heat and allowed to thaw for a week. During this time, all the germs of weeds and pests that were not destroyed by the first freezing will “wake up” in it. After that, the soil is again sent to frost. And so two or three times.
Every gardener knows that in order to grow and get a good harvest of tomatoes and peppers, it is very important to observe 3 important points: high-quality seeds, the right soil for seedlings, and compliance with growing conditions (temperature, humidity, light).
A balanced soil for seedlings of tomatoes and peppers ensures the development of the root system and the nutrition of the whole plant. Experienced vegetable growers share the secrets of preparing soil mixtures on which healthy and strong seedlings grow - the key to a rich harvest.
Taking care of the soil in which the seeds will germinate is necessary first of all. It should be light, loose, porous and not too acidic (preferably close to neutral, pH in the range of 6.5-7.0).
The soil for growing seedlings should be fertile, optimally saturated with organic matter and mineral fertilizers. For normal growth and development of seedlings, it must not only absorb moisture well, but also retain it. Such indicators can be achieved by properly preparing the substrate for seedlings.
Beginning vegetable growers often make a typical mistake: sow seeds directly into the soil from the garden. An ordinary earthen mixture taken from the beds is highly dense; it will be difficult for plants to develop in it. Therefore, many fail to grow vegetable seedlings at home and have to buy plants that are ready for planting.
Soil mix components

- Humus - obtained from rotted plants or manure, it provides the soil with high nutritional and fertile properties.
- Peat - helps to increase the friability of the soil, absorbs and retains moisture well, providing the plant with the necessary amount of it.
- River sand - used as a baking powder, should be large, clean, without inclusions of clay. Before use, it must be washed and calcined on fire or in the oven.
- Perlite is an environmentally friendly material that can replace sand, it absorbs moisture well and makes the soil loose.
- Sawdust - can be used as a baking powder instead of peat and sand, must be clean, they are treated with boiling water before use.
- Leafy soil is loose soil with a low nutrient content, which is used in combination with other types of soil. They collect it in the forest where deciduous trees grow. Experts do not recommend using the land collected under oak, willow, chestnut: due to saturation with tannins, good quality soil for seedlings will not work out of it.
Unacceptable soil additives
For growing seedlings of pepper and tomatoes, organic fertilizers that are in the process of decay cannot be used. Fresh manure, tea leaves, unripe leaves, falling into the ground, begin to decompose.
A large amount of heat generated during this can burn the seeds. If they have time to ascend, then the seedlings will still die from the high temperature. With the decomposition of organic components in the substrate, the amount of nitrogen decreases, which is very harmful for young plants.
Sand or earth mixed with clay is not suitable for making a nutrient mixture: clay compacts and makes the soil heavier, and this is unacceptable for seedlings. In heavy soil that does not allow air and moisture to pass through, the seedlings will get sick and may even die.
Do not use soil collected near a busy highway or even on the territory of an abandoned chemical enterprise for preparing a substrate. Heavy metals quickly accumulate in the soil and remain in it for a long time, and plants can easily absorb them.
How to prepare the soil mixture with your own hands?

A ready-made substrate for growing seedlings of tomatoes and peppers is easy to purchase at the store today. Many gardeners, fearing low-quality goods, prefer to prepare the soil for seedlings with their own hands at home. Each vegetable has individual preferences and needs, so experienced vegetable growers are advised to prepare a mixture for seedlings of various crops separately.
The soil must be prepared in the fall so that it freezes well in winter. It is better to take the land from the forest or collect it on a site where garden crops have not grown for 2-3 years. Weeds and grass must be removed, the earthen mass must be sifted through a sieve so that it becomes soft and loose. This contributes to the formation of a developed and powerful root system in plants.
Experienced gardeners advise taking land at the place where nettle grows. The roots of the plant are not strong, it does not allow the neighborhood of weeds, so this mass is suitable for vegetables.
It is recommended to start preparing the soil for seedlings by mixing the components, which is best done not immediately before sowing the seeds, but at least a few days in advance. During this time, the soil will settle and will not form voids that are washed out during irrigation. Having spread the polyethylene, each component is poured onto it in the required proportions.
Substrate preparation options for pepper and tomato seedlings:
- One part of garden or sod land, peat and river sand. Mix the mixture thoroughly and pour well with a nutrient solution: 25-30 grams of potassium sulfate, 30 grams of superphosphate and 10 grams of urea per 10 liters of water.
- Mix in equal proportions garden or turf soil, humus and peat, add a half-liter jar of wood ash and 2 matchboxes of superphosphate to the resulting mixture.
- Mix 2 parts garden or sod land with 1 part humus and 1 part river sand. Add a half-liter jar of wood ash to a bucket of the mixture.
Proper preparation of the soil and the use of fertilizers rich in minerals and trace elements helps to reduce the growing period of seedlings by almost 2 weeks. Peat-based soil contains long fibers that perform the function of deoxidizing fertilizers that have an increased acidity.
If the main soil itself is nutritious, it is not worth over-fertilizing the soil mixture for seedlings of tomatoes and peppers. The plant does not require many trace elements at the initial stage of seed germination. Only with the advent of the first true leaves does the need arise for them. Additional nutrition can be applied a few weeks after germination in the form of liquid fertilizer.
Some vegetable growers practice mixing their own prepared substrate with a purchased one. From the ready-made mixtures presented in stores, you can choose the following: "Gardener", "Flora", "Krepysh", "Gardener", "Humimax". To avoid fakes, it is recommended to purchase them from trusted retail outlets.
Soil disinfection

Disinfection is an important point in the process of preparing a mixture for seedlings. To obtain a good harvest and prevent the death of plants from the soil mass, it is necessary to remove pathogenic larvae and bacteria.
In order to disinfect the soil, various methods are used:
- freezing;
- watering with disinfectants;
- steam processing.
After undergoing "thermotherapy", the composition is heated, a teaspoon of urea, 2 teaspoons of superphosphate and half a glass of ash are added. After mixing, pour in a manganese solution (3 grams per bucket of water). After 2 weeks, seeds can be planted in a disinfected substrate.
One of the effective methods of disinfecting the earthen mass is steaming. At the bottom of a metal container, it is necessary to pour 1-1.5 centimeters of water, fix the edges of a clean natural fabric with an elastic band and pour the earth mixture into it. For 20-30 minutes, put the container on a slow fire so that the water boils away.
Under the influence of high temperature, the larvae and pathogens will die. When steaming, the soil is additionally saturated with moisture. Some gardeners practice calcining the earth in the oven, but with such treatment, along with pathogenic microbes, nutrients can also disappear from the soil.
Checking the acidity level
It is necessary to check the level of acidity of the soil mass: slightly acidic soils contribute to the infection of plants with clubroot and black leg. Among the methods for determining the acid-base balance of earthen mass, gardeners use laboratory tests, testing with a special litmus test, determination using wild herbs, many of which choose a specific type of soil.
To carry out analyzes in the laboratory, you need to dig holes and place the contents in a bag, sign and indicate the coordinates. Special tests sold in stores are also effective: paper turns red on an acidic surface, darkens on an alkaline one. Another folk method is to moisten a lump of earth with vinegar. If the acidity is lowered, it will make noise.
When determining the type of soil using wild herbs, it is important to know that plantain, wheatgrass, veronica, pikulnik, heather prefer to grow on soils with neutral or high acidity. Alkaline surfaces are chosen by pine, ash, larkspur, European spindle tree. Buttercup creeping, bird buckwheat, white gauze, wild strawberry, field bindweed will develop on any soil.
With increased acidity, 15 grams of dolomite flour is added per 1 kilogram of soil mass. The quality of seedlings of tomatoes and peppers will improve significantly if you fertilize the mixture with grated eggshells.