The path in the garden and in the country is a trivial attribute. Of course, we want to walk along a comfortable and beautiful path, which we got cheaper. Why not choose a brick? Let's solve the last doubts together and figure out how to make tracks with your own hands, including from old material.
Harmony of finishing the porch and walkway
Why do we choose brick paths
Of course, brick garden paths attract us with their durability, affordability, appearance and ease of installation. At the same time, the brick enters into direct competition with paving stones and concrete.
Another case is if the brick remains from the construction site and it is convenient to use it for paths in the garden. The third option is when there is a desire to equip the paths in the country house cheaper, and there is an old and broken brick available.
The best choice is clinker or paving bricks. Such material looks presentable and lasts a long time. Ceramic masonry brick has pores and collapses under the influence of moisture and frost. However, it can also last a long time with proper preparation of the base and special processing. Sand-lime brick should be considered as a material for organizing temporary coverings.
Various styling options
The way the bricks are laid determines both the design and the durability of the walkway. It must be selected before the start of work, otherwise it is impossible to calculate the quantity and range of material. We offer for review a few photos that allow you to cover the possible styling options.
 Curves and steps on brick paths
 Installation of bricks with dressing (bricks are stacked with an offset in adjacent rows) can be carried out both along and across the track. An interesting drawing of bricks laid in pairs. The flooring border is best done with a brick set on edge. Steps on the track are made by installing bricks on the end.
 Brick pavement pattern options
 Brick can be laid flat and on its side. In the latter case, it is more difficult to work, the material will be required twice as much, but the track will last longer. Braided and herringbone laying can be done at 45 or 90 degrees to the curb. All variants of the canvas can be decorated using material of different shades.
Marking and preparation of the base
Starting paving a brick garden path, you need to stock up on the following tool:  In addition to the main material you will need:
- sand;
- crushed stone or gravel;
- geofabric;
- boards 20-25 cm wide;
- wooden pegs.
When starting to build paths in the yard with your own hands, you should decide on their size and placement. Practice shows that in the garden and in the country, a paving width of 0.8-1m is sufficient. Paths should not be located closer than 1 m from trees, the root system of which can disrupt the coating.
 Brick walkway layout
 It is convenient to mark the contours of the path with pegs and a cord, or fill it with sand. A groove is dug with a depth of 20-25cm. The bottom of the trench is leveled, rammed and the base is prepared in accordance with the above scheme:
- A leveling layer of sand 20 mm thick is poured, which is covered with geotextile. The geofabric will allow water to pass from the upper layers and prevent crushed stone from mixing with the soil.
- Install a side of the board, which is fastened with nails to pegs hammered into the ground. The top end of the board coincides with the ground level. The distance between the boards is calculated based on the planned number of elements along the width of the track, taking into account borders and gaps of 2-3 mm. It is advisable to install guides on different sides of the track with a difference in height of 10-15mm in order to ensure the removal of water from the coating.
- Lay, tamp and level a layer of crushed stone with a thickness of about 70 mm.
- Sand 20 mm thick is poured on top of the rubble and covered with geofabric. The sand will level the rubble, and the geotextile will not tear.
- They fall asleep, tamp and level the mixture of cement and sand in a ratio of 1: 5, about 50 mm thick.
It is possible to somewhat simplify the preparation process with some reduction in the quality of the base for the track. In this case, both 20mm thick leveling layers of sand and the middle sheet of geotextile can be excluded. Instead of a mixture of sand and cement, sand is laid, which is moistened and rammed. Crushed stone can be replaced with gravel.
Brick Laying Guide
 Stages of paving a brick path
 It is useful to protect an ordinary brick from destruction by immersing it in a hydrophobic solution before paving the path. In this case, it makes sense to re-treat the garden path with a water repellent every 4-6 years. As a result of processing, the material does not absorb moisture and becomes frost-resistant. Laying the coating begins with the installation of the curb. The brick is placed on the edge along the board and hammered into the sand with a rubber hammer to the level of the top of the guide.
Bricks are successively stacked in accordance with the planned pattern and hammered into the substrate with a mallet. A gap of 2-4 mm is left between adjacent elements. The laying plane is controlled by the level and the rule. After the installation of the coating, the seams between the bricks are filled with a mixture of cement and sand in a ratio of 1: 5 using a brush or broom. The procedure is repeated after the start of operation of the track in order to completely fill all the gaps. Upon completion of paving, the boards are pulled out. The resulting void is filled with cement mortar or soil, which must be compacted.
Paving the path from old and broken bricks
 Combat track options
 By and large, laying an old brick is no different from installing a new and beautiful one. However, compliance with the entire technical process will be redundant to save waste material. In this case, you still have to dig a groove 10 cm deep and fill it with sand 5 cm. This will lay out an even canvas and take some moisture away. A board placed on edge will help make the edge of the track even.
 Original patterns from unusable bricks
 Note that the use of combat can be neat and original. For example, the curb of the path can be laid out in the old fashioned way with bricks set on edge at an angle of 45 degrees. It is even more effective to organize a pattern from a whole and broken brick.
Photos of role models
 Possible combinations of brick and stone covering
 When starting any business, it is always useful to evaluate how others have done it. From the examples above, the logic of combining brick with stone clearly follows. The border bears the greatest load and therefore it is reasonable to use a more durable natural material in this capacity.
 Colorful brick grounds
 These shots highlight the potential of bricks for paving large areas. In this case, various variations of the shape and color of the coating are possible. The main thing is that the chosen solution fits well into the surrounding landscape.
In conclusion, we add that no matter what material you work with, diligence and perseverance will bring the desired result. Let everything work out for you, and we offer a short video to help.
samodelino.ru
How to make a brick walkway with your own hands?
The arrangement of a backyard area near a private house cannot be imagined without a convenient approach to a residential building, a garage and outbuildings, and also, of course, without beautiful walking paths in the garden.
This issue can be easily solved using such a common material as brick. As a pavement, it is attractive in that you can make brick paths with your own hands and at the same time use those leftovers that were not previously used up during construction.
Advantages, disadvantages and types used
The main advantages of using bricks for paving walkways are ease of installation, accessibility and the ability to use leftovers after building a house, including broken fragments.
However, the pavement surface covered with outdoor wall material is not durable. After two or three years, under the influence of moisture and frost, an ordinary brick can collapse. To avoid this, we can recommend:
- treat the stones with a water repellent or moisture-proof varnish;
- use a special clinker brick;
- buy imitating paving slabs.
Treatment of ordinary clay bricks with a hydrophobic composition must be carried out at least twice with its complete immersion in liquid. This will ensure the resistance of the brick to moisture and increase its frost resistance.
At the same time, it should be taken into account that the validity period of the water repellent is no more than five years. After this, the surface of the track must be processed again. The service life of the lacquer coating is determined by the intensity of operation of the brick track.
 Scheme of a brick path.
 Clinker bricks are practically impervious to moisture and therefore almost do not collapse over time. It is more expensive than usual, but the garden path from it will be durable and more beautiful.
A do-it-yourself brick path can be laid out in the form of:
- longitudinal pattern with classic spoon dressing;
- alternation of vertical and horizontal rows;
- "Christmas trees" at an angle of 45 ° or 90 °;
- single or double braid.
There are more complex patterns, but for do-it-yourself styling, it is recommended to use these.
 Paving methods.
 Required materials and tools
In addition to bricks, you will need sand, crushed stone of medium fraction, PTS400 cement and geotextiles - non-woven waterproofing material to build the track.
Tool for work:
- bayonet and shovel;
- manual rammer or tamping machine;
- container for mixing the mortar and preparing the cement-sand mixture;
- measuring tape 5-10 m;
- cord for marking;
- pegs;
- rubber and regular hammer;
- construction worker.
For laying a broken brick path, you may need an angle grinder (grinder) with a diamond wheel to process uneven edges.
markup
 Marking and excavation.
 Use pegs, cord and tape measure to mark future tracks and sites. They must be at least two meters away from the trees, as growing roots can lead to the destruction of the base. The garden path should be wide enough for two people to pass without leaving the pavement.
The cord on the pegs should not sag much. To do this, make the distance between them no more than 5 meters. Turns are recommended to be made smooth so that a wheelbarrow or trolley can turn on them. In places of turns, increase the number of pegs.
Substrate preparation and curb installation
 Geotextile laying.
 To equip the foundation of a brick garden path, it is necessary to remove 20-25 cm of surface soil in accordance with the markings. Sprinkle the bottom of the resulting trench with a layer of sand 2-3 cm thick and compact well. After that, lay out the geotextile along the entire width and length of the track. This will effectively remove moisture down, preventing it from entering the base. In addition, the non-woven fabric will prevent the growth of weeds through the base and brick coating.
On top of the geotextile, pour a layer of sand 2-3 cm thick, and 10 cm of crushed stone on it and tamp it well. Sand is necessary so that the sharp edges of the stones do not tear the canvas. The crushed stone layer will act as a drainage to remove incoming moisture and prevent the base of the track from being washed away.
See also: Characteristics and laying of road slabs  Option using a sand base.
The drainage layer must be sprinkled with sand, hiding the rubble and putting another layer of geotextile on it. Install a curb along the edges of the path, which can be concrete, plastic or made of brick laid on edge. Fastening the curb material is done by hand using cement mortar or steel reinforcement stakes hammered into the ground.
Next, pour sand or a dry cement-sand mixture onto the geotextile. The surface is well compacted and leveled with a plaster rule or a flat wooden block, taking into account the provision of water runoff from the surface after laying. Dry cement-sand mixture provides increased strength and stability of the coating. With light loads on the pavement, you can use the basis of their pure river sand.
brick laying
The paving of the garden path is made in accordance with a pre-selected pattern.
 Stones are placed on a sandy or cement-sand surface, tapping them a little with a rubber mallet to land in place.
 The sagging elements must be removed and a little sand or mixture should be poured under them. Slopes for water drainage are checked with a building level, and a flat surface with a plaster rule or a wooden block. If a block is used, alignment can be done by lightly tapping on it.
 After laying the brick, a little dry cement-sand mixture is poured onto its surface, and then it is brushed to fill the joints and the surface is spilled with water.
 After 2-3 days, after the cement in the joints has set, this procedure must be repeated.
Finally
A brick garden path is an affordable solution for do-it-yourself landscaping. However, an ordinary wall brick requires pre-treatment with hydrophobic materials that will protect it from the damaging effects of moisture and frost. If you use clinker bricks, then pre-treatment of the material is not required.
It is very important to correctly make the base of the track - with the device of the drainage layer and the laying of geotextiles. In addition, all layers of the base must be well compacted so that in the future, during operation, subsidence and surface destruction do not form.
protrotuarnujuplitku.ru
Brick garden paths: 55 photos
Do you want your garden not to tire your eyes with boring rectangles? In your dreams, does the plot in the country house look harmonious and attractive?
 We will tell you a few tricks of landscape design, how ordinary garden paths, using optical laws and the rules of perspective, will help make your cottage more beautiful.
  Long brick garden paths will not be so boring and dull if they are crossed by transverse lines. It can be wooden or concrete beams, brickwork in a perpendicular direction. The same result gives a combination of slabs and brickwork.

If the brick path expands near the porch of the house, then it seems shorter, if it narrows, it is longer. The garden path, widening near the porch, creates the effect of a front platform in front of the house. If you want to increase the space of a summer cottage, make paths in the country with a smooth bend. So even the smallest yard will look very impressive.  The correct forms in landscape design, such as circles and squares, visually greatly reduce the space. Therefore, try to avoid the correct forms for garden paths and areas if you have a small garden plot.

You can choose any trendy design for your garden path or front yard, but there are two important things you need to keep in mind - harmony with the main building and functionality. Pedestrian paths can be narrower, but not less than a meter, and do not require a massive, expensive bed of gravel and sand. If you use the site in front of the house as a driveway, it must have a reliable foundation, otherwise, the brickwork may warp and crack. There are several options for paving a garden path with bricks. In any case, a pillow for the path is first prepared: pegs with a cord are driven in along the contour of the path, the soil is removed, 10-15 cm of crushed stone is poured, the crushed stone is compacted, 3-5 cm of sand is poured on top, on top of which a brick is laid. The seams between the bricks are filled with wet sand, after which the surface of the path is leveled and covered with dry sand. Finally, the excess sand is washed off with water.  Very beautiful garden paths are obtained from a combination of brick and natural stone. In this variant of paving, laying is carried out on lean concrete. For such a path, it is necessary to make a 1-3% slope away from the building, because. the seams in this track will not be able to absorb and channel excess moisture. When laying on a prepared gravel-sand cushion, a layer of wet concrete is poured, bricks and slabs are laid, the masonry is watered. After that, all seams on the track are tightly sealed with a special solution.

However, there is a catch in the method of laying a garden path on concrete: some natural stones react with concrete and become covered with sloppy stains over time. Therefore, with this choice, consultation with a specialist in natural materials is necessary. Special clinker bricks for paving garden paths have a beautiful natural shade and allow you to use not only the front side of the brick, but also the side when laying, creating room for imagination: this is paving with a spiral, squares, beautiful curves.  The combination of durable concrete slabs and brick softens the design of the path, making it more harmonious and comfortable.

Whether you prefer a clean design or are looking to embrace modern landscaping trends, try to avoid boring, ordinary path solutions in your garden. After all, garden paths are a versatile, reliable and easy way to give your garden a unique and spectacular look.
idealsad.com
Brick paths at their summer cottage
For the construction of do-it-yourself paths in the country, not only special materials intended for paving are often used. A favorite way to improve the garden plot is to use the surplus materials left over from the construction of the house. In particular, wall bricks are often used to create platforms and paths.
What types of bricks are suitable for paving
The attractiveness of the idea - to pave the paths in the country with bricks, is due to a number of reasons:
- such material often remains after construction is completed, that is, it is practically “free”;
- the modular dimensions of the bricks are convenient for carrying and doing the work yourself without partners;
- to the uninitiated eye, the brick pavement seems to be reliable and durable.
In fact, the strength characteristics of tracks made from ordinary wall grades of bricks leave much to be desired. It does not depend on the choice of its variety: silicate or red (it does not matter if it is hollow or full-bodied). The desire to save money and make paths out of brick can lead to disappointment after the first winter. Under the influence of water and frost, brick blocks delaminate, split into small pieces. The porous structure of baked brick clay is saturated with moisture and becomes fragile. Therefore, it will be possible to use cheap material only in dry, elevated areas with good drainage, or completely protected from precipitation.
The easiest way to lay out a brick path:
Many reliable modern materials specifically designed for paving are made in a form that allows you to imitate brickwork:
- Paving stones. Produced by vibrocasting or vibrocompression. Vibropressed paving stones have a higher quality and strength. The addition of concrete dyes makes it even more brick-like. Different thickness of products (from 4 to 8 cm) allows you to choose paving stones for a summer residence, depending on future loads - from paths between beds to a parking area.
- Clinker brick. High-strength and very beautiful material has long been popular in Europe, is gaining more and more fans among summer residents. Of course, its price is higher than that of most varieties of paving stones and is close in cost to natural sawn stone. But the assortment of clinker allows you to choose the color and texture of the surface that satisfy the most demanding taste. Clinker bricks are extremely durable. If you get diamond wheels for a grinder that allow you to make the necessary cuts, each craftsman can easily lay out a path of clinker bricks in the country with his own hands.
Preparatory work
Having outlined the location of the path network on the plan, they begin to mark it. It is convenient to do this with the help of pegs and a cord. In the process of laying out, it is determined in which direction to create a slope of the roadway for the flow of water and melted snow. Sufficient slope parameters are 1-2º per linear meter.
As with most other methods of building paths in the country with your own hands, within the marked boundaries, you need to dig a foundation pit for the foundation. It consists of a tightly compacted layer of crushed stone (20 cm) and a leveling layer of sand (about 5 cm). Compaction of crushed stone is carried out with a vibrating plate or manual devices. For better compaction, sand is shed with water.
Using a flat board or building rule level the surface of the sand, not forgetting the slope. Bricks are laid either on sand or on a dry cement-sand mixture in a ratio of 1:4.
Arrangement of curbs and laying bricks during the construction of the path
Since the size of the brick module is small (usually 10x20 cm), without installing limiters along the edges of the track, it may not stay within the allotted boundaries and spread. This can happen both during installation and afterwards. To prevent this from happening, use ready-made sidewalk curbs. In their absence, the role of limiters is played by bricks placed on edge and fixed with mortar.

A border of bricks is fixed at the border of the track with mortar
In the process of self-construction, the paths also use temporary boundaries made of durable boards, which are then removed. A well-packed base and neatly and accurately set curbs will serve as a guarantee of the reliability of brick paving done by yourself.
Starting paving, they begin to lay bricks one by one on sand or a dry cement-sand mixture and punch them with a mallet. The horizon is leveled with a manual bubble level. The stacked rows are pushed closer to each other, hitting the board applied to the side with a mallet.
Choice of paving patterns
Depending on the general design and style of landscape design of the dacha, various types of brickwork are used:
- straight, with row shift;
- diagonal;
- parquet;
- circular;
- scaly (Venetian masonry) and their numerous varieties.

An example of straight masonry with a shift of half a brick

Parquet masonry
Additional effects are created by ornaments of several colors or a selection of shades of bricks with different firing intensities.
The final stage of creating a brick path. Bug fixes and repairs
After the masonry is finished, it is necessary to fill the gaps between the bricks. Most often, ordinary sand is used for this, since the cement-sand mixture can leave ugly whitish stains on the surface. A layer of clean sifted sand is poured onto the path and swept into the cracks with a brush. The operation is repeated several times, alternating with the passage from the hose.

Filling cracks with sand
After winter, defects may appear on the surface of the track: subsidence, bulging, bricks destroyed or spread to the sides. You can start fixing them with your own hands, waiting for the soil to dry. The coating from the defective area is removed and the base is leveled. Then the paving is restored.

Do-it-yourself Alpine hill for giving
Here is the construction guide for you brick walkway Location on. If you have a private house, a good large plot for a garden, but you have to walk on the grass, trampling the paths, or even worse, in the mud. You can easily lay brick pavement like the pros using our guide.
What will our track consist of, what layers should be in it
As you can see from the first picture, the sidewalk will be sunk into the ground, there will be a layer of gravel or gravel, then sand will come and a brick will be placed on top. About everything in order.
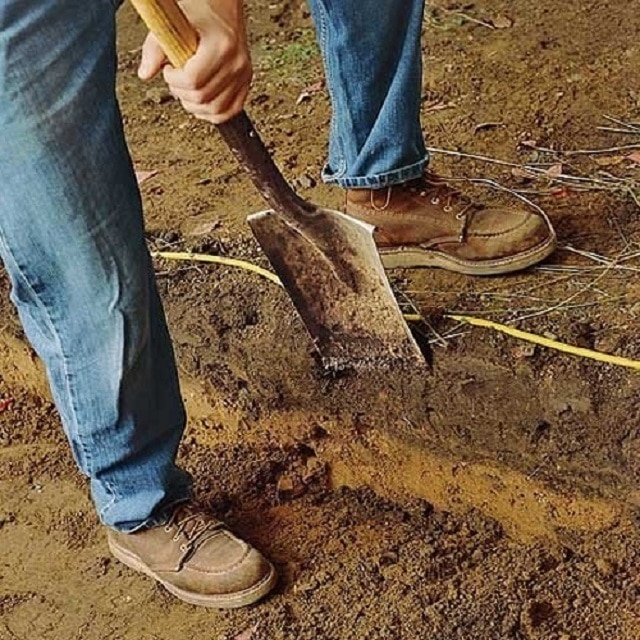
Dig a trench
Determine the desired width of your walkway and add 5 cm. Roughly determine the location of the walkway with rope, hose or paint. Using a shovel between markings, remove the top layer of soil. Dig until you see a change in soil color (as shown). Fold the top layer of soil on a tarp so that it does not pollute the area.

Fill the trench with crushed stone, gravel
Fill with 2.5-5 cm of crushed stone or gravel (as shown in the picture). Water the gravel to wash off the dust.

Pack and refill
Tamp the layer, pouring water, then pour gravel or gravel 2.5-5 cm again, tamp. You should end up with a 10cm layer of gravel.

Add a layer of sand
Now you need to install the side guides and fill in a layer of sand. Make the same outstanding tool as in the figure and level the sand with it.


Lay brick edging
Lay the brick on edge in the trench. Drive in the bricks with a special hammer so that the surface of the bricks is level with the top of the guide (as shown in the figure). For accuracy, check the surface with a level. Lay the edging along the guides.

Fill the space with bricks
Start laying bricks. Varieties of laying bricks on the sidewalk, a large number. We offer this option. Lay should be, checking the level of the surface of the masonry. And leave small holes for sand.

Seam filling
Use a shovel to spread a thin layer of sand over the brick. Using a large broom, notice the sand in the seams between the bricks (as shown). Then you need to pour water on the surface of the bricks so that the sand is compacted. Then repeat the filling of sand between the bricks.
Let it all stand for one week and, if anything, add sand to the seams as needed. After another week, remove all inserts and guides.

If you did everything according to our instructions, you should get something like this brick path.

With proper use of the material and observance of the laying technology, a broken brick path can serve not only as a functional element of a country exterior. A neatly paved path made of waste products allows you to effectively emphasize the style of the garden complex and improve the visual perception of the space.
The key advantages of using waste building resources are:
- ease of installation. For paving garden sidewalks and paths from brick fragments, only basic knowledge of working with the material and a simple set of tools are required;
- product availability. A waste resource allows you to save a considerable amount on the preparation of materials;
- the possibility of recycling construction waste with a significant benefit for the budget. That is, there is no need to take out the broken remains of products in order to clear the territory.
Among the disadvantages of using the remnants of building materials, they note the need for additional processing to extend the service life. Moreover, this does not apply to clinker bricks, which are characterized by high performance.
Brick fight - an excellent material for arranging garden paths
How to use broken brick
When planning how to use broken bricks in the country, home craftsmen find interesting solutions, such as:
- paving beautiful garden sidewalks;
- creating borders;
- decoration of flower beds and high beds.
Also, when deciding how broken bricks can be used, it is recommended to use recycled material in the construction of gabions and the arrangement of foundations for alpine slides. Most gardeners are fond of decorating high vegetable beds, the design of which provides for the formation of a powerful drainage layer, where different-sized fragments of the battle can also be effectively used. With the help of waste products, it is easy to build high-quality drainage when planting trees and shrubs.
As experienced tilers note, the use of unsightly material can give quite original results. For example, from a product unsuitable for construction, you can make a curb of the track by placing specimens on the edge at an angle of 45 °. To get a unique masterpiece in the form of a garden path with an original masonry pattern, you can organize a composition from a battlefield and a whole brick.
How to make a path out of broken bricks: stages of work
In order for the end result to please with worthy decorative and functional characteristics, one should adhere to the technology of paving garden paths.

Planning
When planning a brick walkway with your own hands, the following points are taken into account:
- the width of the path is chosen so that two people can freely pass along it;
- the distance between the object to be drawn up and the trees is at least 2 meters, otherwise the growing roots of the plantations may eventually lead to the destruction of the base of the structure.
Tools and materials
When building a garden path, you will need the following tools and supplies:
- tape measure, pegs and cord for marking;
- shovel - bayonet and shovel;
- tamping tool;
- hammer - rubber and ordinary;
- rule, trowel, brush;
- container for preparing the solution.
To process uneven edges of broken products, you will need a grinder with a diamond blade.

In addition to the main building material, you should take care of the availability of:
- sand and crushed stone of medium fraction;
- Portland cement brand 400;
- geotextile.
It is also worth having on hand a garden wheelbarrow for moving materials, a hose for final surface treatment with water.

Foundation preparation
When deciding how to make a road out of broken bricks when organizing a country landscape, the following algorithm for preparing the foundation is performed:
- along the marking line, it is necessary to remove the top soil with a depth of 20-25 cm;
- the trench is sprinkled with a leveling layer of sand 2-3 cm thick and rammed;
- the entire surface of the trench is covered with geotextile;
- non-woven fabric is covered with a layer of sand 2-3 cm thick;
- the next is a drainage layer of crushed stone 10 cm thick;
- then the drainage is covered with sand and a second layer of geotextile is laid.
It should be borne in mind that a layer of sand between the geotextile and crushed stone helps prevent deformation of the waterproofing sheet by the sharp edges of the pebbles.
Forming a curb
The perimeter of the trench is framed with a border. Here you can use a concrete solution or plastic products. It is also important to apply a brick border, laying it on the edge. Fastening the curb structure is carried out in different ways: using cement mortar, steel reinforcing elements or other convenient means. After the formation of the curb, a dry cement-sand mixture is poured onto the geotextile and the composition is leveled, using the rule, taking into account the runoff of water from the surface.

brick laying
When paving a garden path, one of the simple masonry options is used, including:
- classic spoon dressing in the form of a longitudinal pattern;
- herringbone pattern at different angles;
- "braid" single or double;
- alternating horizontal lines with vertical ones.
Broken brick according to the selected pattern is laid on a prepared cement-sand surface:
- when laying, the stones are tapped with a rubber mallet for a better fit;
- sagging specimens need to be lifted by pouring sand under them;
- after laying the material, a little cement-sand mixture is poured onto the surface;
- then, using a brush, sweep the composition to fill the seams.
At the end of the installation work, the surface is spilled with water to seal and set the seams.
Final processing
The last points of installation, including filling the joints with a cement-sand composition and water procedures, must be repeated after 2-3 days, when the cement sets well.
Practical tips for the long-term use of a broken brick garden path:
- so that the surface of the sidewalk does not deform under the influence of moisture and temperature changes, the stones are treated with a water repellent or moisture-proof varnish;
- if a clay brick is used, before installation, the material is treated 2 times with a hydrophobic composition by completely immersing the product in a liquid and drying;
- the validity of hydrophobic agents is 5 years, after this period of time it is necessary to re-treat the pavement surface. The service life of the facility is also affected by the level of intensity of operation.
The potential of broken bricks, especially if the material is used in different colors, allows you to create interesting compositions, which is confirmed in the works of the masters.
An old brick cottage will always come in handy. Running a private economy is a rather complex and responsible process aimed at the constant care of buildings and maintaining their appearance. However, such work has many advantages, consisting in the ability to equip the site based on personal preferences and your own wishes. For the implementation of similar projects, a variety of materials and available tools can be used. Old brick is one of those products that are almost always available and can be reused for the construction of various objects.
The old brick left after dismantling the stove or the walls of the house can be useful for ennobling the summer cottage.
Using old bricks: building a garden path with your own hands
To create a garden path, you can get by with recycled material, which is almost always available in a summer cottage. Demolishing an old barn, building an outbuilding, or renovating a house inevitably leaves behind a lot of surplus that can be useful for building garden paths.
The main material of such structures are the remains of bricks. Also, the garden path may include other waste materials left after construction work or dismantling of an object. It is not difficult to create this system with your own hands, and the result of the work will be an excellent coating that can not only ensure the practicality of moving around the site, but become its decoration.
How to lay out a brick path? The procedure for creating such an object is time-consuming and responsible, containing many nuances. However, with knowledge of the matter and skillful handling of the tool, creating a path in the country will take a little time. Brick pavement is made in the following steps:
- drawing up a construction plan;
- site marking;
- tool collection;
- ground preparation;
- border formation;
- brick laying;
- finishing processing.
Paths in the country, made of old brick, should be carried out according to the above scheme. This is the only way to guarantee the receipt of a strong and durable coating that can become a decoration of the cottage and last for many years.
Preparatory work and collection of tools
Do-it-yourself country paths made of bricks are made on the basis of a building plan containing a drawing of the future object and its technical characteristics.
At the same time, the plan is of tremendous importance, since it is a visual display of a building that previously existed only in thoughts. Having created a detailed drawing, a person imagines how such a sidewalk will look, and understands the feasibility of building on a particular site.
The next step after drawing up a construction plan is the marking of the area. As a rule, it is performed using wooden posts and a rope connecting them together. The delimitation of the garden plot makes it possible to see the contours of the future brick path, all its twists and turns.
As soon as the preparatory work is over, and the future brick garden paths have taken shape with the help of ropes and posts, you can start collecting inventory.
This process is of utmost importance, since it makes it possible to significantly speed up and simplify the work. The following set of tools will help you make a red brick path:
- roulette;
- pencil;
- hacksaw;
- rubber mallet;
- shovel;
- bucket.
Formation of a country sidewalk of bricks and its finishing
What can be done with recycled materials? Can independently build a brick border for a flower bed.
Brick paths for summer cottages are one of the most successful and striking objects in which the use of waste material is almost imperceptible.
//www.youtube.com/watch?v=JEPVrUcFZQE
The next step is to make the base on which the brick surface will be laid. Using a shovel, it is necessary to dig a hole up to 1 m deep over the entire area of the path. After that, a pillow of gravel is formed at its bottom, designed to ensure the removal of water from the surface. A layer of sand is poured onto the rubble and leveled, forming the basis for laying brick blocks.
A wooden board is laid along the contour of the future red brick path, which plays the role of a curb. Its appointment is conditional, since after completion of work it should be removed. However, during the construction process, it is simply irreplaceable, since it helps to obtain a flat plane.
Directly next to it is placed a boundary brick, which is laid on the end. Such placement of it will allow the path in the country house not to blur and keep its shape.
//www.youtube.com/watch?v=LnL1xE7QDSQ
Between the two curbs with the help of a rubber hammer, the blocks themselves are stacked. At the same time, each of them is installed close to the other in such a way that the gaps between them are minimal. Their removal to the level and the formation of a monolithic surface is carried out using a rubber hammer. At the end, a layer of sand is poured over the finished red brick plane, designed to fill the gaps and complete the composition of the track.
For the construction of do-it-yourself paths in the country, not only special materials intended for paving are often used. A favorite way to improve the garden plot is to use the surplus materials left over from the construction of the house. In particular, wall bricks are often used to create platforms and paths.
What types of bricks are suitable for paving
The attractiveness of the idea - to pave the paths in the country with bricks, is due to a number of reasons:
- such material often remains after construction is completed, that is, it is practically “free”;
- the modular dimensions of the bricks are convenient for carrying and doing the work yourself without partners;
- to the uninitiated eye, the brick pavement seems to be reliable and durable.
In fact, the strength characteristics of tracks made from ordinary wall grades of bricks leave much to be desired. It does not depend on the choice of its variety: silicate or red (it does not matter if it is hollow or full-bodied). The desire to save money and make paths out of brick can lead to disappointment after the first winter. Under the influence of water and frost, brick blocks delaminate, split into small pieces. The porous structure of baked brick clay is saturated with moisture and becomes fragile. Therefore, it will be possible to use cheap material only in dry, elevated areas with good drainage, or completely protected from precipitation.
The easiest way to lay out a brick path:
Many reliable modern materials specifically designed for paving are made in a form that allows you to imitate brickwork:
- Paving stones. Produced by vibrocasting or vibrocompression. Vibropressed paving stones have a higher quality and strength. The addition of concrete dyes makes it even more brick-like. Different thickness of products (from 4 to 8 cm) allows you to choose paving stones for a summer residence, depending on future loads - from paths between beds to a parking area.
- Clinker brick. High-strength and very beautiful material has long been popular in Europe, is gaining more and more fans among summer residents. Of course, its price is higher than that of most varieties of paving stones and is close in cost to natural sawn stone. But the assortment of clinker allows you to choose the color and texture of the surface that satisfy the most demanding taste. Clinker bricks are extremely durable. If you get diamond wheels for a grinder that allow you to make the necessary cuts, each craftsman can easily lay out a path of clinker bricks in the country with his own hands.
Preparatory work
Having outlined the location of the path network on the plan, they begin to mark it. It is convenient to do this with the help of pegs and a cord. In the process of laying out, it is determined in which direction to create a slope of the roadway for the flow of water and melted snow. Sufficient slope parameters are 1-2º per linear meter.
As with most other methods of building paths in the country with your own hands, within the marked boundaries, you need to dig a foundation pit for the foundation. It consists of a tightly compacted layer of crushed stone (20 cm) and a leveling layer of sand (about 5 cm). Compaction of crushed stone is carried out with a vibrating plate or manual devices. For better compaction, sand is shed with water.
Using a flat board or building rule level the surface of the sand, not forgetting the slope. Bricks are laid either on sand or on a dry cement-sand mixture in a ratio of 1:4.
Arrangement of curbs and laying bricks during the construction of the path
Since the size of the brick module is small (usually 10x20 cm), without installing limiters along the edges of the track, it may not stay within the allotted boundaries and spread. This can happen both during installation and afterwards. To prevent this from happening, use ready-made sidewalk curbs. In their absence, the role of limiters is played by bricks placed on edge and fixed with mortar.

A border of bricks is fixed at the border of the track with mortar
In the process of self-construction, the paths also use temporary boundaries made of durable boards, which are then removed. A well-packed base and neatly and accurately set curbs will serve as a guarantee of the reliability of brick paving done by yourself.
Starting paving, they begin to lay bricks one by one on sand or a dry cement-sand mixture and punch them with a mallet. The horizon is leveled with a manual bubble level. The stacked rows are pushed closer to each other, hitting the board applied to the side with a mallet.
Choice of paving patterns
Depending on the general design and style of landscape design of the dacha, various types of brickwork are used:
- straight, with row shift;
- diagonal;
- parquet;
- circular;
- scaly (Venetian masonry) and their numerous varieties.

An example of straight masonry with a shift of half a brick

Additional effects are created by ornaments of several colors or a selection of shades of bricks with different firing intensities.
The final stage of creating a brick path. Bug fixes and repairs
After the masonry is finished, it is necessary to fill the gaps between the bricks. Most often, ordinary sand is used for this, since the cement-sand mixture can leave ugly whitish stains on the surface. A layer of clean sifted sand is poured onto the path and swept into the cracks with a brush. The operation is repeated several times, alternating with the passage from the hose.

Filling cracks with sand
After winter, defects may appear on the surface of the track: subsidence, bulging, bricks destroyed or spread to the sides. You can start fixing them with your own hands, waiting for the soil to dry. The coating from the defective area is removed and the base is leveled. Then the paving is restored.

Clinker paving. Effectively selected shades of terracotta of different degrees of firing