The Russian bath is still cut from wood, but the log house was replaced by technologically more advanced designs:
- log house made of rounded logs;
- frame made of timber (glued or profiled).
If the thickness of the logs of the Russian bath in the old days allowed only the space between the crowns to be insulated, then the less powerful body of a rounded log, and even more so a bar requires complex work on the insulation of the structure designed for use in any season of the year.
Bath must comply with the thermos principle- keep warm at any outside temperature. In this regard, the design solutions of the project are of great importance: by the method of joining wooden elements when knitting crowns, by the location of the steam room relative to the soap and dressing room, the height and thickness of the windows, the size of doorways, the height of the thresholds, the design of the "heater".
But the system of measures for the insulation of the outer walls, floor and ceiling, the technological features of this process in different rooms of the bath cannot be belittled either.
Materials suitable for baths
A bathhouse is a place where all structural elements constantly endure temperature changes and their contrasts. In conditions of damp heat, the evaporation of many synthetic substances and polymers is activated, tactile contact with heated building materials can lead to burns.
These operational features define the mandatory material specifications used for thermal insulation of baths: thermal conductivity, moisture resistance, fire safety, natural components, environmental friendliness.
In order for the bath to become a place of health promotion, it is preferable to assemble a log house from the wood of Siberian forests(cedar, larch, pine) harvested in winter. For the facing of the premises, deciduous trees are chosen that do not emit resins and essential oils when heated.
Since ancient times, popular heaters have been organic and natural: clay, peat, expanded clay, flax fiber, moss, jute, tow.
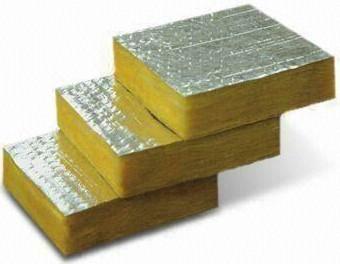
New synthetic- non-combustible mineral insulation, magnesite plates, gypsum fiber, expanded polystyrene, honeycomb.
Waterproofing agents bitumen mastic, steklohydrozole, euroruberoid (except for use in a steam room), polyethylene film with a density of 140 microns are often used.
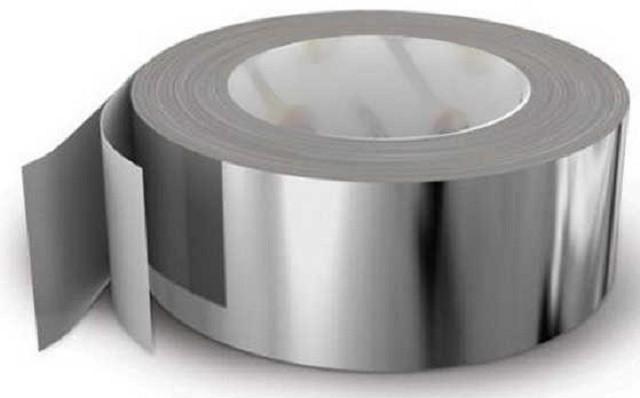
Optimal views steam insulators for bath rooms are - kraft paper, aluminum foil, at the same time insulation - foil-coated penotherm (NPP polypropylene laminated with foil).
The sequence of works on insulation
- The very first stage of warming will begin even during the assembly of the log house, when an organic fiber heat insulator will have to be laid between its elements: tow, jute, flax, dried moss, or a combination thereof.
- When laying a bath, you can take measures to insulate the floors, especially if they are constructed of concrete. In this case, you will have to perform earthwork for leveling, filling sand and expanded clay; pouring the base floor.
- How to insulate the ceiling and walls of the bath? Warming is carried out from the inside and outside, but after the shrinkage process of the structure has been completed.
- Measures for the insulation of windows and doors, external and internal cladding work to preserve the heat in the premises of the bath.
Only after six months is it possible complete this process using a hammer and caulk (special spatula), carefully sewing the ends of the fibers into the seam. True, synthetic sealants have appeared for this purpose, but for a bath it is especially important to observe environmental safety in conditions of heating and evaporation.
Thermal insulation of a wooden bath from the inside
How to insulate a bathhouse from a log house (bar)? You should start with ceiling insulation, it is he who takes on the first wave of heat and steam. The heat-insulating layer should be significant (in the steam room - up to 15 cm) with an obligatory vapor barrier: for the steam room it is foil, for other rooms it is kraft paper or thick polyethylene. It is also enough to upholster the walls in the soap and dressing room from the inside with clapboard or wooden dies made of hardwood (aspen, linden).
- Ceiling insulation algorithm:
- with clean roll paper we overlap the surface of the wooden ceiling (we fix it with tape and a stapler);
- we fasten bars across the ceiling that exceed the thickness of the insulation used (preferably rigid mats made of basalt wool or cinder fiber); for the overlap of the dressing room and soap room, expanded clay, sand and even sawdust mixed with clay can be used as insulation;
- mats fit into the crate;
- the next layer is aluminum foil, the joints of which are glued with tape;
- on the foil, as the basis for the front sheathing, the crate is attached;
- if the ceiling of the bath will be used as the floor of another room, then 3 cm of cement-sand screed is made on top of the insulation layer under the wooden flooring.

First way:
- bituminous mastic is applied to the concrete surface;
- after it dries, the floor is covered with a thick plastic wrap;
- then comes the laying of ceramic tiles or underfloor heating.
Second way:
- a layer of 15 cm of mineral wool is laid;
- covered with euroruberoid with entry to the level of the plinth;
- lags are treated with an antiseptic;
- the subfloor is laid;
- a clean wooden floor made of grooved boards.
The first method is more suitable for the back rooms of the bath, the second - for the steam room.
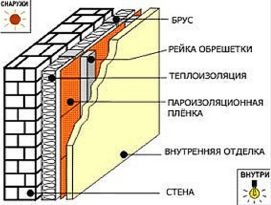
We insulate the bath outside
Insulating does not only mean protecting against blowing. Insulate - provide conditions for maintaining a stable thermal regime indoors.
For log cabins or when building baths in areas with mild winters, it is quite enough to carry out external insulation of the walls in order to protect the bath from heat leaks. Inside - only finishing from natural materials.
At the same time, it is possible to insulate the walls from the outside immediately after the shrinkage of the log house, based on the thickness of its elements and the density of laying the crowns.
The attic is subject to external insulation:
- the overlap is covered with glass hydrozol;
- covered with expanded clay, slag or mineral mats are laid on the insulator;
- a reinforced or non-reinforced screed is made on top.
For external wall insulation the ventilated facade technology is applied:
- a lathing frame is created along the width of the sheets (mats, slabs) of the insulation with an excess of the sheet thickness by 3 cm (for the ventilation gap);
- the insulation fits into the structure of the crate from the bottom up:
- the diffuse membrane is attached to the crate with a stapler;
- revet facades with lumber under varnish, false beams or colored siding.
Requires special attention insulation of the basement, where the cooling of the walls, especially in the cold period, occurs especially intensively.
For this, a formwork of boards up to half a meter high and 30 cm deep is installed along the perimeter of the structure. The formwork cavity is lined with any waterproofing agent and covered with soil or expanded clay. From above it is covered with a board from being washed away by rainwater.
Additional insulation
Additional insulation are subject to windows. To preserve heat, it is preferable to make them small and in the lower part of the wall. The most reliable are triple glass units, provided that they are tightly inserted into the openings of the walls, with the sealing of the cracks.
High thresholds and small door frames with a low headroom will also help keep the room warm. The entrance from the dressing room to the soap room and the steam room should not be located on the same axis.
The dressing room should have a door insulated with thick vinyl-covered felt. The insulation must exceed the dimensions of the door by 10 cm. It is even better if the entrance to the dressing room is equipped with a closed vestibule.
The efforts and costs of warming the bath depend on subsequently, the cost of firewood for heating it, and, finally, its safety and durability.
Detailed instructions for insulating a bath from the inside: insulation of walls, floor and ceiling. To insulate the bath with your own hands, you do not need to have special skills, you only need a standard set of tools and our instructions!
The overwhelming majority of country house owners cannot imagine their site without a real Russian bath or sauna. But in order for it to function properly, and really bring only strength and health to the owners, it is very important to insulate it well, methods of insulation are considered even at the stage of drafting a bathhouse project, but this can be done even with a finished construction
To know how to properly insulate a bath from the inside, you need to study the technology of this process and choose the right materials.
Materials for work
Before proceeding to consider the technology of insulation, it is necessary to figure out what materials need to be prepared for work.
1. Thermal insulation material is the most important component in the process of insulating walls, ceiling and floor of a bath. Today there are a large number of heaters, but not all of them are suitable for bathing conditions. Which ones are most adapted to high temperatures and humidity?
Rating of heaters for a bath
| Photo | Name | Rating | Price | |
|---|---|---|---|---|
| #1 |
|
⭐ 82 / 100 |
||
| #2 |
|
⭐ 86 / 100 |
||
| #3 |
|
⭐ 88 / 100 |
||
| #4 |
|
⭐ 92 / 100 |
||
| #5 |
|
⭐ 98 / 100 |
||


- Low price
- Good thermal insulation
- Light weight
- Multifunctionality and wide range of applications
- Durability
- High resistance against fungi, various microorganisms
- Ease of installation
- Gives off toxic substances when burned
- Release of harmful substances even at low temperatures
- Creates a vapor barrier
- Hygroscopicity
- Afraid of the sun's rays
- Whole until the mice got there
- Not resistant to solvents
- Low resistance against mechanical damage
Styrofoam prices
expanded polystyrene

- Perfectly "sticks" to any materials - brick, glass, wood, concrete and metal.
- Differs in extraordinary lightness and does not weigh down the surface.
- The polyurethane foam coating does not react to cold snaps and warming throughout the year.
- Unlike sheet and panel thermal insulation, this type of insulation is a single whole. There are no joints or seams through which cold air can enter the room.
- Under the influence of ultraviolet radiation, rapid deterioration of the insulation can occur.
- Polyurethane foams are flame retardant materials. However, where the surface gets too hot or may catch on fire, polyurethane foam should still not be used.
- High cost of material and high cost of spraying services
Prices for polyurethane foam
polyurethane foam

- Low thermal conductivity, which makes it an excellent insulation
- Fire safety
- Resistant to temperature extremes.
- Excellent vapor permeability, thanks to which the material "breathes"
- Ease of installation
- When moisture is absorbed, the heat-insulating properties decrease, cold bridges are formed
- Large mass and volume, increased shipping costs
Mineral wool prices
mineral wool

- High frost resistance - withstands temperatures down to -70 ° C without loss of properties.
- High degree of fire resistance.
- Safety for humans.
- Durability - 45 years.
- Low vapor permeability - 0.007-0.008 mg / m · h · Pa.
- Flammability. Even in spite of self-extinguishing properties, the material burns on contact with fire.
- Low sound insulation.
- The breathability of the seams.
XPS Slab Prices

- Low price
- Resistant to acidic environments
- Quickly absorbs moisture and does not lose positive qualities
- Long-term drying
- Dust protection required during installation
Expanded clay prices
Acquaintance with characteristics leads to the conclusion that mineral wool for walls and wooden floors is most suitable for insulating a bath from the inside, and XPS slabs for concrete. Expanded clay can be called a universal material that is perfect for any of the floors, but for walls it cannot be used for internal insulation.
If you buy, then it is perfect for a bath foil-coated material that promotes long-term retention of heat inside the room according to the thermos principle. For example, some characteristics of foil mineral wool insulation of the company "Izorok" are shown in the table:
| Isolite-L | Isolite | Isovent | Isocor -S | Isophorus | Isoruf | |
|---|---|---|---|---|---|---|
| Density, kg / m³ | 40 | 50 | 90 | 105 | 110 | 150 |
| Compressive strength at 10% deformation, kPa, not less | 20 | 25 | 50 | |||
| Tensile strength for separation of layers, kPa, not less | 4 | 4 | 12 | |||
| Declared thermal conductivity coefficient, W / m × ° K | 0,035 | 0,034 | 0,034 | 0,036 | 0,034 | 0,036 |
| Thermal conductivity coefficient under operating conditions, W / m × ° K | 0,043 | 0,038 | 0,039 | 0,041 | 0.040 | 0,042 |
| Water absorption by volume,%, no more | 1.5 | 1.5 | 1.5 | 1.5 | 1.5 | 1 |
| Moisture by mass,%, no more | 0.5 | 0.5 | 0.5 | 0.5 | 0.5 | 0.5 |
| Content of organic substances by weight,%, no more | 2.5 | 2.5 | 4 | 4 | 4 | 4 |
2. For bonding mats of mineral wool or other foil-clad insulation, and creating a one-piece sealed surface coating, it will be necessary to purchase a special foil tape.

3. The insulation is laid between the guides of the crate, which means that you will need wooden blocks with a section that depends on the thickness of the insulation mats. If, as an example, we take the recommended insulation thickness of 100 mm, then the bars should have the same size on one side, or a double lathing with a perpendicular arrangement of guides and a two-layer arrangement of mats will be used.
4. The bars are attached to the walls using self-tapping screws, dowels or anchors (depending on the type of wall material), therefore it is necessary to purchase these elements of the required length, corresponding to the dimensions of the guides, and the required depth into the walls - for wood - 20 ÷ 25 mm, for capital walls - not less than 40 mm.
5. If a heater without a foil layer is chosen, then a hydro-vapor barrier film is required to close it.
6. If the floor in the bath will be filled with a concrete screed, then in addition to insulation you will need:
- cement and sand or ready-made construction mixture;
- roofing material;
- reinforcing mesh;
- guides for beacons;
- polyethylene film ;
- damper tape.
The amount of materials will depend on the area of the floor, ceiling and walls of the room to be insulated.
Having prepared everything you need, you can proceed to warming the surfaces of the bath rooms.
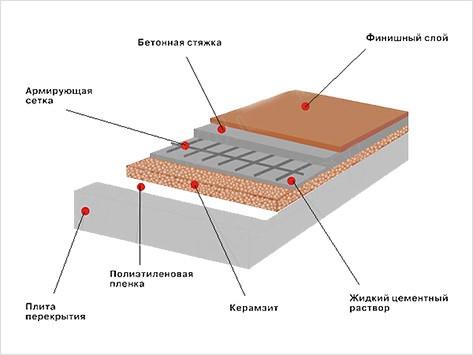
Thermal insulation of bath floors
As you know, a bathhouse can be built of wood or brick, therefore, not only wooden, but also concrete is arranged. The latter is most often poured in a brick bath, but sometimes it is done in a wooden one. In any case, a concrete floor always requires reinforced insulation.
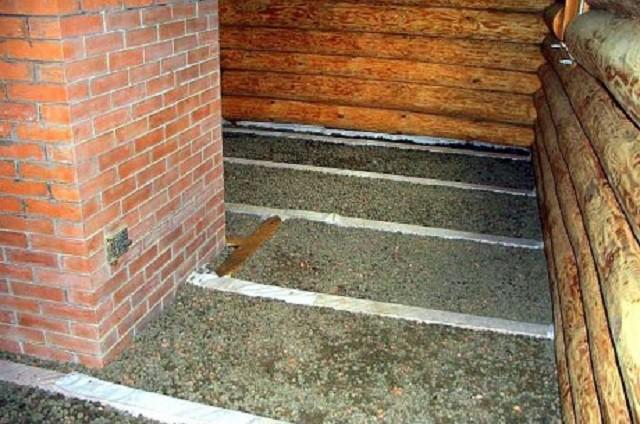
Thermal insulation of floors in any bath should be given special attention, since it is they who must withstand high humidity and temperature drops between rooms and the ground. Therefore, before proceeding with the installation of a multilayer "pie" of a wooden floor or a concrete device, it is recommended to fill the entire surface under the structure of a bath of a medium fraction or slag.
The expanded clay layer will depend on the thickness of the walls of the building. It should be at least twice as thick as they are. It should be noted that if it is possible and allows the space to make the expanded clay embankment thicker, this will only increase the effectiveness of thermal insulation. If the bath is built of bricks and installed on a concrete foundation, it is recommended to fill it with expanded clay to almost the entire height of the foundation tape.
 Floor covered with expanded clay "pillow"
 Concrete floor
In order for the concrete floor of the bath to be warm, you need to do a number of operations that are carried out after the drain pipe has been brought in (it must be raised in advance to the height of the future screed). The work consists of the following stages:
- The soil inside the morning is well compacted, and the walls are covered with a waterproofing compound.
- Further, a layer of sand 80 ÷ 100 mm thick is poured onto the ground, moistened and compacted.
- Roofing material is laid on top of the sand with a 150 ÷ 200 mm approach to the walls. The canvases are laid with an overlap of 120 ÷ 150 mm, it is advisable to fasten them with waterproof tape or glue them together thermally using tar mastic.
- Further, expanded clay is poured onto roofing material in such a way that the future floor screed is approximately 50 mm lower than the foundation height.

- Further, expanded clay is distributed over the entire surface in an even layer. Additionally, XPS slabs 50 mm thick can be laid on it - they have sufficient rigidity and can easily withstand all loads, do not forget that expanded clay should be covered with dense polyethylene before laying them.

- Reinforcement mesh with cells from 50 to 100 mm is laid on the surface prepared in this way.
- Beacons are placed on top of the reinforcing belt, along which it will be aligned.
- If the hole of the sewer pipe is located in the center of the room to be insulated, then the beacons are laid at a slight angle to it, so that when the concrete is leveled, a slight slope is formed from all sides of the room to the drain.
- Further, along the perimeter of the room, a damper tape is glued or otherwise attached to the lower part of the walls. This measure will keep the screed from deformation during temperature extremes, since compensates thermal expansion of the material.

- Prepared concrete is laid out on the reinforcing mesh, mixed from sand and cement in a ratio of 3: 1, and leveled using the building rule. It is advisable to include in the composition special plasticizers that are on sale - this will increase the quality of the coating. Often, ready-made screed mortars with an already optimized composition for rooms with high humidity or for external works.
- After hardening and screed and gaining strength by it, it is impregnated with a waterproofing compound () of deep penetration.

- After the soil dries up, ceramic tiles are laid. Another option - logs with wooden flooring can be installed on the concrete floor. Well-processed boards on it should be fixed at a distance of 20 ÷ 30 mm from each other.
Wooden floor
Plank floors are traditional for wooden baths. To arrange them correctly, in addition to insulation operations, it is necessary to provide for high-quality waterproofing. Do not forget about the ventilation of the floor - for this, special channels must be left in the foundation.

Floor construction and insulation works are carried out in this sequence:
- First of all, a drain pipe is supplied to the bath. The drain is usually located in the middle of the room, and all insulation materials and floors are arranged around it.

- Roofing material is laid on the compacted soil, which should rise to the walls by 150 ÷ 200 mm.
- Expanded clay is laid on top of the waterproofing. The greater its thickness, the better, but there should be a ventilation distance of at least 200 ÷ 250 mm between its surface and the floor beams.
- Further on waterproofed with layers of roofing material, the protruding part of the foundation is laid with floor beams. All wooden floor elements must be pre-treated.

- On the lower parts of the floor beams, cranial bars are nailed or screwed onto which the subfloor boards will be mounted.

- The sub-floor is covered with a vapor-proof film that covers both the floor beams and the boards laid between them.
- Further, on the subfloor between the floor beams, insulation is laid - it can be mineral wool or the same expanded clay.

- From above, the insulation material is closed with another layer of vapor barrier film.
 Above - another layer of hydro-vapor barrier
 - Logs are fixed perpendicular to the floor beams, on which a wooden flooring is arranged. A hole is made in the middle - a drain pipe will come out into it.

- Slats are nailed onto the style, cut off at an angle of 5 ÷ 7 degrees towards the drain - they will become a crate for installing a waterproof wooden floor.
- Between the bars of the lathing, the insulation is laid with a foil layer upwards and fastened together with foil tape. The thermal insulator must completely cover the battens of the crate.

- A non-leaking, well-fitted fine wood flooring is laid from above at an angle.
Another option for insulation for wood and concrete floors
In addition to the ones presented above, there are still a very large number of different options for warming the bath floor. You can briefly talk about another possible way of arranging the floor using expanded polystyrene. The method is more laborious, but it is suitable for both concrete and wooden flooring.

1 - soil;
2- layer of sand;
3 - foam plates;
4 - cement mortar with foam crumbs;
5 - a layer of waterproofing;
6 - cement mortar with vermiculite;
7 - concrete screed;
9 - boardwalk.
- In this version, the space under the future floor will have to be deepened by 500 ÷ 600 mm, and the soil at its bottom should be well tamped.
- Then, a layer of sand 50 ÷ 70 mm thick is poured onto the bottom, which is moistened and compacted with a manual rammer.
- On top of this layer, a dense waterproofing film is laid, which should completely cover the bottom and be 200-300 mm on the walls. It must be securely fixed on its walls.
- Instead of expanded clay, which was used in the first versions, a layer of expanded polystyrene plates is laid on the film. Its total thickness must be at least 150 ÷ 200 mm.
- Further, a screed made of cement mortar and foam crumbs in proportions of 2: 1 is laid on the foam plates. The thickness of this layer should be 50 ÷ 70 mm. This layer will be not only insulating, but also strengthening for the slab material laid below.
- Then a layer of waterproofing is laid again - for it you can use a dense plastic wrap or roofing material. The canvases should be fastened together with waterproof tape.
- Next in this "pie" is a layer of concrete with vermiculite, mixed in proportions of 3: 1. Its thickness should be 50 ÷ 100 mm. Is a natural material that has high thermal insulation properties. Insects and rodents never settle in it, it is not subject to rotting and decay. The vermiculite layer will significantly increase the thermal insulation of the floor.
 It looks like a natural material - vermiculite
 The table shows the proportions cement-vermiculite solutions and their performance characteristics:
| Characteristics of solutions with vermiculite | |||||||
|---|---|---|---|---|---|---|---|
| Cement (kg) | 40 | 30 | 250 | 200 | 150 | 120 | 100 |
| Vermiculite (liter) | 130 | 130 | 130 | 130 | 130 | 130 | 130 |
| Water (liter) | 42.5 | 41 | 40 | 39.5 | 39 | 38.5 | 38 |
| Volume weight (kg / m³) dry | 60 | 50 | 43 | 39 | 34 | 31 | 29 |
| Compressive strength (kg / cm²) | 20 | 13 | 10 | 7 | 5 | 2 | 1 |
| Dry thermal conductivity (W / m × ° K) | 0.13 | 0.11 | 0.1 | 0,092 | 0,083 | 0,075 | 0,07 |
| Thermal conductivity at 5% humidity (W / m × ° K) | 0.17 | 0,145 | 0.13 | 0.12 | 0.105 | 0.09 | 0.08 |
| Sound absorption coefficient at a frequency of 1000 Hz | 0.37 | 0.51 | 0.54 | 0,56 | 0.6 | 0.64 | 0.73 |
- The hardened screed is reinforced with a reinforcing mesh with cells up to 100 mm, and beacons for the upper concrete screed are placed on it. Beacons are fixed on concrete or plaster mortar, at an angle of 5-7 degrees towards the drain.
- Further, concrete is laid on this structure, in the same proportions and combinations with modifying additives, as described above. The thickness of the screed near the drain must be at least 50mm.
- After the screed has been hardened, ceramic tiles are laid on it, or removable wooden floorings of wetted floors are arranged.

Boards in such semi secured at a distance of 15 ÷ 20 mm from each other - this will allow not only to quickly leave the water from the flooring, but also to dry out the wood. In addition, removable ones can be periodically exposed to the street for airing and drying, so you need to foresee their size in advance so that they pass freely through the bath door.

Thermal insulation of the walls of the bath
It is equally important, in addition to the floor, to reliably insulate the walls and ceiling of the bath rooms. The walls and ceiling of a brick or wooden bath are insulated according to the same principle, the only difference between them will be the thickness of the thermal insulation layer. Since wood has a lower thermal conductivity than brick, the latter will require fixing a thicker layer of insulation.
 Particular attention - to the insulation of the walls of the bath
 The process of wall insulation is carried out as follows:
- The walls are treated with an antiseptic compound - it will protect them from the appearance and spread of mold and mildew.
- Further, it is necessary to fix the hydro-vapor barrier film on the wall.
- The crate is mounted.
- Insulation is laid between the guides of the crate.
- A vapor barrier is attached.
- The slats of the counter-lattice are nailed - this will create the necessary ventilation gap.
- Facing material is installed.
The sequence of work is general, but walls made of different materials have their own characteristics.
Brick walls

- The lathing bars are fixed to the brick wall with a step of 600 mm. The size of the section of the timber should be equal to the thickness of the selected insulation. Usually, for a brick wall, slag wool in mats, 100 mm thick, is taken for insulation, which means that the thickness of the lathing guides should be 100 mm.

- Insulation is placed between the bars in the spacer. You can help fix it with a tight zigzag nylon cord.
- The next layer is a waterproofing film, which is fixed to the lathing bars. The overlaps between the canvases (at least 150 mm) are glued with waterproof tape.
- Further, counter-lattice slats are nailed to the bars.
- Then a foil-clad insulation with a thickness of 8 ÷ 10 mm is stretched over the entire surface, which is attached to the slats. The joints are sealed with foil tape.

- From above, the entire "pie" is sheathed with wooden clapboard, which is fixed to the same counter-lattice slats.
It should be noted that if foil insulation is used in the insulation process, then an additional vapor barrier layer can be excluded, since this type of insulation material perfectly holds back steam.
Insulation of a log wall

1 - log wall;
2 - basalt insulation with a foil surface;
3 - lathing bars;
4 - lining;
5 - ventilation gap between the insulation and the lining.
The walls of a log bath themselves have low thermal conductivity and retain heat well inside the room, provided that the joints of the logs are well sealed at the corners and with each other. Therefore, the insulation is carried out as follows:
- Basalt mineral wool with a foil layer is fixed to the wall, which must be turned towards the room. The thickness of the insulation is chosen from 50 to 80 mm. You can fix it with special fasteners with wide caps - "fungi", which are sunk into the insulation.
- On top of the insulation, wooden lathing bars are nailed vertically or horizontally.
- Further, the wall is sheathed, having a thickness of 10 mm - it is attached to the lathing bars.
Insulation of a wall from a bar
A wall of a bar should be, just like a log wall, well insulated by itself, that is, all cracks and gaps are caulked with tow. It is easier to attach all the components of the insulation "pie" to it, since it has a flat surface into which fasteners can be easily screwed in or hammered. It is warmed in the following sequence:

- A lathing made of a bar is attached to the wall, at a distance of 600 mm from each other.
- Further, an insulating material is laid between the bars - it is better if it is mineral wool.
- Then the entire structure is closed with a roll of foil-clad insulation, which is fixed on the lathing bars, and the joints of individual canvases are glued together with foil tape.
- Counter-battens are nailed on top of the bars, which will create a ventilation gap between the insulation and the lining.
- At the end of the process, the insulating "pie" is sheathed with clapboard.
I must say that there are other options for laying layers of insulation, but the above are considered the most popular and often used, since they are quite simple and have long been tested in practice.
Ceiling insulation
The ceiling can be mounted and insulated in three ways - you can choose any of them if it is suitable for the existing structure of the bath.
Panel ceiling
This ceiling is assembled from panels, which already consist of all layers necessary for vapor barrier, insulation and inner cladding, fixed on support bars. Mineral wool, which has a thickness of at least 100 mm, is most often used as a heater in the panel.

Shields are mounted at the bottom and rise up in finished form. A feature of such insulation is that insulation gaskets must also be laid between the finished panels - this process is carried out after the panels are fixed on the floor of the bath.
Lifting the panels up can be complicated by the fact that when assembled, they have a rather large weight, so very often they are lifted in parts and assembled at a height.
False ceiling
A false ceiling is fundamentally different from a panel ceiling in its design, since its installation is carried out according to a different principle, somewhat similar to wall insulation.

- The frame for such a ceiling is the attic floor beams, laid with a step of 600 mm.
- From the side of the attic room, waterproofing is laid on the floor beams, which should cover the entire ceiling area.
- On the waterproofing, also from the attic side, a wooden flooring is fixed.
- Insulation is placed between the floor beams.

- Then the insulation is closed with a vapor barrier or foil material, which is fixed to the floor beams.
- The last step is to cover the ceiling with wooden clapboard.
There is another option for warming a false ceiling, using other insulation materials, for example, expanded clay. In this case, almost all work is carried out from the attic side, except for finishing the ceiling surface with clapboard.
Deck ceiling
The decking ceiling also differs from the two already mentioned in its design, in particular - by the fact that it is laid directly on the walls of the room, that is, in principle, it does not rest on the floor beams. For such a ceiling, boards are used that have a thickness of at least 30 mm.

From the side of the attic, a vapor barrier and insulation are laid on a board made of boards, which are covered from above with a waterproofing film and plywood or board flooring.
The advantages of this design can be attributed to the speed and ease of installation, but this version of the ceiling can only be used when insulating a small bath room, with the distance between the walls no more than 2.5 ÷ 2.7 m.
A detailed publication with a description of all the materials necessary for this and step-by-step instructions can be found on the pages of our portal, following the recommended link.
If the installation of thermal insulation and auxiliary materials is done correctly, then the heat in the bath rooms will remain for a very long time, which will help to significantly save on fuel.
In conclusion - a detailed video tutorial on warming a bath, built using frame technology.
Video: warming and finishing a frame bath )
0 % ( 0 )
0 % ( 0 )
To see the results, you need to vote
In order for the bath room to please with warmth, absence of drafts and dampness, it is required to properly insulate the walls, floor and ceiling. You also need to know which insulation is best used for outdoor or indoor work.
Basic requirements for the material for bath insulation.
- Moisture resistance.
- Fire resistance.
- High vapor barrier.
- Resistant to decay.
- Resistance to deformation with a sharp change in temperature.
Materials that can be used for indoor and outdoor use are divided into three types.

Also, heaters can be divided by composition and filling.

When insulating a bath, it is required to sheathe all planes of the room with insulation: floor, walls and ceiling. Only in this case there will be no heat leaks and water procedures will be as comfortable and pleasant as possible.

Bath insulation should be started from the floor. As a rule, in rooms with high humidity, the arrangement of two types of floors is practiced: leaking and continuous. Solid structures are supplemented with a central drain, and the leaking ones are equipped with a crate, under which water flows into the drain, mounted below the level of the finished floor.

The floor beneath the wooden crate, through which the water flows out, resembles a multi-layered sandwich made of various materials. All materials for insulation must be installed sequentially.
Step 1
To equip leaking floors with insulation, you need to dig a hole 60 cm deep. The dimensions of the hole should coincide with the perimeter of the washing room or steam room.
Step 2
The bottom of the pit must be flat and dry. At the bottom, you need to pour a pillow of sand and tamp it carefully. The height of the pillow is 5-6 cm.
Step 3
Foam plates are laid on top of the sand. The material must be at least 20 cm wide. The joints of the slabs must be carefully matched to each other, there must be no gaps.
Step 4
On top of the slabs, a solution is poured, consisting of a mixture of cement and finely crushed foam, 50-60 mm thick. The solution should dry.
Step 5
A waterproofing material is laid on top of the concrete screed; ordinary roofing material can be used. The edges of the roofing material should overlap the walls.
Step 6
A cement screed is poured onto the roofing material, into which vermiculite is added 1 to 1. Screed thickness - 50 mm.
Step 7
Reinforcement. For these purposes, a reinforcing mesh is laid on the screed.
Step 8
A concrete screed is poured over the mesh again, to which fine gravel has been added, the recommended layer thickness is 50 mm.
Step 9
Installation of posts to support the wooden floor.
Step 10
Floor covering with technical gaps through which water can escape.
Important: the installation of the drain pipe must be carried out before starting the insulation. The last layer of the screed should be poured at a slight incline towards the drain so that water does not accumulate on the concrete floor.

Warming of continuous floors in the bathhouse is carried out in the same way as in residential buildings.
Insulation is best laid during construction work. It is optimal to build a double floor structure: rough and finish.
Insulation that is most suitable in terms of technical characteristics and price, for example, mineral wool, is located between the finishing and rough layers of the boards. It is recommended to lay a waterproofing material on top, which will prevent the insulation from getting wet.

It's important to know! It is best to install ceramic tiles that are resistant to high humidity in the washing room.
Internal wall insulation in baths built from various materials
Brick baths are insulated during construction. You can use both bulk and slab-like material. Loose insulation, for example expanded clay, is covered with layers, between which lime mortar is poured. Layer-by-layer filling reduces the thermal conductivity of the walls by filling the voids with mortar.

Insulation in the form of slabs is attached to the walls using special fittings. It is recommended to additionally attach a vapor barrier on top of the plates, which protects the insulation from moisture and high temperatures.

Panel and frame baths are insulated using lightweight materials that do not create additional stress on the frame. Polyfoam, expanded polystyrene, reed or fiberboard plates are the best insulation materials for frame structures. The material is fixed to the walls; there should be no gaps between the slabs. On top of the insulation, a vapor barrier layer must be installed, which prevents the absorption of moisture by the plates.

For insulation of walls and ceilings made of natural wood, the most successful option is glass wool mats or mineral slabs.
Also, slabs with a one-sided foil layer - isover, ursa - are in special demand - these materials perform two functions at once: they are a vapor barrier and a heater.

In regions with cold climates, the use of several types of insulation materials is practiced at once, which helps to minimize heat loss.

For internal insulation of a bath from a bar, the following materials and tools are required:
- insulation in the form of slabs;
- vapor barrier film or isover;
- construction tape;
- beams with a section of 50 to 50 mm for a double frame;
- lining for finishing walls;
- self-tapping screws;
- screwdriver;
- hammer.
Step 1
Assembling the frame from beams. Mats with insulation will be attached to the inside of the frame. The recommended pitch of the lathing is 50 by 50 cm. The beams are screwed to the log walls and ceiling of the bathhouse with self-tapping screws.
Step 2
Placement of insulation inside the frame. Plates should fit snugly against the beams. It is important that the thickness of the insulation is no more than 5 cm.
Step 3
All slabs placed inside the frame must be secured. For walls, construction wide tape is best suited for these purposes. All joints between the timber and the insulation are glued with adhesive tape. To fix the slabs to the ceiling, you need to purchase plastic disc-type dowels. It is also recommended to seal the seams with tape.
Step 4
An isover or other vapor barrier with foil is mounted on top of the main insulation.
Step 5
On top of the isover, a crate made of timber is stuffed. The second lathing will perform 2 functions: provide an air gap and serve as a frame for fixing the lining.
Step 6
Fastening the lining.

Video - Ways to insulate a bath from the inside
It is recommended to install insulation material from the street side on the walls of the bath in several cases: if the air temperature in winter is constantly below 20 degrees (regions with a cold climate) or if the bath room is connected to the heating system of the house. It is also recommended to additionally insulate structures that are built of blocks or bricks.

It is considered impractical to fasten insulation to the walls of a bathhouse made of logs or beams, especially in regions with a temperate and warm climate, but it is imperative to seal all cracks and joints between wooden crowns and beams. For these purposes, felt, jute ropes, moss or special silicone sealants are used.
Bricks and blocks are affordable building materials, which is why they are often used to build bathhouses.
The thermal conductivity of bricks and blocks is quite high, due to which they do not retain heat well. Accordingly, in saunas built from these materials, it is recommended to carry out double insulation: outside and inside.
Step 1
Fastening the frame. For the frame, you can use a wooden beam or a metal profile. The frame is attached to the anchors.
Step 2
Insulation is placed between the frame battens: mineral wool, polystyrene or expanded polystyrene.

Step 3
All joints between the insulation and the frame are sealed with reinforcing tape.
Ideally, you need to mount two layers of insulation. The second layer of material should overlap the seams of the first. In this way, heat losses are absolutely minimized and drafts in the washing and steam rooms are prevented. But this method is not popular due to additional material costs.
Step 4
Installation of waterproofing film. A moisture and windproof protection is attached on top of the insulation.
Step 5
On top of the film, strips or special brackets are stuffed. Finishing materials are attached to them: siding or lining. It is required to leave a technical gap (5-6 cm) between the film and the finish for air circulation. The air cushion will help prevent condensation and mildew from forming on the inside of the finishing material.

A properly insulated bath retains heat well for a long time. With the correct selection and consistent fastening of all materials, there are no drafts, dampness and an unpleasant odor in the premises.
Video - Expanded polystyrene. Advantages and disadvantages.
Eh, a bathhouse-bath, as it is good, sometimes to sit in a steam room, to relax, but this cannot be done if it is difficult to maintain the required temperature in it. This happens in most cases due to poor thermal insulation or violation of technology during its installation. How to insulate the walls of the bathhouse from the inside, so that nothing could overshadow the joy of visiting the steam room? I'm going to give the answer to this question in this article. Read, don't get distracted.
The advantages of internal insulation
Yes, yes, we will talk specifically about internal insulation, since this method has fundamental advantages over insulation of a bath outside. There are at least three such advantages that come to mind.
The first is the ability to reduce heat loss in an already built bathhouse, but during the construction of which, mistakes were made when insulating the foundation. This defect cannot be corrected by insulating the building from the outside, since the heat will escape through the floor, and it can only be isolated from the inside.
The second advantage is purely economic. Thermal insulation of a bath from the inside requires much less materials than full cladding with thermal insulation and cladding of the entire building - the area of work is much smaller. In addition, insulating the bath from the inside, often the main work is carried out only in the steam room, which is even smaller in size.
Of course, other premises, such as the dressing room, the shower room also need to be insulated, but the degree of material consumption for them is several times less than for the steam room, therefore, all this takes an order of magnitude less money.
The third benefit only comes into play if the winters in your area are particularly harsh. In this case, the bath must be insulated both outside and inside, especially if the building is built of brick or aerated concrete. Even log baths, which are known for their thermal insulation properties without special treatment, in such winters will not do without additional internal thermal insulation.
The choice of material for insulation
At the moment, a huge number of different heaters for walls are presented on the construction market. But not all of them are suitable for a bath. You need to choose thermal insulation based on two facts:
- The conditions in which the thermal insulation will fall;
- Characteristics of the insulation material itself.
The first fact is the operating conditions. In the bath, they are more than aggressive, high humidity and temperature. Its big drops, especially in winter. From the street side, frost will "press" on the insulation, and on the other hand, heat. This combination will inevitably lead to condensation.
In addition, the high temperature turns many popular insulation materials hazardous to human health. Also, do not forget that the bathhouse is a building with an increased risk of fire, so there is no need to insulate it with materials that burn well.

As for the characteristics of the material, they must correspond, again, to the operating conditions. To make it clearer, I will give an example of thermal insulation, which should not be used when insulating a bath. This material is ecowool. Yes, she is an excellent heat insulator, but her tendency to accumulate moisture spoils everything. When ecowool is wet, it loses its properties.
What materials cannot be used to insulate the bath?
In addition to ecowool, it should be a taboo for you to insulate the walls of the bath from the inside using foam, other materials based on it, such as penoplex, and also forget about using classic mineral wool as insulation. I explain why they are not suitable.
At high temperatures, polyfoam and all its derivatives begin to emit harmful substances that can lead to suffocation, in the conditions of a steam room this may not even be noticed. In addition, the foam burns well, which is not good.

As a binder in classical mineral wool, formaldehyde resins are used, their vapors are destructive to humans. Yes, all manufacturers declare that these fumes do not exceed the norm. But who cares if this is the norm of the poison. And besides, this rate stands out under normal conditions, and the bath does not differ in such.
What materials are suitable for insulation?
- Peat blocks;
- Sawdust;
- Foam glass;
- Acrylic based mineral wool.
Peat blocks. This is regular peat mixed with natural fillers such as sawdust or straw. From these materials they make "porridge" by dissolving it in water, with the help of molds and a press, and produce blocks. They do not rot, do not burn, perfectly absorb, and also give moisture back. They have good heat and sound insulation.
Sawdust is a common production waste when sawing wood. Despite its small size, it is still wood, and it has good thermal insulation. The wall in the bath is insulated with slips, filling them into niches, which are previously covered with a vapor barrier and waterproofing.

Fiberboard - wood fiber boards, are nothing more than pressed wood chips. They have rather mediocre thermal insulation, but they are also inexpensive.
Foam glass. As the name implies, foam glass is foam glass with excellent thermal insulation characteristics. Does not emit harmful substances, does not burn, is indifferent to moisture. In my opinion, foam glass is the best option for warming a bath, but there is a drawback, like any other good product, the price of it "bites". But if the issue of saving is not an edge for you, then choose foam glass, you will not regret it.
Acrylic based mineral wool. These are the same slabs of mineral wool, with practically the same characteristics, but not emitting harmful substances. This is because the binder is not formaldehyde, but acrylic resin, which is absolutely inert to any chemical compounds and temperature extremes.
Thermal insulation technology "Pie"
This technology has this name because of the several layers that make up the wall after the completion of the insulation work. The first layer is the load-bearing wall, the second is insulation, the third is the vapor barrier, and the fourth is the wall cladding, which is usually a wooden lining in the bath. To make it clear how to operate using this technology, I will give an example of how a bath can be insulated with mineral wool on acrylic resin.
The technology provides for starting insulation from the ceiling and ending with the floor. The "Pie" begins with mounting wooden blocks on the surface. They will serve as the basis for mounting mineral wool slabs, which, by the way, will be fastened to the spur, without the use of any additional fasteners.

In order for the insulation plates to reliably fall into place, the distance between the wooden bars of the frame should be 1 cm less than the width of the insulation, only in this case you can be sure that the insulation will not fall out. After the frame is ready, you can start stuffing it with thermal insulation. Make sure that during installation, the edges of the mats are not crushed, as this can negatively affect its properties.
Important: When installing insulation, all its component parts must fit snugly together. This is also necessary because if a gap remains between the plates, moisture will accumulate in this place, and a so-called cold bridge will form, through which heat will leave.
After installing the insulation, it must be covered with a vapor barrier. It can be a traditional roofing material or more modern foil vapor barriers. The side that is covered with foil must “face the interior of the room to reflect the heat back. All seams and joints of the vapor barrier must be sealed with aluminum tape.

Further, after all the seams of the vapor barrier have become airtight, you can begin to make the crate, on top of the vapor barrier, on the protruding bars of the frame. When installing, keep in mind that the distance between the vapor barrier and the future cladding must be at least 5 cm. This is necessary so that the condensate drains freely, otherwise it will fall on the lining, which will quickly rot because of this.
Features of steam room insulation
The main feature of steam room insulation is the concentration of insulation in this room compared to others. Since the steam room is the main room of the bath, it is necessary to create conditions so that as much heat as possible remains in the room, and at the same time ensure good ventilation.
In order to warm the steam room conscientiously, as already mentioned, you need to use high-quality thermal insulation, and observe the technology of its installation at all stages, from surface preparation and installation of the frame, to the last stage, wall cladding with wooden clapboard. Once again, I would like to emphasize the importance of a good sealing of the vapor barrier joints and a dense installation of insulation.

Sometimes it is permissible to use several layers of insulation, but even in this case, do not forget that you need to leave an air space between the vapor barrier and the finishing wall cladding.
Insulation of the ceiling, floor and roof
Thermal insulation of all surfaces in the bath, technologically, has a few differences. They consist of only a few nuances, and the basic rules are relevant both for walls and for a floor with a roof.
For example, as already mentioned, bath insulation starts from the top, that is, from the roof and ends with the floor, there are several reasons for this. Firstly, it’s more convenient, you see, it’s easier to systematically descend than to rush from the wall to the roof, and then to the floor.
Secondly, all surfaces must have uniform thermal insulation. That is, the heat-insulating materials must adhere tightly to the same elements, but already on a different surface, and the vapor barrier must also overlap onto the next surface.

For example, the roof and ceiling insulation should be adjacent to each other, the vapor barrier on the ceiling overlaps the walls in order to further connect it with the vapor barrier on the wall using aluminum tape.
In turn, the thermal insulation and vapor barrier of the walls are connected to the floor in the same way. Observing this technology, it turns out to achieve uniformity of thermal insulation and complete sealing of the room so that steam does not leave the room. The latter is especially true for the steam room.
Video "We sheathe the bath from the inside"
A video explaining the stages of work using the example of a bath with an already mounted frame and almost ready-made surfaces for the installation of insulation.
Internal insulation of a bath is one of the most important stages in the arrangement of this structure. Without high-quality thermal insulation, the owner will have to spend much more resources on heating the steam room, and the very atmosphere in the bath without properly installed protection will leave much to be desired.
For a long time in Russia, moss, felt and even flax were used to insulate a bath, mainly due to the lack of other insulation - plant fiber either rots or dries, therefore today it is not used for the main thermal insulation.

Red moss - insulation
The main difference between bath insulation and a similar event in an ordinary house is simple: in the steam room you need to keep the heat for as long as possible, i.e. the high temperature should remain indoors for as long as possible.

Thermal insulation work in the bath can be carried out using a wide variety of materials. For example, a modern insulation based on stone wool with a foil-coated coating is an ideal solution - it does not burn, withstands temperatures up to 750 degrees, effectively retains heat, does not rot, and is not of interest to rodents.
After reviewing the information below, you will get a complete theoretical understanding of the process of performing the internal insulation of the steam room, as well as study the step-by-step instructions for self-installation of thermal insulation materials.
Any construction and repair and finishing activities begin with the preparation of materials, without which it will be simply impossible to carry out the planned work. Pay due attention to studying the list below: it is better to spend a little time reading and immediately buy everything you need, than then return to the store and buy what you forgot.
Insulation
The main component of the list under consideration. The modern market offers the widest range of heat-insulating materials, but not all of them are suitable for use in a steam room - humidity and temperature may be too tough. For thermal insulation of a bath, the following are most often used: expanded clay (floor insulation), materials based on stone wool, as well as expanded polystyrene.
Important! It is strongly discouraged to use foam for insulation directly in the steam room - at high temperatures, material of dubious quality is likely to emit substances harmful to human health.
Comparative characteristics of the mentioned materials are shown in the following table.
Table. Comparison of popular heaters for a bath
| Evaluation criterion | |||
|---|---|---|---|
| Structure | Loose material of natural origin. Presented in the form of granules with a cellular structure. | Fibrous structure. The arrangement of the fibers is both vertical and horizontal, irregular. | Open cellular structure. |
| Moisture permeability | The material does not allow water to pass through. | Mineral wool insulation has practically no tendency to absorb moisture. | Moisture permeability is extremely low. |
| The weight | Light | Medium-light | Light |
| Strength | High | Average | Average |
| Compression resistance | High | Low to medium, depending on the specific type of material and manufacturer's technology. | Average |
| Toxicity | Material is safe | No toxic properties | Over time, it begins to release harmful substances |
| Suitable for use under high loads | Fit | Depending on the grade of material | Not suitable |
| Decay propensity | The material retains its original integrity for a long time | Durable insulation | Has a tendency to decay |
| UV resistant | Does not react in any way to exposure to sunlight | Characterized by high UV resistance | Prolonged direct exposure to sunlight has an extremely negative effect on the performance of the material. |
As noted, expanded clay is suitable for warming bath floors. Bulk material allows you to provide the required thermal insulation for both wood and concrete structures. Mineral wool insulation is ideal for insulating both walls and ceilings. The best option, as noted, is a stone wool-based thermal insulation material equipped with an additional foil coating - the key characteristics of such heaters at a higher level.
Mineral wool prices
mineral wool

In accordance with the current provisions of the technology for carrying out the work under consideration, the joints of the insulation plates are necessarily glued with foil tape. This will create a sealed surface with the highest thermal insulation properties.
Foil tape prices
foil tape

The elements of the heat-insulating coating are placed in the cells of the pre-assembled lathing, for the assembly of which wooden blocks are used. Select the cross-section of the beams in accordance with the thickness of the thermal insulation. For example, if you are equipping a 10 cm thermal insulation layer, use bars of the same thickness or width to assemble the frame.
Choose the distance between the bars 1-2 cm less than the width of the plates or a roll of insulation. For bulk materials, the optimal distance between the bars is 45-60 cm.

The fixing of the elements of the lathing (bars) is carried out using dowels / self-tapping screws (if the surface is wooden) or anchors (if the base is stone). The length of the fasteners is also selected in accordance with the base material: for wood - 2-2.5 cm, for capital structures - from 4 cm.
The specific length of the fasteners is determined in accordance with the specifics of their use. For example, during the installation of the lathing, the fasteners must be of such a length that high-quality fixation of the beam / profile of the selected section is ensured. Directly the cross-section of the timber, as well as the parameters of the profile, are determined in accordance with the thickness of the heat-insulating layer to be equipped.
Additional materials
If the bath is insulated with a material other than foil-clad mineral wool, you will additionally have to purchase a hydro-vapor barrier film.

If the pouring of a concrete screed is planned, the work kit will increase to include the following items:
- reinforcing mesh;
- a mixture for pouring a screed or materials for its self-preparation (cement, sand, water);
- lighthouses;
- damper tape;
- polyethylene.
Prices for waterproofing film
hydro-vapor barrier film
The floors in the bath can be wooden or concrete. The technology of arranging the heat-insulating layer itself does not have any special differences depending on the material for making the floor, except that in the case of a concrete structure, more expanded clay will have to be poured.
The thickness of the backfill is usually determined in accordance with the thickness of the walls. On average, a layer of expanded clay is poured at least 2 times thicker than the walls. If the height of the room allows, the thickness of the backfill can be further increased - this will contribute to an increase in the efficiency of insulation.
First, for greater convenience of work and subsequently more accurate control of the evenness of the backfill, mark the base. To do this, it is enough to divide it with parallel lines into sections up to 1 m wide or according to the length of the rule you use.
Important! If you are insulating the floor on the ground, at the very beginning, even before marking, you must do the following:
- thoroughly compact the ground inside the base (if the foundation design assumes the presence of "free" soil, for example, in the case of tape supports);
- cover the walls with waterproofing impregnation;
- cover the soil with a 10-centimeter layer of sand, spill it with water and tamp it thoroughly;
- cover the sand with roofing felt with a 15-centimeter overlap on the walls. Lay individual sheets of roofing material with a 15-centimeter overlap. Use waterproof construction tape for bonding.
The direct procedure for insulating the floor with expanded clay with illustrations and the necessary explanations is given in the following table.
Table. Thermal insulation of the bath floor with expanded clay
| Stage | Illustration | Required explanations |
|---|---|---|
| The film must be stretched so that its edges along the wall are above the floor level. If the base is already covered with roofing material, there is no need to lay the film. |
|
| For example, a drywall profile is well suited. The guides are aligned according to the previously marked lines and secured in a suitable way, for example with screws or nails. | |
| Level the lighthouses. In the future, these accessories will help you fill the most even layer of expanded clay, which will ensure the best quality of further planned work. Determine the installation height of the guides in accordance with the required thickness of the thermal insulation layer. Many developers do without guides, but this is a less convenient and accurate option. |
|
| We pour expanded clay |
| The previously installed guides will help to do this as efficiently as possible. |
| For leveling, we use a rule or an ordinary rail of a suitable length. | |
| For more convenience in leveling the insulation, we can use various accessories. For example, in large areas, a rake is useful. |


The floor is insulated and ready for further development in accordance with the plans of the developer. At the discretion of the owner, additional heat-insulating material, for example, mineral wool or expanded polystyrene, can be laid on top of the expanded clay.
As an example, a diagram of a concrete floor equipped with expanded clay for thermal insulation is shown.
Video - Floor insulation with expanded clay
Thermal insulation of bath walls and ceilings
Wall insulation schemes will differ slightly depending on the material of manufacture. Information about this is presented in the following table.
Table. Wall insulation schemes
| Manufacturing material | Scheme |
|---|---|
|
|
1 - wall, 2 - thermal insulation, 3 - lathing, 4 - sheathing, 5 - ventilation gap. |
|
|


The sequence of thermal insulation work remains the same for walls made of any materials: if necessary, a hydro-vapor barrier film is attached, lathing bars are mounted, insulation is placed in the resulting cells, another layer of hydro-vapor insulation is fixed on top (if necessary), lathing slats are nailed for finishing sheathing (at the same time they will provide the required ventilation gap), the selected finishing material (usually lining) is mounted.
The ceiling is insulated in a similar sequence. An example of a ceiling insulation scheme is shown in the following image.


Information regarding the step-by-step insulation of the walls and ceiling of the bath is given in the following table.
Important! Insulation will be carried out with a mineral wool material with a foil layer, which eliminates the need for preliminary attachment to the surface of the hydro-vapor barrier material. The order of work is considered on the example of wooden surfaces. For concrete walls and ceilings, the recommendations are the same, the only thing is that you need to use other fasteners and for greater convenience, wooden guides can be replaced with a metal profile.
Table. The procedure for insulating walls and ceilings in the bath from the inside
| Stage of work | Illustration | Required explanations |
|---|---|---|
| Information regarding the elements used for arranging the frame, as well as fasteners for fixing the guides in different cases, was given earlier. The step of mounting the guides is selected in accordance with the width of the insulation. Typically, this is about 60 cm, it can be reduced to 59-59.5 cm so that the thermal insulation elements fit as tightly as possible. |
|
| Slab laying rules |
| Beforehand, we must put on gloves - the contact of “bare” skin with mineral wool does not give the most pleasant sensations. We put the foil material inside the room with foil - thanks to this, the heat will not only linger, but also be additionally reflected into the steam room. |
| Plates are installed in the frame and do not need additional mechanical fastening. | |
| Installation of slabs on the wall |
Installation of slabs on the wall | The sequence and recommendations for wall and ceiling insulation are similar. To insulate the partition separating the steam room from the adjacent room, a layer 50 mm thick is usually sufficient. |
| Thermal insulation of the outer wall requires a thicker layer - 100-150 mm (in regions with a particularly cold climate - up to 200 mm). | |
| In order to save money, the insulation can be made two-layer, by equipping one layer of ordinary mineral wool, and the second, which will "look" into the room, from a material with a foil coating. | |
| The use of such a heater, as noted, eliminates the need for additional waterproofing materials. |
|
| Having filled the frame with heat-insulating plates, we glue the seams and joints with foil tape. | |
| A 1 to 2 cm gap is sufficient. The external finish will be attached to the same crate in the future. Important! The order of further installation of the lining depends on the location of the laths: if the laths are fixed vertically, the lining must be fixed horizontally, and vice versa. |
|
| The best material for the interior cladding of a bath is lining. The choice of the material for making the cladding is at the discretion of the owner. The fixing of the cladding elements is traditionally carried out using screws / self-tapping screws. |


Video - Insulation of walls and ceiling from the inside
Now you know everything about how to properly insulate a bath with your own hands using the most optimal thermal insulation materials for this. The information obtained will help you cope with the planned activities on your own, eliminating the need to contact third-party masters and significantly saving money.
Happy work!
Video - Thermal insulation of the bath from the inside scheme