The destructive process, which ends sadly for the home environment, is not carried out by cats out of harm. Nature forces them to sharpen their claws.
Although small predators were not successful in size, they retained the basic instincts of their wild counterparts. Well, a cat can’t help but sharpen its claws.
That’s why forward-thinking owners purchase or build scratching posts for their furry pets in advance.
We’ll talk about how to make a scratching post for cats with your own hands.
It is not at all necessary to run to the pet store and buy exquisite works of art in the form of entire wooden spans for sharpening claws. You can build the simplest model of a scratching post yourself. In this article you will learn how to make scratching posts for cats with your own hands.
What is a scratching post for?
In the natural environment, large and small predators of the cat family, take, for example, or, grind their claws on tree trunks.
This procedure is vital for animals.
The claws grow quickly, they begin to interfere with the movement of the predator, and can even grow into the body, causing pain to the animal.
To avoid such troubles, animals constantly grind their claws on hard surfaces.
Domestic cats, be they long-haired breeds like or, are deprived of this opportunity, unless, of course, you have a tree growing at home.
But it definitely isn’t growing, which means you should take care of purchasing a “claw picker.”
Why "claw pickers"? Yes, because, as it seems to you, the cat is tearing up your sofa or carpet, and not sharpening its claws at all.
However, the cunning cat knows that he is doing a manicure, and it is impossible to prevent him from doing this - nature demands it.
This means that you should meet nature and the desires of your pet.
However, it is not at all necessary to run to the pet store and buy exquisite works of art in the form of entire wooden spans for sharpening claws.
You can build the simplest model of a scratching post yourself. It will cost you much less than buying it.
And you will get much more pleasure from your own creativity than from a finished product.
Before we begin construction, we will determine the properties that a self-made scratching post for cats must meet.
- Sustainability. The design must withstand the active pressure of the animal, seeking to eliminate the factor that is bothering it. Simply put, your scratching post must withstand the weight of the animal and not fall under the pressure of its powerful paws, even if it is a large breed, or.
- Compactness. It’s great if you live in a large apartment and can afford to create a personal office for your furry pet. Then a multi-level bookcase can be built, but most often we don’t have enough space anyway. This means that our scratching post should be small in size.
- Durability. Seeing what furniture upholstery turns into after several cat manicure sessions, it’s worth thinking about the reliability and durability of the materials for the scratching post.
If you are interested in a complete list of large breed cats, you can read the article
- Beauty. No matter how you turn it, the cat in the toilet or hallway won’t even pay attention to your work. The scratching post is installed in one of the rooms, freely accessible for the animal. Since it automatically becomes an element of the decor, it is necessary that the product fits organically into it.
Scratching posts can be horizontal or vertical, but the design of the structure is chosen by the one who builds it.
Let's take the simplest option for construction, having mastered it, you can create a more complex structure over time.
Important! Observe your cat to find out in what position she prefers to sharpen her claws. Just look at what gets more use in the house, the back of the sofa or the carpeting.
Materials for production
Let's make a list:
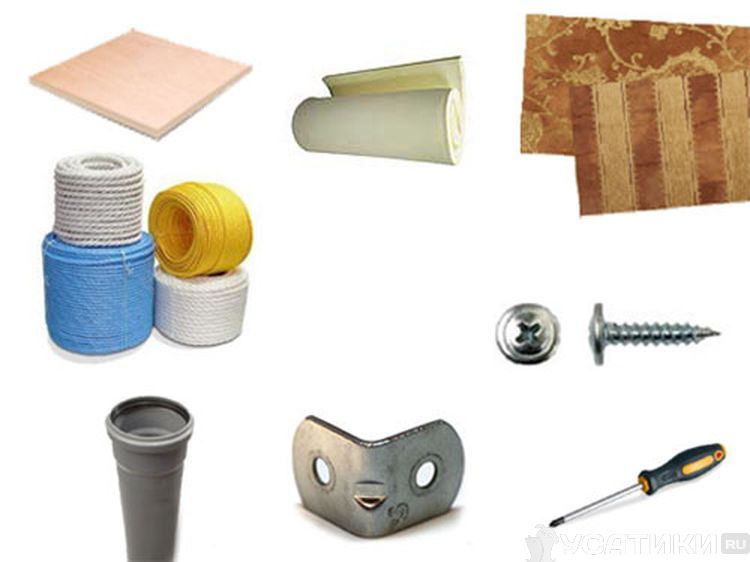
- A wooden block 50 - 70 cm high (two lengths of your cat's body without a tail) and a square side of 5-6 cm.
- Hemp or jute twine, thread diameter 4 - 7 mm. We don’t measure the length of the twine; we buy 2 ready-made skeins in the store. If you don't have enough, you can always buy more. You can use hard carpeting as a material for a nail clipper; choose what is preferable to you.
- A piece of plywood or board for the base. The square size is 40x40 cm and 15 - 20 mm thick.
- A scrap of faux fur, tapestry, or furniture upholstery for finishing the base. We take the size so that it is enough to cover the top and sides of the base.
- A piece of the same material as used to cover the base, but smaller in size to cover the top of the block.
In the toilet or hallway, the cat will not even pay attention to the scratching post. It is installed in one of the rooms, freely accessible for the animal. Since it automatically becomes an element of the decor, it is necessary that the product fits organically into it
Important! Choose only durable natural materials for twine; cellulose twines quickly fray and can harm the animal’s health if they get inside it.
Tools for work
- Wood glue
- Screwdriver
- Self-tapping screws
- Hacksaw or jigsaw for cutting parts
Assembly
If required, we cut out the parts according to the specified dimensions.
Now that we have everything ready, let's start assembling.
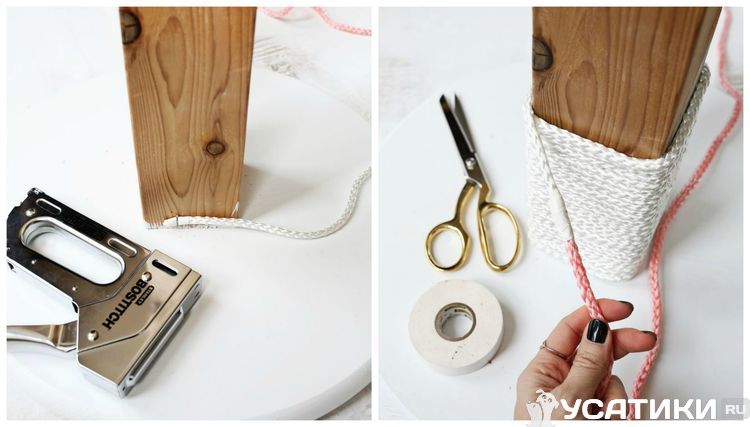
We wind twine onto the block, coating the surface of the block with glue every 100 mm.
This procedure will help secure the twine more firmly. Having reached the top of the bar, we carefully glue the last two turns.
We also apply a layer of glue to the top of the block and cover it with a fabric flap. Trim off excess material.
We cover the base with material. We cut a hole in the fabric, in the center, with a side length slightly less than the side of the bar. (The hole can be cut in advance).
We attach the block to the base using self-tapping screws. After securing, check for looseness: the block should not act as a pendulum, it must stand firmly.
If the base lifts, weigh it down with additional weight.
Our scratching post is ready. All we have to do is wait for her acceptance by our beloved cat.
Too lazy to look for a block, use only a sheet of plywood. It must be covered with twine in the same way and placed horizontally on the floor or nailed to the wall.
Important! Don't be alarmed if you find your pet's claw near the scratching post. The thing is that the cat does not sharpen its claws; like a snake, it sheds dead plates, making room for the growth of a new claw.
If you buy a multi-level cat house, most likely there will already be a built-in scratching post. But it’s more interesting to do it yourself, isn’t it?
The imagination of folk craftsmen, as always, is limitless.
Cat owners familiar with carpentry create scratching posts disguised as real works of art.
We have prepared options for a DIY scratching post for cats, photos of which we present to your attention.
The scratching mat looks very aesthetically pleasing. And you need less materials for it, and it is convenient to place it.
Some craftsmen offer their pets not just a rug, but a “sea wave” with several bends.
The scratching post can be turned into an amazing ottoman that will fit perfectly into any interior. Or give the design the shape of a fish.
The scratching post with the figure of a dog looks great. The subtle subtext makes you smile, and the cat enjoys taking revenge on the eternal enemy with health benefits.
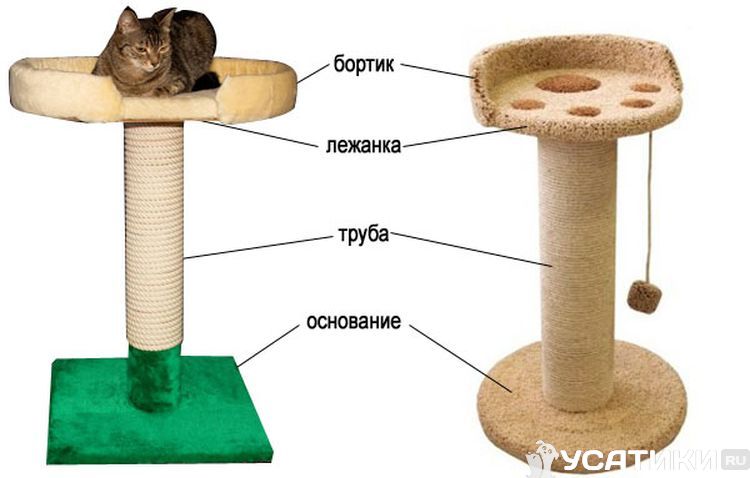
If you try, you can combine it with a scratching post for a cat. A shelf with edges is attached to the top of the block, and the structure is ready.
For those who have more than one pet in the house, a multi-tiered composition would be the best option.
Advice: You can paint the scratching post any color, it doesn’t matter to cats, but for your interior the color combination will definitely play a positive role.

In situations where a pet begins to damage furniture and wallpaper by scratching them, a scratching post made according to a master class will be the best assistant. If you figure this out well, the task will turn out to be completely uncomplicated, especially considering how much benefit you will get from it.
Since this habit is inherent in the nature of the animal, you cannot scold your pet for its tricks. With a homemade scratching post, the cat will be able to calmly sharpen its claws, and the owner will forget about the problems with the scratched sofa.
You can choose the right scratching post for any apartment, based on its size and design concept. Our master class suggests making one of the following scratching post options for cats:
- scratching post in the shape of a cone, wrapped with ordinary rope, which is glued to the base

- a rectangular product covered with natural fabric to make it convenient for the cat to sharpen its claws on it

- compact scratching posts with fleecy fabric placed on the wall

- houses that combine both a place for a cat to sleep and vertical columns for sharpening claws

- scratching post resembling an ordinary board, which is tightly wrapped with rope

- corner design, which is placed at an angle for the convenience of the pet

Any option can be adapted to suit your apartment and make it convenient for the cat, and if necessary, the structure can be installed exactly in those places where the pet likes to sharpen its claws.
Our master class on creating a scratching post is very simple. If you do not have the opportunity to purchase any materials for its manufacture, there will be suitable things in the house to construct a scratching post according to the diagram. It can be:
- any remnants of coverings (fabric, carpet, etc.) that will be comfortable for the cat;
- small but stable plastic pipes;
- remnants of furniture that has already outlived its usefulness.
It is important to take into account the fact that for manufacturing you need to select materials that will not leave debris as a result of sharpening the claws. You can take a ready-made form as a basis or use cardboard, but it is better to wrap it with fabric or rope on top.
Step-by-step making of a cardboard scratching post
One of the simplest and most affordable materials for a scratching post is cardboard, because it can be found in almost every home. This product will serve your pet for quite a long time, so its production will be not only easy, but also practical. To work you will need to take:
- pencil;
- ruler;
- ordinary cardboard;
- stationery sharp knife;
- fabric or rope for decoration.
You don’t need to have any specific skills to make such a scratching post according to our scheme. Follow the steps below and construct it yourself, without much difficulty or expense:
- Drill a hole in the center of the board.
- Attach the cardboard to a wooden dowel that also has a hole drilled in it, right in the middle.
- Screw the screw into the base, holding it with a screwdriver, and screw the dowel onto it.
- Then, for several levels of the scratching post, you need to prepare templates and cut them out.
- Use these templates to get the pieces you need from cardboard and cut them out with a sharp knife.
- Assemble all the cut pieces onto the dowel.

All you need to do is spend a little time, and a scratching post for a cat from improvised means is ready for use.
Scratching post with a bed for your beloved pet
This design will require some sewing skills, and more complex materials are needed to make the scratching post, namely:
- timber is dry;
- plywood (thickness about 1 cm);
- rope;
- textile;
- self-tapping screws;
- plastic;
- foam;
- sharp knife or scissors;
- necessary construction tools.
Having selected the necessary materials and decided on the size of the future scratching post, you can begin to perform the step-by-step master class presented below:
- Based on the results of measuring the required characteristics, a stable board is selected, which will be the base of the product.
- Cut 2 rectangles to the specified dimensions.
- Determine their center by drawing diagonal lines.
- Make an oval template out of paper before cutting it out of a wooden board or chipboard, attach it to the base and trace the shape.
- Once you have the base of the desired shape, sand the edges.
- Cut another such oval out of plywood, only its thickness should be smaller.
- Make a side for the future bed using metal, and cut out another oval from foam rubber for the bed itself.
- For a scratching post, take a plastic pipe or wooden beam of the required length and diameter and attach it with self-tapping screws.
- Assemble all the received parts as follows: fix the pipe on the base of the scratching post with self-tapping screws, decorate the pipe with fabric or rope using special glue so that it is convenient for the cat to sharpen its claws on it and there is no debris left on the floor, and install the bed itself on top, in the same way , with which the pipe was secured to the base.


This version of the scratching post will be more versatile, since the cat will also have a place to rest. The structure can be placed anywhere, because it is quite compact.
Twine scratching post: step-by-step description
In order for a scratching post made according to our master class to be of high quality, the design and dimensions of the product must be correctly selected. Natural twine is perfect for a standard scratching post in the form of a vertically mounted tube wrapped in fabric or rope. You can do it as follows:
- Take a stable and strong base.
- Make a post of the required size, which can be a regular pipe or a wooden beam.
- Next, you should connect and fix the post on the base of the scratching post.
- Wrap the finished form tightly with rope, the skeins of which should fit tightly together, and secure them with permanent glue.

To make such a scratching post look more interesting, you can install a bed on top or attach some toys to interest the cat.
Making a flat or corner scratching post for a cat
The flat scratching post for cats, the photo of which can be seen above, is made from the same materials as the previous ones, except that it does not need to be mounted on a column.
- You can take any board or timber, the main thing is that it is flat.
- Then you should wrap the base with material that you find around the house.
- Using a stapler, you need to fix the material on the base of the scratching post.

This structure is attached to the wall or floor. Its main convenience is that it can be installed specifically in the place where the cat sharpened its claws before the scratching post appeared in the house.
As for corner structures, the process of its creation involves the use of the above steps, with the exception that it must be made in two planes. Attach it to two surfaces, the floor and the wall, and firmly fix it with self-tapping screws, and this scratching post will serve your pet for a long time.

Tips for making scratching posts at home
If you have never encountered master classes before, then perhaps the process of making a scratching post will seem complicated and time-consuming to you, but it is much easier and faster than you think. Follow the step-by-step recommendations and everything will work out, and small tips will help you avoid mistakes:
- in structures with a house, place it on a pole, since the cat can use this room as a toilet and relieve itself in the wrong place;
- if you have several cats in the house, and you decide to design a scratching post with several beds, then think through everything so that the resting places are at the same level from the floor, otherwise disagreements may arise between the cats;

- the height of the scratching post or the entire structure should not be higher than 1 meter;
- If you want to arouse your pet's interest in the scratching post using toys attached to the structure, make sure that your cat will be interested in it so as not to waste time.
If you take into account all the parameters of the room and the factors that influence the convenience of the cat in using the scratching post, you can create an excellent design according to our scheme and spend your time profitably, saving your own money on the purchase of the product.
Having a pet in your apartment is a responsible decision. We must remember that animals are not only cute furry creatures, but also living beings with their own requirements and problems. Therefore, do not be surprised if your kitten suffers serious harm when the kitten arrives. , upholstery, outer corners in rooms - all these are potentially attractive objects for a cat. She will sharpen her sharp claws on them, and the only thing that can save you in this situation is a special scratching post. For cats, such devices can be made with your own hands from scrap materials, and this is exactly what is discussed in the material from HouseChief.
Read in the article
Why is a cat scratcher so important?
The domestic cat is a predator by nature. Like its wild counterparts, it is capable of moving very quickly, climbing trees and clinging to prey with a death grip. Her claws are an important tool that needs careful care. Some owners solve the problem with claws in a radical, but inhumane way, which deprives a living creature of its usefulness, making it disabled. Removing a kitten's claws is the same as cutting off a person's fingers.
The claw is a very sensitive instrument with a constantly renewed surface. It is constantly growing, and the cat needs to remove the old stratum corneum. In nature, it uses tree trunks and roots for this purpose. During this manicure, the cat's fingers release odorous substances that leave marks for their fellow members of the tribe.

What should a scratching post be like?
The main requirement for a place to sharpen cat claws is strength. The surface should be hard enough so that the stratum corneum can be easily cleaned off, but not excessively so as not to damage the claws. The surface of the claw blade should be fibrous and rough. The fibers must break, otherwise the pet will hang on the sharpener, becoming entangled in it.

If you combine all these requirements, you will understand that they are fully met by natural materials: wood, hemp, burlap, coarse woolen fabric, thick cardboard. Synthetic fiber materials are not suitable for this purpose - their threads are too strong and can tear out the claw during the cleaning process.
Important! Nail sharpeners should not contain metal nails, screws or staples, otherwise your pet could be seriously injured.
The size, shape, and type of claw are a separate matter. You can get by with a simple board, but if you really care about your cat, it is better to equip the structure with a bed on a hill.

For your information! Experts in cat psychology say that the place to leave a claw mark should not coincide with the animal’s house. Cats never leave marks where their den is, this is an instinct of self-preservation.
Photo examples of hand-made cat scratching posts
There is nothing difficult about making a nail clipper yourself. Any available materials from those we listed above will be suitable for this. And with a certain amount of imagination, this utilitarian item can become an interesting object in yours.
A simple DIY scratching post made from container cardboard
Boxes from household appliances and other large purchases are affordable material. You can use it to make a scratching pad even for a small kitten, and at the same time you don’t have to worry that the baby will somehow damage his paws. This device is also suitable for small breed cats. But large animals with character are unlikely to be satisfied with such a proposal. Their powerful claws are too hard to wear off on cardboard.
The easiest way to make such a device is to place pieces of cardboard on a pin, gluing them together for reliability. Afterwards, you can cut the cardboard and give it some original shape.

How to make a wooden scratching post for a large cat with your own hands
For adult large animals, a natural sharpener would be an ideal option. A durable straight-layer board of any hardwood species is suitable for this purpose. You can also use coniferous trees other than spruce, but pine needles have a strong aroma that your cat may not like.

The claw board should not have any knots or cracks. A cat's claw could get stuck in a crack, causing injury to the animal. It is better to place a piece of wood away from the floor, so the cat can sharpen the claws on its hind paws.
Step-by-step instructions with photos for making scratching posts with your own hands
Making a claw cutter is a simple and fascinating task. It's like a toy for your kitten, he should like it. The success of the entire enterprise depends on his reaction - otherwise he will prefer yours.
Simple flat sharpener for wall
How to make a simple cat scratching post in just 10 minutes:
| Illustration | Description of action |
 | For a cat manicure you will need a skein of jute rope. You can find this material in any hardware store. This is a rope made of natural fibers, like no other suitable for our purposes. Another option for the name of the rope for the scratching post is hemp. |
 | The second important part of the claw hammer is a piece of board or rectangular shape. If you don't find either one, use a wooden cutting board or a piece of plastic. |
 | Wrap the base with jute rope, securing the skeins with a glue gun. This will prevent the rope from moving when the cat exerts force. |
 | Drill two through holes at one end of the board. |
 | Thread a piece of rope through the holes and make a loop out of it. |
 | Hang the finished scratching post on the wall in a place that is attractive to the animal. |
How to make an original cat scratching post in the shape of a column
Another simple option for installation anywhere in the apartment is a column-shaped scratching post with a bed that your pet will really like:
| Illustration | Description of action |
 | For the base you will need a square piece of plywood, at least 40 × 40 centimeters in size. If you use a smaller base, the scratching post will be unstable and the animal will not like it. |
 | For the column, select a piece of thick board or. Install metal corners at one of the ends to secure them to the base. |
 | To prevent the cat's back paws from slipping, cover the base with a cloth or an old terry towel. |
 | Wrap the beam with jute or linen rope, securing the rings with glue. |
 | Secure the beam using corners and to the base. |
 | Install a shelf-bed on the top of the beam. Its width should correspond to the base. |
 | Cover the bed or towel. |
 | The finished scratching post can be supplemented with a hanging toy. Your pet will love it! |
Complex design: DIY cat house with scratching post
If you are not looking for easy ways and really want to please your cat, make a more complex design, including several beds, a house and sharpening posts.
| Illustration | Description of action |
 | To make the load-bearing part you will need. The base of the structure and the round house is made from it. |
 | Attach plywood to a round base to create a cozy cat house. Please note: in order for the plywood to bend in a circle, you need to cut it in a certain direction. |
 | Use plastic sewer pipes as racks. To secure them firmly to the base, you will need to make such liners. They are inserted inside the pipe. |
 | Secure the posts to the base. To do this, attach a wooden liner to the platform, put it on it, and the pipe is fixed to the liner with the same screws. |
 | In order for the structure to be strong, at least one more level of fixation will be required - make holes in the slab and thread pipes through them. |
 | Using the corners, install and secure additional beds. Choose a place for the house. Cats will love secret holes. |
 | All that remains is to wrap the racks with rope and cover the entire structure with carpet. As a result, you will get such a masterpiece. |
DIY cat scratching post: examples of diagrams with dimensions
You can develop your own design that will suit you in size and shape. If you wish, you can use ready-made projects, of which there are many on the Internet. Here are some of them:
Examples of claw sharpeners for cats: original ideas
Use your imagination in preparing this instrument for your pet, because you will have to look at your work for a very long time. Here are some interesting photos that may tell you how to make a cat scratching post with your own hands:
Flat scratching posts


Interesting scratching posts on the corner of the wall

Cats are the favorite pets of most of the country's population. When getting them, you should prepare in advance for a lot of unpleasant surprises due to the incredible activity and curiosity of these animals. So that coexistence with them within the living space is not overshadowed, you need to prepare a decent place for them to relax and play.
The ideal solution is a cat house with a scratching post - it will easily become a favorite place to sleep and an excellent exercise machine for your tailed friend. Moreover, it is not at all necessary to go to the store for such a design - you can easily make it yourself. And in most cases, a design made with one’s own hands turns out to be much more practical, attractive and functional than a purchased one.
What materials to make cat apartments with a scratching post from?
Before you make a scratching post house, you need to decide on its further placement in the house or apartment. After all, its size, appearance and configuration directly depend on its location. Initially, you should carefully measure the installation site - the measurements obtained will be needed to develop a design project. You can immediately design a future pet house with a scratching post on paper, or you can fantasize as you go: it’s up to you.
To assemble the structure you will need a few materials:
- cutting plywood or chipboard. It is necessary for assembling the house and beds. You should not skimp on material: thin and flimsy plywood may not withstand the activity of a cat. It is better to choose high-quality and strong slabs. I used an old countertop as a base;
- wooden beam for making supports. At the same time, it will serve as a scratching post. The length of the beam directly depends on the height of the future structure.
Remember that you will need several supports for manufacturing, so carefully calculate the amount of timber. The thickness should be from 100x100 mm;
- carpet used as the main covering. It is easy to install, lightweight, durable and wear-resistant material. It is quite common - carpet can be easily purchased at any building and finishing materials store;
- jute rope 1 cm thick. You will need it for winding it around support posts - this is what makes a great scratching post for a cat. Rope is sold both by the meter and in coils of 200 or 400 meters. When purchasing by the meter, it is worth considering that to wrap 1 meter of timber 100x100 mm thick you will need about 25 meters of rope;
- self-tapping screws for fastening all structural elements;
- metal corners. They are needed for assembling supporting structures and hanging the hammock.
Advice! Since carpet is an expensive material, it makes sense to save money on its purchase. This is easy to do: stores have leftover materials that remain unclaimed. And if you talk to the sellers, you can buy them at a significant discount.
When the required materials have been purchased (it is possible that in one building materials store), and the project has been developed, it is time to begin assembling the structure. But first, let’s figure out why a scratching post is needed and how it will be useful in the house.
What is a scratching post for?
Houses for cats with scratching posts allow you to solve several important problems at once:
- provides the tailed pet with his personal place where he can retire at any time;
- minimizes the risk of “suddenly” discovering a four-legged animal lying on a table, shelves, sofa or TV;
- protects your doors and walls from cat claws, because the cat will use a scratching post;
- additionally decorates the interior of the room.
Since constantly sharpening their claws is a basic instinct of all cats without exception, it is useless to fight it. It is better to simply organize a special place for the cat for this - namely, a scratching post with platforms and a personal house in which she will spend a lot of time.
Which is better: a homemade scratching post or a store-bought one?
Despite the fact that stores offer a huge range of different designs, a self-assembled scratching post is the most acceptable option. There are several reasons for this:
- affordable price. If you make it yourself, your costs will be 7–10 times lower than the cost of a similar design in a store;
- the ability to create any configuration. Whatever one may say, most store-bought products are universal and differ little from each other. A scratching post assembled by yourself will fit perfectly into the configuration of the room and the interior, and will not look alien;
- reliability and durability. Often store structures are made using the most inexpensive and short-lived materials. As a rule, such a scratching post lasts no more than 1–2 years, after which you have to purchase a new one. A structure made according to all the rules with one’s own hands can easily last for decades;
- efficiency of production. If you need a cat house of a personal configuration, then to purchase it you will have to contact the manufacturer to change the basic design and manufacture a new scratching post model. This is not only financially expensive, but can also last for several months. While you can make it yourself in a few days, and if the design is extremely simple, then in a few hours;
- safety and hygiene. It is difficult to be completely confident in the environmental friendliness of the materials used for the production of store-bought scratching posts. After all, with active use, threads and small fibers may remain from low-quality rope. A cat can easily choke on them, and litter lying in a continuous layer on the floor is unlikely to add aesthetics to the room. In addition, it is impossible to know for sure how materials are processed in production - but toxic varnishes and paints can be applied to them.

In other words, if you want a high-quality, durable and safe scratching post for your four-legged pet, then it is better to make it yourself. That’s what I did, and it turned out much better compared to store-bought products.
What tools and materials will we need?
To make your own personal apartment for your four-legged friend, you will need very few materials and tools. Moreover, you can easily find most of it in a storage room, garage or shed: as a rule, you will only have to buy elements of the external finishing of the structure in the store. Before starting work, you will need the following tools and consumables:
- tape measure and long ruler;
- pencil (you can take either a simple or a construction pencil);
- jigsaw (it’s faster and more accurate to use a jigsaw; in extreme cases, a manual one will do);
- screwdriver, electric drill, set of drills and bits for them;
- drawing compass;
- construction stapler with staples;
- hammer;
- hot glue gun;
- a sharp knife (can be a stationery or construction knife), scissors;
- if the assembly will be carried out in a house (apartment), then it is worth preparing a household vacuum cleaner;
- stool or workbench for assembly.
Directly for the construction of cat apartments we will need:

As you can see, most of the tools are usually always at the disposal of the home owner. The missing materials for assembling the base of the structure can easily be found by rummaging around in the garage and storage room. And it won’t take much money to purchase everything you need - at least many times less than the cost of a ready-made cat house.
Assembly instructions for a house with a scratching post
The process of building a house for your beloved cat with a built-in scratching post must begin with creating a drawing - in the future it will help you better understand the number of elements received and the order of their assembly. To mark, you must use a ruler, compass and pencil, and cut the parts strictly along the marking line.
Initially, you need to mark the walls and roof of the cat house, and mark a hole for the cat in part of the wall. I made it original by adding cat ears to the regular hole.

Then you need to start the most important and dirty process - cutting out the details of the future cat apartments. If you live in a private house, then it would be better to go outside and carry out all the procedures there. If this is not possible, then prepare a vacuum cleaner in advance.
There is nothing complicated in the process of cutting wood panels - the main thing is not to rush and cut strictly along the drawn line. After cutting, it is advisable to process the edges with a file and sandpaper - this will get rid of sharp edges and burrs.

When all the elements have been manufactured and processed, you can test assemble the house to ensure the correct dimensions and ease of assembly.
At the next stage, you need to cover all surfaces with carpet - this way the house will look much more aesthetically pleasing and will be much safer for the cat. In addition, cats show increased interest in decorated apartments: the softer and warmer they are, the more willing the cats will be there.
Important! When gluing carpet to a surface, you need to minimize the number of seams. The fact is that cats will pay close attention to each seam and play with it, which will ultimately reduce the service life of the entire structure.
The procedure for gluing on the carpet surface is as follows:
- Trying on fabric. It is necessary to lay the carpet on the part and try to wrap it, avoiding the appearance of unnecessary seams. It is optimal if they are located at the junctions of the elements.
- Cut out the fabrics. For cutting, scissors and a sharp knife are used. It is optimal if before this stage you mark the surface of the carpet with soap or crayons.
- Stretching the carpet into pieces. The fabric should be stretched as efficiently as possible: any tubercles and folds on the surface should be excluded. We check again that the seams are located at the joints or at the edges of the elements.
- Upholstery fastening. The carpet is attached to plywood (chipboard) using a construction stapler. It is important to choose the correct length of the staples so that they do not pierce through the base. Places of folds and joints of several sheets of carpet must be treated with hot-melt adhesive.
The internal and external walls of the house are sheathed in the same way. The main thing is that the edges of the carpet are secured to the ends of the wood board in two ways: using glue and staples. To upholster the inside of the house, it is recommended to use a single piece of fabric and leave the seam on the back wall.

- Using self-tapping screws and furniture corners, it is necessary to fasten the walls of the house.
- Using the corners, attach the assembled house to the base.
- Then assemble the roof of the house.
- Holes must be cut in the middle shelves for subsequent installation of support posts.
- Completely assemble the entire structure according to the drawing, connecting all the elements with screws and corners.
Then you need to make a scratching post for cats. This is done as follows:

At the final stage, all we have to do is construct a hammock for the cat and cover it with fabric. You can attach it to regular corners or to corners with reinforced stiffeners. The main thing is to choose the screws of the optimal length and make sure that they do not go right through the shelves - sharp tips can injure your pet.
All that remains is to hang a piece of rope with a ball at the end between the floors - you will get an interesting toy for the cat. The resulting structure is quite massive and durable, and its base is wide; no additional fastening to the floor is required.
Conclusion
To minimize the consequences of living in the same house with cats, you just need to prepare a place for the tailed cats to play and relax. And there is simply no better option than a scratching post with beds and a hammock. Before making a scratching post house, be sure to develop a design for the future structure and do not rush into assembly. Then you are guaranteed to succeed.
Write comments about how you have arranged a place for your pet to rest and play. Subscribe to content in terms of many interesting crafts.
Sincerely, Alexander!!!
No matter how domestic and affectionate a cat is, it will always have the instincts of a wild animal. In the wild, animals sharpen their claws on trees, grass, soil, and stones.
When a pet lives at home, he involuntarily makes cat scratches on the furniture, so it is more economical to make a scratching post for him with your own hands according to the instructions at home.
The optimal shape of the nail clipper is a column, the material is coarse twine. The selection at the pet store is much more varied.
There are different types of scratching posts:
- By shape– hanging, floor or corner mat, ring, pole.
- By design- “town”, with toys, tiers, shelves, bridges, a house.
- Based on materials– from cardboard, fabric, wood, twine.
- By size– monolithic, large, medium.
If the kitten is alone, there is no point in building a huge structure for it. When there are two or more of them, you can purchase a multi-level scratching post.
Corrugated cardboard scratching post
A scratching post made of corrugated cardboard is made according to a very simple scheme. It is a known fact that cats have a special love for boxes, so your pet will also like this look.

An eco-scratching post can only be used for a couple of months, so making one yourself will be much more profitable.
What you will need:
- corrugated cardboard (can be replaced with cardboard boxes),
- paper knife,
- fabric for decoration,
- thick paper,
- PVA glue,
- adhesive tape.
Master class step by step:
- Lay the boxes out on flat sheets and draw stripes of equal width. You can take any width, but it is recommended that the scratching post pillow be 10 cm higher. The stripes on the cardboard should be horizontal to the folds of the boxes.
- Cut cardboard into strips.
- Start rolling the strips with your hands. Twist the first one more tightly, since it will act as the core of the claw hammer. Secure with tape or glue.
- Wrap the remaining strips around the core, securing with glue or tape.
- Fasten the last strip especially carefully.
- Wrap the cardboard in fabric and secure.
- Place the resulting pillow on paper and trace it with a pencil. Cut out the bottom, attach the base.
The claw sharpener is ready!
Wooden scratching post
There are several more budget and easy options for making a scratching post. For example, find a small stump or log on the street. Clean the bark with a coarse brush and dry in a dark room.

After this, you can choose to do the following:
- Secure the log in a vertical position on a wide stand.
- Unfold vertically, securing half to a stand or wall.
You can decorate a log by making it not only a scratching post, but also a decorative element.
To do this you need:
- Clean the log with a brush.
- Wrap with twine. You can not wrap it completely, but wind it randomly in pieces.
- Using a drill, secure the structure to the wall, hang toys and balls.
Scratching post-post
The scratching post acts as a cat simulator for pets. The height of this device is 1 meter. It’s not difficult to make; it’s much more difficult to find such a column.

What you will need:
- post pipe;
- wood base;
- jute thread or carpet;
- base fabric;
- pipe filler (for example, construction foam);
Master Class:
- Cover the podium with fabric and secure it with a stapler from the floor side.
- Wrap the column with thread or cover it with carpet.
- Place the pipe in the middle of the base and secure it with a self-tapping screw.
- Disguise the top of the column (you can sew a “cap”).
- Hang your pet's toy on a long rope.
Wall-mounted scratching post
A wall-mounted scratching post can also be called a classic option. Pets enjoy sharpening their claws on it.

You will need:
- wall panel or block of wood with a height of 50 to 70 cm;
- electric drill;
- screws;
- jute or hemp twine (diameter – 5 mm) – 2 skeins;
Algorithm of actions:
- To accurately understand the height of the wall panel, you can measure the cat's height without taking into account the tail. The pet's height must be multiplied by two.
- Drill six holes in parallel in the wooden panel and block - 2 on top, 2 in the middle and 2 on the bottom.
- Wrap tightly with twine and secure the ends.
- Screw the block and wooden panel onto the wall.
You can call the cat for a test!
Corner scratching post
The pet will like the corner claw clipper because it will be able to climb up.

To make it you will need:
- board – 3 pcs.;
- screwdriver;
- self-tapping screws;
- fabric (rope) for decoration;
Instructions:
- Wrap the boards or cover with fabric. Fasten the fabric to the base with the wrong side. The rope needs to be glued and the edges secured with a stapler.
- Secure the boards to the wall using a screwdriver.
Scratching post with shelves
A scratching post with shelves is not an easy option, but your pet will appreciate it.

Instructions:
- Make a drawing, calculate the dimensions and purchase the necessary materials.
- Cut out parts of the future scratching post from plywood or furniture board.
- Cut off pieces of pipes.
- Mark the place where the pipe is attached and circle it. Bend straight hangers and attach them using self-tapping screws to the base along the edges of the circle.
- Place a pipe between them, securing it with self-tapping screws.
- Make a hole for the pipe on the base and cover it with fabric. Secure the fabric with a stapler.
- Secure the shelf on top of the pipe, secure the canopies to the pipe. Cut holes in the shelf, thread the canopies, bend and secure.
- Install 2 smaller pipes on the shelf using the method described above.
- Place foam rubber on the surface of the shelf. Cover it with cloth on top and make holes for the pipes. Secure the fabric with a stapler.
- Install and secure the shelf onto the pipes. Cover with foam rubber and fabric.
- Wrap all the pipes with rope and secure the ends with glue.
Cat's house
It is much more difficult to make a house-shaped scratching post, but this design will last for a long time.

Step-by-step algorithm:
- Stage 1. Draw truncated circles on rectangular pieces of chipboard. The radius is 27 cm. For the back wall the circle is solid, for the front wall you need to draw the entrance to the house. Diameter – 22 cm. Draw 3 holes to decorate the house. Diameter – 5.5 cm.
- Stage 2. Use a jigsaw to cut out the holes and walls. For small holes, you can use a drill with drill bits. Place the walls on top of each other, mark 7 points (drill with a thin drill). They serve as places for attaching slats. Drill the recesses (there will be screw heads in them).
- Stage 3. Saw off 7 slats. Length – 37 cm, cross-section – 3 x 4 cm. The 2 lower ones may be slightly thicker. Treat surfaces so that there are no sharp edges or roughness. Screw the slats using self-tapping screws to the walls of the house.
- Stage 4. Cut out the details for finishing from the fabric, do not forget about the allowances. Cover the walls. Pay attention to the choice of glue - there should not be a strong smell. It is recommended to use a hot glue gun. Cut the fabric on the front wall, carefully glue the edges of the holes. For neatness, you can glue a strip of fabric.
- Stage 5. Try the resulting workpiece on the base. It is a chipboard board, size 44 x 61 cm. Mark the position, cut the foam to fit the bottom, and glue it to the base. Draw a circle on the pipe fastening area. Cut out the fabric for the base and cover the surface with it. Secure the upholstery from the sides with a furniture stapler. Cover the bottom with a fiberboard sheet of suitable size.
- Stage 6. Cut out a piece of fiberboard - the roof of the house. Size – 40 x 122 cm. Cover with fabric. Cut 2 pieces from the fabric intended for the base. Glue on the sides of the bottom slats.
- Stage 7. Place the cat house on the base and secure it with self-tapping screws. Before doing this, make indentations on the slats so that there are no protrusions of the caps. Cover the slats completely with the remaining fabric.
- Stage 8. Secure the roof with a furniture stapler. Straighten the fabric lint out of the staples. The side parts visible from the outside should also be covered with fabric.
- Stage 9. For a scratching post you need to take a pipe. Size – 60 cm, diameter – 11 cm. Insert dry wood blocks inside. Cut out semicircles from fiberboard and chipboard for the top bed.
- Stage 10. Place the fiberboard blank on the pipe, having previously made a hole in the shape of a circle. Screw the chipboard blank using self-tapping screws to the block located in the pipe. Turn the house over onto its back wall and attach a pipe with a stove bench to the base. To ensure that it is in a level position, place objects under it. Make recesses for the screws on the bottom side. Screw the pipe with the stove bench. Cover the bottom of the pipe with fabric.
- Stage 11. Glue foam rubber onto the bed. Secure the ball rope at the bottom with a stapler. Cover the upper part of the bed with fabric and secure it to the folds using a stapler. Glue the fiberboard to the bottom of the bed. Wrap the rope around the pipe and glue the first two turns from the bottom and top.
- Stage 12. To make an additional inclined scratching post, you need to take a board. Size – 18 x 41 cm. For a good stop, cut the lower edge at an angle of 45 degrees. Cover the board with fabric on all sides and wrap a rope around the middle.
The location for the scratching post must be chosen very carefully. To do this, it is worth observing where the cat most likes to sharpen its claws.
To attract the cat to the prepared scratcher, you can put catnip there or drop a little valerian. If another animal sits on the scratching post, the cat will have no choice but to leave its mark there. During the training period, you need to encourage your pet with a treat, but under no circumstances scold or punish.